

WeWeb's MCP server lets AI coding agents like Claude Code build directly inside your WeWeb project. The AI generates your pages, workflows, and database tables. You get a fully working app you can visually inspect, understand, and edit in the WeWeb editor.
This post walks through how to build a dental clinic patient portal from scratch: a patient-facing appointment booking form, an admin dashboard to approve or reject requests, role-based access control, and automated confirmation emails. The whole build took about 30 minutes.
Here's what we'll cover:
- Setting up Claude Code with your design system
- Connecting to WeWeb via the MCP server
- Prompting the AI to build your app
- Setting up your backend
- Adding role-based access control
- Wiring up automated emails
What You'll Build
The finished app has two parts:
- A patient booking form where patients fill in their details and request an appointment.
- An admin page where staff can see all incoming requests and approve or reject them. When a booking is approved, the patient receives a confirmation email automatically.
Everything is stored in a WeWeb database and visible in the editor, so you can tweak the UI, adjust workflows, or add features at any point.
Pre-Requisite: Connect the WeWeb MCP to Your Favorite AI Agent
In a WeWeb project, go to "Agents" and follow the setup steps for your favorite AI agent:
Learn more about how to setup the WeWeb MCP.
Once you have connected the WeWeb MCP with your favorite AI agent(s), you'll be able to prompt your AI to build in WeWeb.
Step 1: Export Your Design System
If you have a design system in a tool like Claude Design, start by exporting it. Download it as a zip file to your computer. This gives the AI a visual reference for typography, colors, and component styles so the app it generates matches your brand from the start.
If you don't have a design system, you can skip this step and style the app manually in WeWeb after the build.
Step 2: Open Claude Code and Select Your Project Folder
Open Claude Code and point it to the folder where your design system lives. In the example from the video, this is a folder called "Dental Clinic" that contains the downloaded design system files.
Selecting this folder gives the AI context about your design tokens before it starts building.
Step 3: Connect to WeWeb via the MCP Server
In Claude Code, tell the AI which WeWeb workspace and project you want to work in:
"I want to work with the MCP and the Dental Clinic project inside the Tutorials workspace."
The MCP server connects to your WeWeb project and confirms the connection. From here, it can read your project structure and make changes directly inside WeWeb.
Step 4: Write Your Build Prompt
This is where you tell the AI what to build. Be specific. The more detail you give upfront, the less back-and-forth you'll need later.
A good prompt for this project covers:
- The overall goal (a client portal for a dental clinic with appointment scheduling)
- The pages you want (patient booking form, admin dashboard)
- The fields on each page (patient name, preferred date/time, notes, etc.)
- Any workflows or automations (confirmation email when an appointment is requested or approved)
Paste your prompt and let the AI start building. It will lay out a plan and ask for approval before making changes. You can review and iterate on the plan, or approve it immediately and let the AI build.
Here's the one I used in the video, feel free to give it a try:
Help me build a simple client portal for a dental clinic with appointment scheduling.

Use the HabitPlus Design System present in this folder for the UI components, spacing, typography, colors, and design patterns.

Build two main pages:

1. Patient booking page

Patients should be able to:
- Select an appointment type, such as Cleaning, Checkup, Whitening, Emergency, or Consultation
- Choose a preferred appointment date
- Choose a preferred appointment time
- Enter their full name
- Enter their email address
- Enter their phone number
- Add optional notes
- Submit the appointment request
- See a confirmation message after submitting

When a patient submits a booking, create a new booking record with the status set to "Pending."

2. Admin bookings page

Clinic staff should be able to:
- View all appointment booking requests
- See the patient name, email, phone number, appointment type, requested date, requested time, notes, status, and created date
- Filter bookings by status: Pending, Approved, and Rejected
- Approve a pending booking
- Reject a pending booking

When the admin clicks "Approve":
- Update the booking status to "Approved"
- Send a confirmation email to the patient using WeWeb Email

Use this email content:

Subject:
Your dental appointment is confirmed

Body:
Hi {{patient_name}},

Your appointment request for {{appointment_type}} on {{appointment_date}} at {{appointment_time}} has been approved.

We look forward to seeing you at the clinic.

Best,
The Dental Clinic Team

When the admin clicks "Reject":
- Update the booking status to "Rejected"

Data structure:
Create a table with these fields:
- id
- patient_name
- patient_email
- patient_phone
- appointment_type
- appointment_date
- appointment_time
- notes
- status
- created_at

Default status should be "Pending."

Make sure the booking submission flow, admin approval flow, status updates, databases, APIs and WeWeb Email action are all connected properly.
Step 5: Set Up Your Backend
After reviewing your prompt, the AI will let you know if your WeWeb project doesn't have a backend yet. The MCP server can build pages and wire up workflows, but it can't create the backend server itself. You need to do that step manually.
In WeWeb, go to Data & API > Authentication and select WeWeb Authentication to create the backend server and enable authentication.
Once that's done, tell the AI: "I've set up the backend."
It will verify the setup, confirm there are no tables yet, and then start building your database tables and wiring everything together.
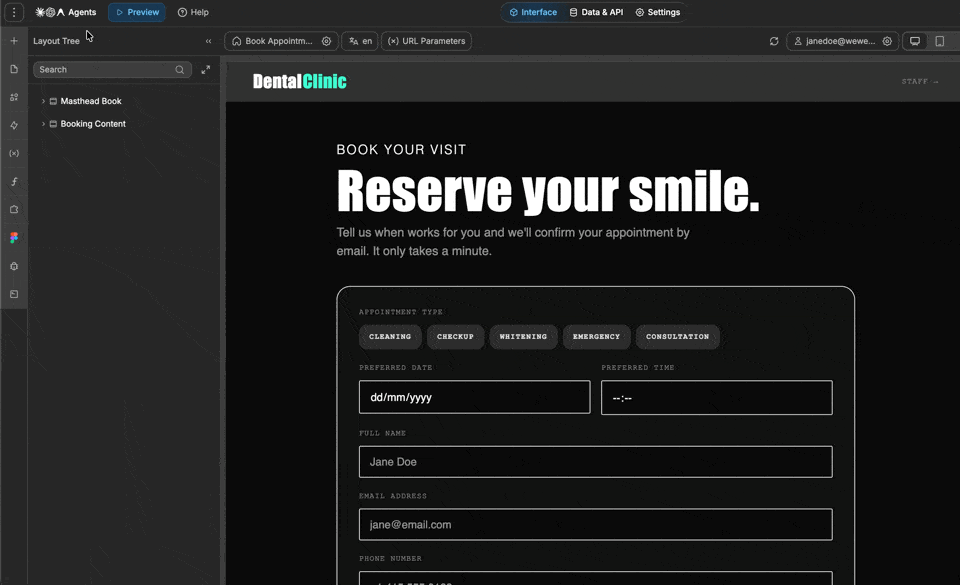
Step 6: Review and Preview Your App
When the build finishes, the AI gives you a summary of everything it created: page structure, workflows, database tables, and component connections.
Switch to WeWeb and open the preview to test the app. In the video walkthrough, the patient booking form works out of the box and a submitted booking creates a row in the database on the first try.
At this point you can also make visual edits directly in WeWeb. For example, adjusting the time picker to show only hours and minutes (not seconds) takes about 30 seconds in the editor.
Step 7: Add Role-Based Access Control
By default, the admin page is publicly accessible. You'll want to restrict it to authenticated users with an admin role.
You could ask AI to do this for you and audit the output later, or do it yourself manually. In the video, we decided to go the manual route to save some tokens and keep full control over the security steps.
Create the admin role manually:
- In Data & API > Authentication, go to the Roles tab and insert a new role called
admin. - Then in the Users table, assign that role to the relevant staff user.
Restrict the bookings view:
In your database, find the bookings view (or table view) that the admin page reads from. Update its access settings so that only authenticated users with the admin role can query it.
Once this is in place, non-admin users will get an empty result when they try to load booking data. Admin users will see everything as expected. You can verify this by previewing the app as different users.
Step 8: Add a Confirmation Email
The initial build creates a booking workflow that inserts a row into the database when a patient submits the form, and sends a confirmation email when an admin approves the booking.
Test it by logging in as an admin, approving a booking, and checking the patient's inbox. The email sends from WeWeb's outgoing email service and arrives with the patient's name and appointment details.
The email copy was specified in our original prompt. You can ask AI to update it or make the change yourself in the backend workflow that triggers the email.
What This Looks Like in Practice
From one detailed prompt, the AI built a full-stack app with a working database, two connected pages, and an approval workflow in about 30 minutes. The result isn't a prototype: it's a real, full-stack application that you can edit in WeWeb.
Because everything lives in the WeWeb editor, you can:
- Change any UI element visually without touching the AI again
- Open any workflow and see exactly what it does
- Continue iterating with the AI on top of what it built
- Invite your team to collaborate in the same project
The MCP server bridges your AI agent and your WeWeb project so each build step is transparent and reversible. You're not guessing what the AI generated, you can see it, click through it, and change it. This is especially useful for debugging and handling security without relying on probabilistic AI or a developer to understand the underlying code.
Ready to try it yourself? Connect WeWeb's MCP server to Claude Code and start your first build.