



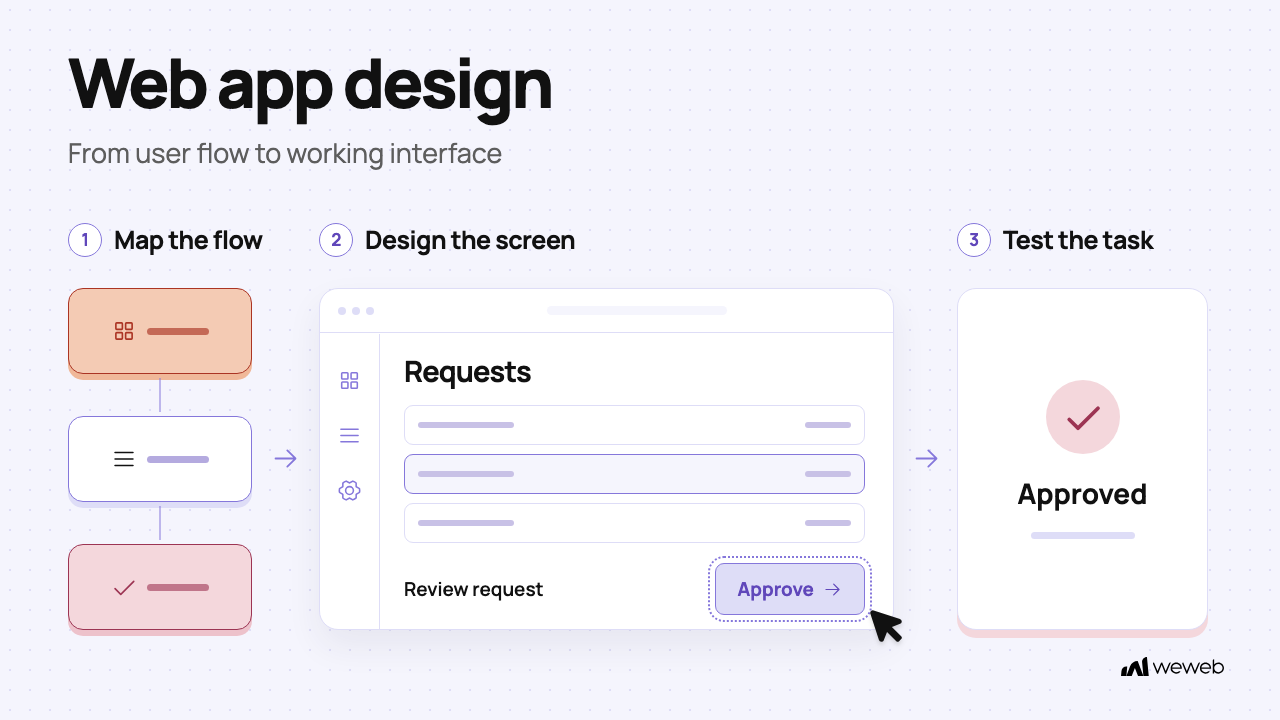
Web app design is not just how an application looks. It is how clearly users can understand what to do, complete a workflow, recover from mistakes, and trust the product enough to come back.
That makes web app design different from website design. A website usually helps visitors read, browse, compare, and convert. A web app helps users log in, manage data, submit forms, view dashboards, approve requests, update records, collaborate, or complete repeatable tasks.
Good web app design brings together UX, UI, information architecture, accessibility, performance, responsive layouts, product logic, and feedback states. The goal is not just a beautiful interface. The goal is an interface that works when real users, real data, and real edge cases show up.
This guide walks through the web app design process, practical UX principles, common screen patterns, and a launch checklist builders can use before turning designs into a working product with tools like WeWeb.
Design your web app. Then build it visually.
Use WeWeb to turn user flows, wireframes, dashboards, forms, and portals into working apps with data, auth, backend logic, and workflows.
Start building for free or explore apps built with WeWeb.
What is web app design?
Web app design is the process of planning and creating the user experience, interface, flows, components, states, and interactions of a web application.
It covers how users:
- Log in and onboard.
- Navigate the product.
- Understand what to do next.
- View, filter, and manage data.
- Complete forms and workflows.
- Recover from errors.
- Receive feedback after actions.
- Use the app across desktop, tablet, and mobile.
A good web app design is clear, responsive, accessible, fast, and task-focused. Users should always know where they are, what they can do, and what happens after they take action.
Website design vs web app design
A website and a web app can look similar, but they are designed for different jobs.
A website is mostly about presenting information. A web app is about helping users complete actions.
Web app design process: from idea to usable product
A strong web app design process starts with the user’s task, not with visual inspiration.
Before choosing colors, layouts, or components, understand what the app needs to help users accomplish.
1. Define the core user job
Start with the job the user needs to complete.
Examples:
- A client needs to upload files and track project status.
- A manager needs to approve or reject requests.
- A customer needs to view usage, invoices, or account details.
- An admin needs to manage users, content, or transactions.
- A sales rep needs to update records and see next steps.
- A support agent needs to review tickets and respond quickly.
Good design starts with the workflow, not the screen.
Ask:
- Who is the user?
- What are they trying to do?
- How often do they do it?
- What information do they need?
- What can go wrong?
- What does success look like?
Once you know the job, every design decision becomes clearer.
2. Map the main user flows
Before designing individual screens, map the key paths users need to follow.
Examples:
- Signup → onboarding → first successful action.
- Login → dashboard → detail page → update record.
- Request submitted → admin review → approval → notification.
- Search → filter → compare → select → save.
- Upload file → validation → confirmation → status update.
- Invite teammate → assign role → confirm access.
This helps you avoid designing disconnected screens. Every page should exist because it helps a user complete a flow.
For complex apps, start with the smallest useful flow. A SaaS app might start with onboarding and the main dashboard. A client portal might start with login, project status, and file upload. An internal tool might start with request review and approval.
3. Plan the information architecture
Information architecture is how the app is organized.
For a web app, this usually includes:
- Primary navigation.
- Secondary navigation.
- Dashboard structure.
- Object types.
- Detail pages.
- Settings.
- Admin areas.
- User/account areas.
- Search and filters.
- Empty states.
Keep navigation simple. Users should know where they are, what they can do, and how to get back.
For example, a client portal might include:
- Overview
- Projects
- Files
- Messages
- Invoices
- Settings
An internal tool might include:
- Inbox
- Requests
- Approvals
- Users
- Reports
- Admin
A SaaS dashboard might include:
- Dashboard
- Projects
- Reports
- Team
- Billing
- Settings
Navigation should reflect how users think about the work, not how your database is structured.
4. Wireframe the core screens
Start with low-fidelity wireframes before polishing the interface.
Focus on:
- Layout.
- Hierarchy.
- Primary action.
- Navigation.
- Data density.
- Forms.
- Tables.
- States.
- Mobile behavior.
Do not start with colors and visuals. Start with whether the screen makes sense.
A good wireframe should answer:
- What is the page for?
- What does the user need to know?
- What should the user do next?
- What information is most important?
- What happens if there is no data?
- What happens if something fails?
Once the structure works, visual design becomes easier.
5. Design components and states
A web app is not just pages. It is a system of reusable components.
Design:
- Buttons.
- Inputs.
- Dropdowns.
- Tables.
- Cards.
- Filters.
- Modals.
- Tabs.
- Toasts.
- Alerts.
- Sidebars.
- Empty states.
- Loading states.
- Error states.
- Success states.
States are especially important. A screen should not only look good when everything works. It also needs to handle missing data, slow loading, invalid input, permission issues, and failed requests.
Designing states early makes the app feel more reliable when real users start using it.
Choose a source of truth for design decisions
When a mockup, a component library, and the working app disagree, which one should the builder follow? Decide that before implementation, especially if an AI coding agent is helping you build.
The reference can be a Figma library, a documented component system in code, or reusable components maintained in your visual builder. Choose the place your team actually maintains. Use design tokens, named values for colors, spacing, and typography, to give shared decisions consistent names across design and implementation.
- Agree what is ready to build. Link to the approved version and name who maintains it, so work in progress is not mistaken for a new requirement.
- Document behavior as well as appearance. For a file upload, explain when progress appears, what happens if it fails, and how the user retries. Include how the layout changes on mobile.
- Close the loop when something changes. Compare the working flow with the agreed design, resolve differences, and update the reference when an implementation decision is accepted.
If you use an AI agent, give it these references and ask it to reuse the agreed components and values. Review its output against the same reference rather than judging each generated screen in isolation.
6. Design for roles and permissions
Many web apps have multiple user types.
For example:
- Admins.
- Members.
- Clients.
- Managers.
- Operators.
- Viewers.
- Guests.
Design what each role can see and do. This affects navigation, buttons, pages, forms, data visibility, and workflows.
Do not treat permissions as a backend-only issue. Permissions shape the user experience.
A client should not see admin controls. A viewer should not see edit buttons. A manager may need approval actions. An operator may need a focused task queue. If permissions are unclear in the interface, users will feel lost or unsafe.
📝 Keep permissions consistent behind the scenes, too. Hiding controls helps users focus on what they can do, but it does not protect the data behind them. To enforce those permissions, your backend needs to check every request against what the user is allowed to see or change. Our web app security guide walks through practical examples.
7. Test real tasks
Test whether users can complete the most important flows.
You do not need a huge research project. Even a few task-based tests can reveal where users get confused.
Test things like:
- Can users find the main action?
- Can they complete a form?
- Can they recover from an error?
- Can they understand the dashboard?
- Can they tell what happens after clicking a button?
- Can they use the app on mobile?
- Can they complete the task without asking for help?
The best test is not “do users like the design?” It is “can users complete the task?”
Web app design launch checklist
Before launch, take one core workflow, such as a client uploading a file and checking its status, through the checks below. Use test accounts and sample data in your own test environment, and mark each outcome only after you have seen it work.
- ☐ A user can complete the core flow without help and tell when it has succeeded.
- ☐ Empty and loading states explain what is happening, errors offer a way to recover without losing entered information, and successful actions show confirmation.
- ☐ Each role can complete its permitted actions, while direct requests for restricted actions or another user’s private records are denied by the backend.
- ☐ The same task works on a mobile screen, including forms, navigation, and recovery from an error.
- ☐ A user can finish the task using only the keyboard, see where focus is, and activate buttons with Enter or Space.
8. Build, measure, and improve
Once the app is live, design work continues.
Track:
- Activation rate.
- Task completion.
- Form errors.
- Drop-off points.
- Search usage.
- Feature adoption.
- Support questions.
- Performance issues.
- Accessibility issues.
The best web app designs improve through real usage. Launching is not the end of the design process. It is when the most useful feedback starts.
10 web app design tips
The best web app design tips are not about copying trendy layouts. They are about making the product easier to use.
1. Design around workflows, not pages
Users do not think in pages. They think in tasks.
Instead of asking, “What screens do we need?” ask, “What does the user need to complete?”
A client portal flow might be: log in, check project status, upload a file, leave a comment, and get confirmation.
An internal tool flow might be: review a request, approve it, assign it, and notify the requester.
A SaaS dashboard flow might be: sign up, create a workspace, connect data, view insights, and invite a teammate.
Design the flow first. Then design the screens.
2. Give every screen one primary action
Every important screen should make the next step obvious.
A dashboard might guide users to review pending tasks. A form might guide them to submit. A detail page might guide them to edit, approve, export, or message.
Avoid making every button look equally important. If everything is highlighted, nothing is.
Use one primary action per screen or decision area. Secondary actions can still be available, but they should not compete visually with the main next step.
3. Use navigation that matches the app
Web app navigation is different from website navigation.
A marketing site may use top navigation with pages like Features, Pricing, Blog, and Contact. A web app often needs an app shell: sidebar, dashboard, account menu, workspace switcher, breadcrumbs, tabs, or contextual actions.
Choose navigation based on how users work inside the product.
For example:
- A dashboard app may need a sidebar.
- A marketplace may need search and filters.
- A client portal may need a simple top-level menu.
- An admin panel may need nested navigation.
- A mobile-heavy app may need bottom navigation or simplified menus.
Navigation should reduce effort, not show every possible page at once.
4. Design empty, loading, error, and success states
Most designs show the happy path. Real apps need every state.
Design:
- Empty state: What does the user see when there is no data?
- Loading state: What happens while data is loading?
- Error state: What happens when something fails?
- Success state: How does the user know the action worked?
- Permission state: What happens if the user cannot access something?
These states are not details. They are part of the product experience.
An empty dashboard should not feel broken. It should explain what the user can do next. A failed form submission should not erase the user’s work. A successful action should confirm what happened.
5. Make forms easy to complete
Forms are where many web apps succeed or fail.
Keep forms focused. Ask only for what is needed. Group related fields. Use clear labels. Show validation inline. Explain errors in plain language. Preserve user input when something fails.
For complex forms, break the process into steps and show progress.
Good form design includes:
- Clear labels.
- Helpful placeholder text only when useful.
- Inline validation.
- Specific error messages.
- Sensible defaults.
- Clear required fields.
- Save or autosave behavior when appropriate.
- Confirmation after submission.
If forms are frustrating, users will blame the product, not the form.
6. Make tables and dashboards usable
Many web apps depend on tables and dashboards, but they are often designed poorly.
For tables, prioritize:
- Search.
- Filters.
- Sorting.
- Pagination.
- Clear column labels.
- Row actions.
- Bulk actions when useful.
- Responsive behavior.
For dashboards, avoid showing too many metrics. Focus on the few numbers and actions that help users make a decision.
A dashboard should not be a wall of charts. It should answer: what changed, what matters, and what should I do next?
7. Design for permissions early
If different users see different data, design that from the start.
A client should only see their own records. A manager may see team-level data. An admin may see everything. A viewer may not be allowed to edit.
Permissions affect:
- Navigation.
- Buttons.
- Forms.
- Empty states.
- Error messages.
- Dashboards.
- Detail pages.
- Admin screens.
Do not patch permissions into the design at the end. They are part of the product structure.
8. Keep the app responsive, not just resized
Responsive web app design is not just shrinking desktop screens.
Some patterns need to change on mobile:
- Tables may need card layouts.
- Sidebars may become menus.
- Filters may move into drawers.
- Multi-column forms may become single column.
- Large dashboards may need prioritized sections.
- Buttons need larger tap targets.
Test the actual workflows on smaller screens, not just the homepage.
If users need to approve a request, upload a file, check status, or complete a form on mobile, design that flow intentionally.
9. Build a reusable component system
A web app becomes hard to maintain when every screen is custom.
Create reusable components for:
- Buttons.
- Forms.
- Cards.
- Tables.
- Filters.
- Modals.
- Alerts.
- Navigation.
- Status indicators.
- Empty states.
This keeps the product consistent and makes future changes easier.
A component system also helps you move faster when the app grows. Instead of redesigning each screen, you reuse patterns that already work.
10. Design feedback into every action
Users should always understand what just happened.
When they click, submit, save, upload, delete, approve, or invite someone, show feedback.
Use:
- Loading indicators.
- Disabled states.
- Confirmation messages.
- Toasts.
- Inline errors.
- Undo options.
- Clear next steps.
Good feedback makes the app feel reliable. Without feedback, users may click twice, leave the page, submit duplicates, or assume something broke.
Core screens every web app design should consider
Not every app needs every screen, but most web apps include some version of these.
Login and signup
Keep authentication flows simple. Show clear error messages, password requirements, and recovery options.
If the app has multiple roles, make sure the signup or invitation flow sends users to the right experience.
Onboarding
Help new users reach their first meaningful action. Avoid dumping them into an empty dashboard with no guidance.
Good onboarding might include:
- A short setup checklist.
- A first project creation flow.
- Sample data.
- A guided empty state.
- A clear next action.
Dashboard
A dashboard should summarize what matters and guide the user to the next action.
Do not turn it into a cluttered wall of charts. Show the information that helps users make decisions or continue their workflow.
List or table view
Use tables or lists for records users need to browse, filter, search, compare, or manage.
Examples include users, invoices, projects, tasks, clients, bookings, orders, submissions, or content items.
Detail page
A detail page should show one record clearly and provide relevant actions.
For example:
- Edit.
- Approve.
- Reject.
- Assign.
- Comment.
- Export.
- Delete.
- View history.
Detail pages are where users often make decisions, so the hierarchy needs to be clear.
Form page
Forms should be structured, readable, and resilient.
Use validation, helper text, progress indicators, and success states. For long forms, consider breaking them into steps.
Settings
Settings should be predictable.
Group account, billing, team, notification, security, and integration settings logically. Do not hide critical settings in unexpected places.
Admin panel
Admins need control, visibility, and safeguards.
Design for search, filters, status changes, permissions, and safe destructive actions. Admin panels should make it easy to manage records without accidentally breaking something.
Empty states
An empty state should explain what is missing and what the user can do next.
Instead of saying “No data,” say what the data is, why it matters, and how to create or connect it.
Error states
Errors should help users recover.
A good error message explains what went wrong, what the user can do, and whether their work was saved.
AI-powered workflows
If AI helps users complete a task, design more than the prompt box and final answer. Users need to see what is happening, when their input is needed, and what the app has actually changed.
- Activity and progress: Show useful steps such as “Reading uploaded files” or “Preparing a draft,” based on what the app is actually doing. Use progress percentages only when they reflect measurable work.
- Tool calls: Summarize meaningful actions, such as searching records or creating a draft, with details available when useful. Do not make users interpret raw technical logs.
- Approvals: Before a consequential action, such as sending an email or updating records, show the proposed action and let the user approve, edit, or cancel it.
- Streaming and completion: Distinguish an answer that is still arriving from a finished result, and make clear whether an action was proposed or completed.
- Errors and recovery: Explain which step failed, what already succeeded, and what retrying will do, so users do not repeat completed actions by mistake.
For example, an assistant preparing a client update could show that it is reading project records, stream an editable draft, ask for approval before sending, and then confirm delivery or explain a sending failure.
💡 See these patterns in action. Explore Beautiful UI for interactive examples of streaming responses, approval cards, tool-call chips, and task progress.
From web app design to working product with WeWeb
A good web app design defines how the product should work: what users see first, what actions they can take, how forms behave, what happens after a button click, which data appears on each screen, and what different user roles can access.
The hard part is turning those design decisions into a real app without rebuilding everything from scratch in code.
That is where WeWeb fits.
With WeWeb, builders can move from wireframes or design mockups to working app screens visually. You can create the layout, structure reusable components, connect real data, define user flows, and make the interface respond to user actions.
For example:
- A dashboard design can become a live dashboard connected to backend data.
- A form design can become a working form that creates or updates records.
- A table design can become a searchable, filterable interface for real data.
- A modal design can become a confirmation, approval, upload, or edit flow.
- A role-based design can become protected pages and user-specific views.
- A prototype can become a working MVP without handing every screen to a frontend developer.
This matters because many app designs look complete in Figma but still hide the hardest product questions:
- Where does the data come from?
- What happens when the data is empty?
- What happens when the request fails?
- Who is allowed to see this screen?
- What should happen after the user submits the form?
- How does the interface change after an action succeeds?
WeWeb helps builders answer those questions inside the app itself. You can design the UI, connect it to WeWeb’s native backend or external tools, add authentication, create workflows, and keep iterating as the product becomes more real.
The goal is not just to recreate a static design. The goal is to turn the design into an app people can actually use.
Useful resources for web app design
The right reference depends on what you need: a visual direction, a working user flow, or a component you can build on.
Find inspiration for your next screen or flow
- Explore visual directions. Browse Pinterest, Dribbble, and Behance for layout, typography, and color ideas.
- Study real product flows. Use Mobbin to explore web-app screens and journeys. Search for a task, such as onboarding or account setup, and follow what happens before and after each screen.
- Explore component examples. Browse 21st.dev for React components and interactions. Use them as design references, or check compatibility with your project before adopting the code.
- Learn from designers. Follow designers and design engineers on Twitter/X who share prototypes, walkthroughs, and the reasoning behind their work.
- Build a reference collection. Save images, links, and ideas in Sublime. Note what makes each reference useful so you can find and apply it later.
A polished screenshot is a starting point, not a complete design. Before adapting it, check how the idea works with your users’ tasks, realistic data, mobile layouts, and error states.
Support the rest of your design process
- Miro: Map user flows, wireframes, and product journeys.
- Canva: Create branded visuals and empty-state illustrations.
- Carbon Design System: Reference component patterns and accessibility guidance.
- Web.dev: Learn about Core Web Vitals and web performance.
- WebAIM: Find accessibility checks and explanations of common WCAG issues.
FAQs
What is web app design?
Web app design is the process of designing the user experience, interface, flows, components, states, and interactions of a web application. It covers how users log in, navigate, complete tasks, manage data, recover from errors, and understand feedback.
How is web app design different from website design?
Website design focuses on presenting content and guiding visitors toward conversion. Web app design focuses on logged-in experiences, workflows, data, roles, permissions, forms, dashboards, and repeated user tasks.
What screens should a web app include?
Common web app screens include login, signup, onboarding, dashboard, list or table views, detail pages, forms, settings, admin panels, empty states, loading states, and error states. The exact screens depend on the app’s workflow.
What makes a good web app design?
A good web app design is clear, fast, accessible, responsive, and task-focused. Users should know where they are, what they can do, what happens after each action, and how to recover when something goes wrong.
Can I design and build a web app in WeWeb?
Yes. WeWeb lets builders design web app interfaces visually and connect them to data, authentication, backend logic, APIs, and workflows. You can build dashboards, portals, internal tools, marketplaces, admin panels, and SaaS apps without hand-coding every frontend screen.
Do I need Figma before building in WeWeb?
Not always. Figma can be useful for planning complex interfaces, but many builders can start with user flows, wireframes, or WeWeb templates and design directly in WeWeb. The important thing is to define the core workflow before polishing the UI.
How do I design a web app for mobile?
Start by prioritizing the most important tasks. On mobile, simplify navigation, use single-column forms, make buttons easy to tap, collapse filters when needed, and turn dense tables into more readable layouts. Test real workflows on actual mobile screens.
Can I use templates to design a web app faster?
Yes. Templates can help you start faster by giving you common layouts, pages, and components. The key is choosing a template that matches your app type and then customizing it around your real users, data, workflows, and permissions. You can explore WeWeb templates if you want to start from an existing app structure.