


An app that leaks personal information, or lets the wrong person edit your database, is an app nobody will want to use.
The good news is that the mistakes behind those leaks are predictable. They show up in the same seven places in almost every no-code app, and you can test for all of them yourself.
In this article we build a small job board, break it on purpose seven times, and fix it each time.
Don't worry if this sounds a bit technical. By the end of this article, you'll understand what each step means and know exactly what to check in your own app.
The app we're going to break
Every example below uses the same app: a small job board.
- candidates browse job listings and apply,
- each candidate should only ever see their own applications,
- admins can view every user and change roles.
We built the frontend in WeWeb, and we're showing the backend in WeWeb's native backend, with notes for Supabase and Xano where the setup is different.
We also created three test users, because you can't test access control with a single account:
⚠️ Only run these tests on an app you own, in a staging environment, with test users and fake data like these.
You're loading more data than you think
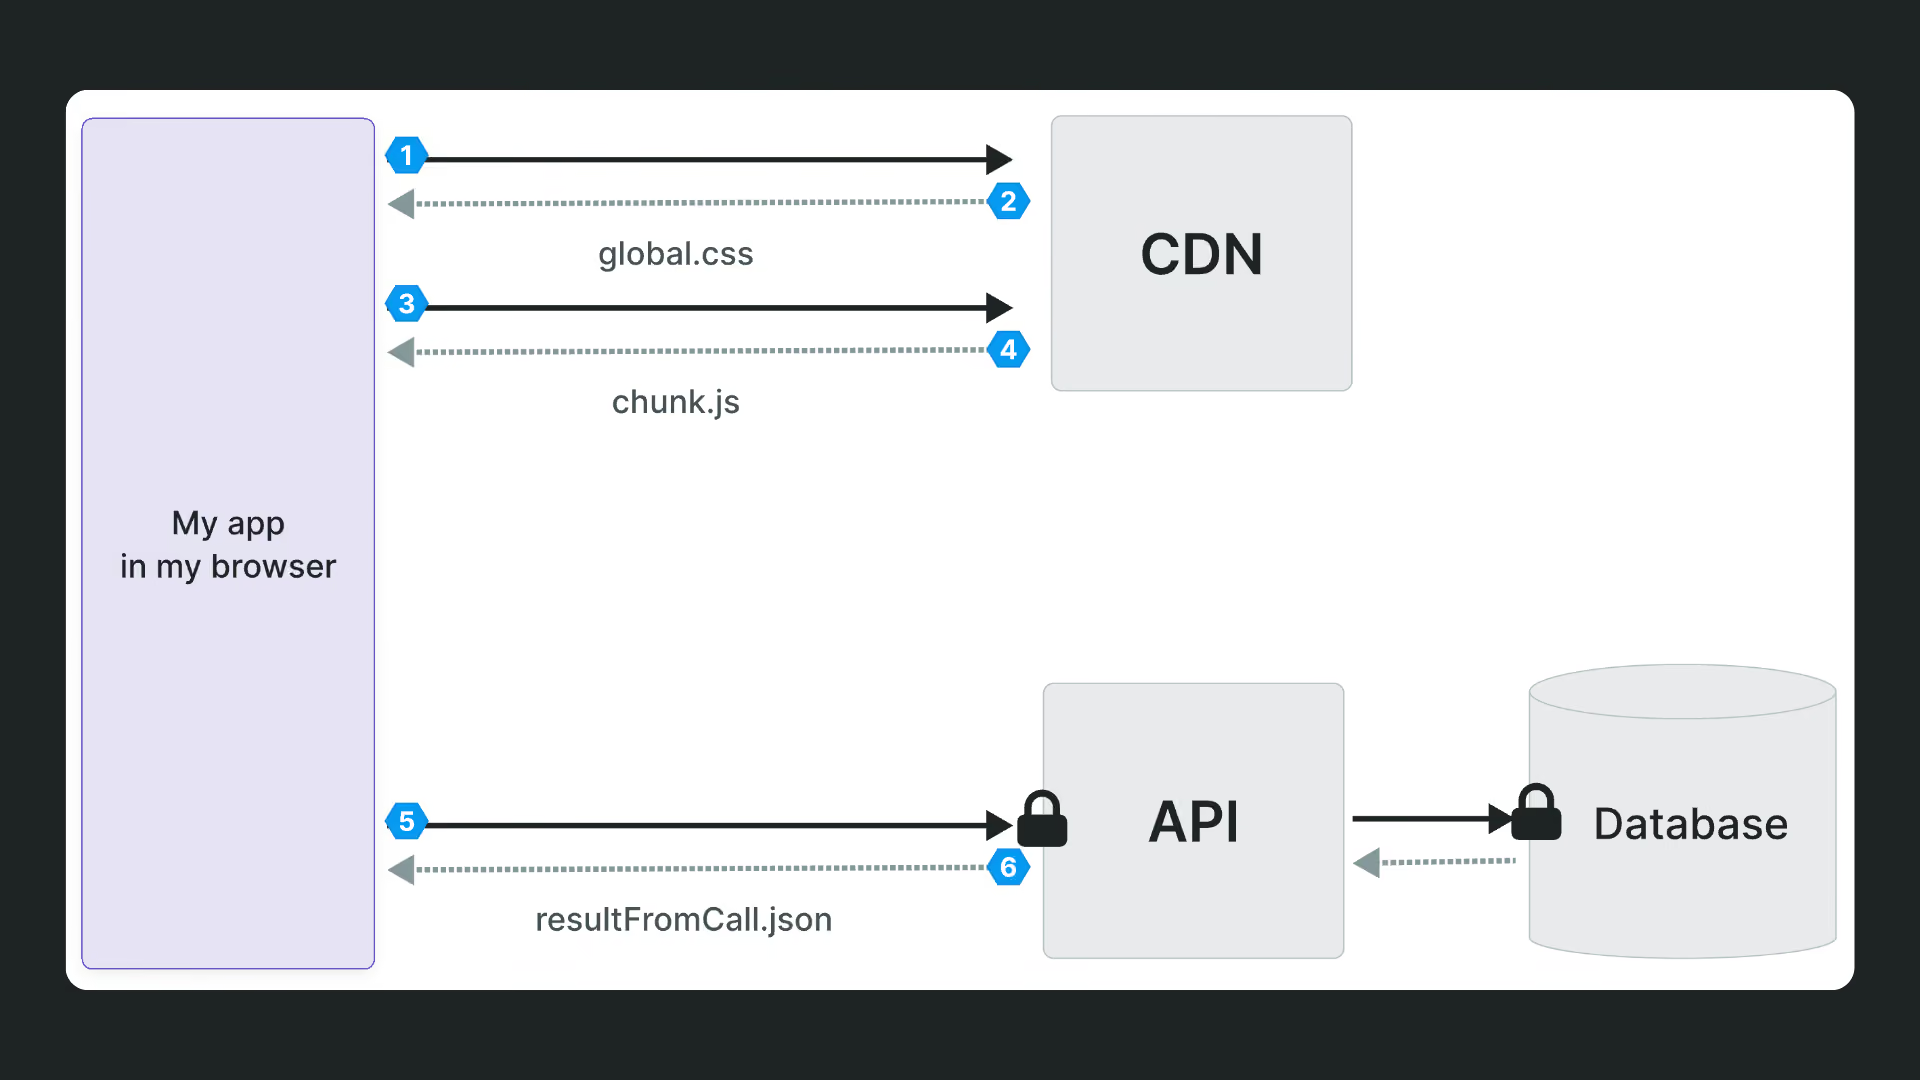
When a user accesses a web page, their browser downloads a bunch of files and data, i.e. HTML, CSS styles, Javascript, images, etc.
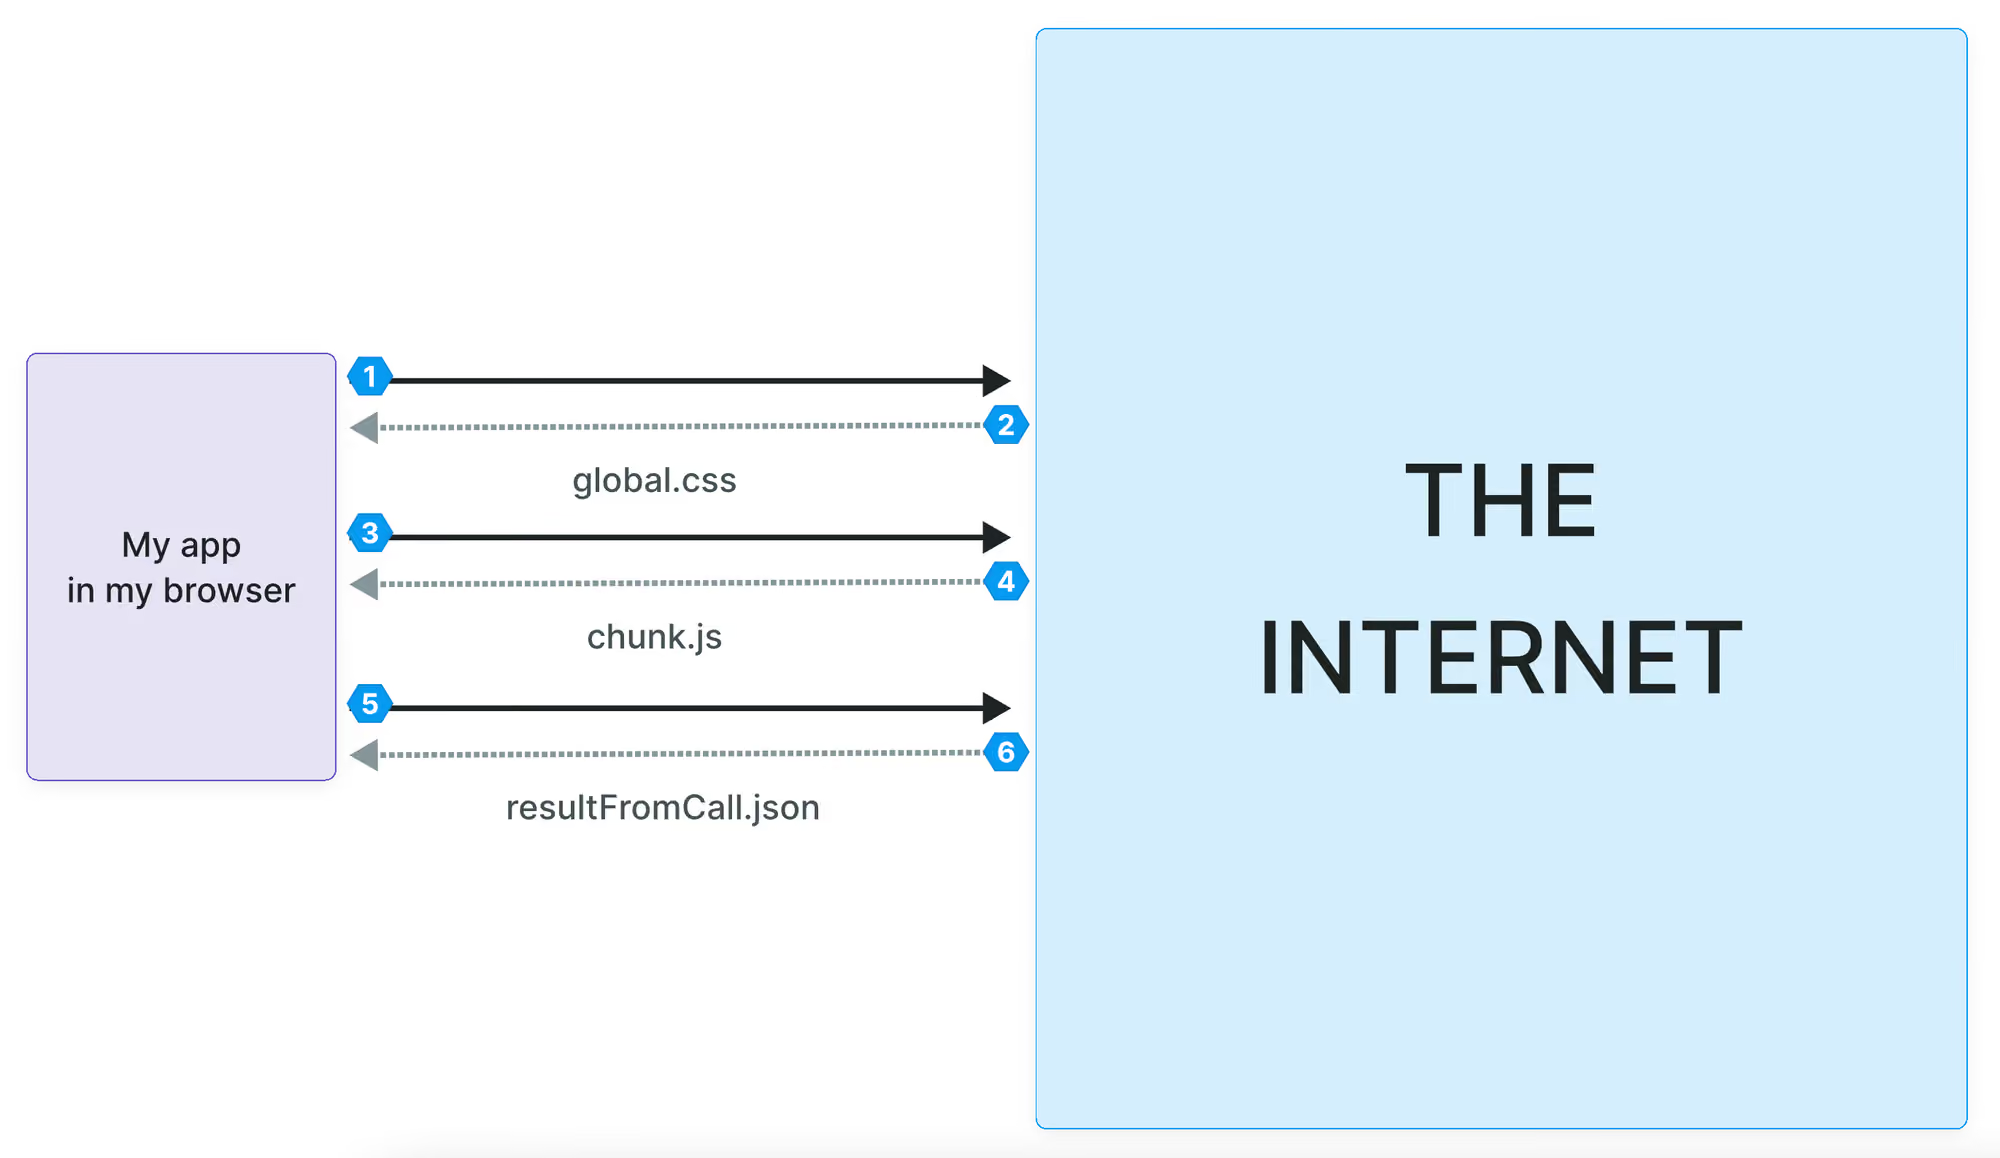
When a user interacts with the page, their browser reacts. For example, the browser may execute some Javascript to change the color of a button or make an API call to a backend to get a user's personal information.
All of this information is accessible even if you can't see it on the page.
"I hid it, so it's safe" is one of the most common security assumptions in web development. Whether you hide an element with display: none or use conditional rendering so it never appears at all, you're only changing what the browser paints, not what it receives. Anything your API returned is in the network response, and anyone can open the inspector and read it.
It is therefore crucial that you control what kind of information you're making available in your users' browsers, whether that information is displayed on a page or not.
Vulnerability 1: Sensitive data is reaching the browser
The mistake
The first step to keeping personal data private is to avoid ever loading it in the frontend.
In our job board, we built the "My applications" page the quick way: we pulled the whole applications collection into WeWeb, then added a filter on the current user's ID so each candidate only sees their own.
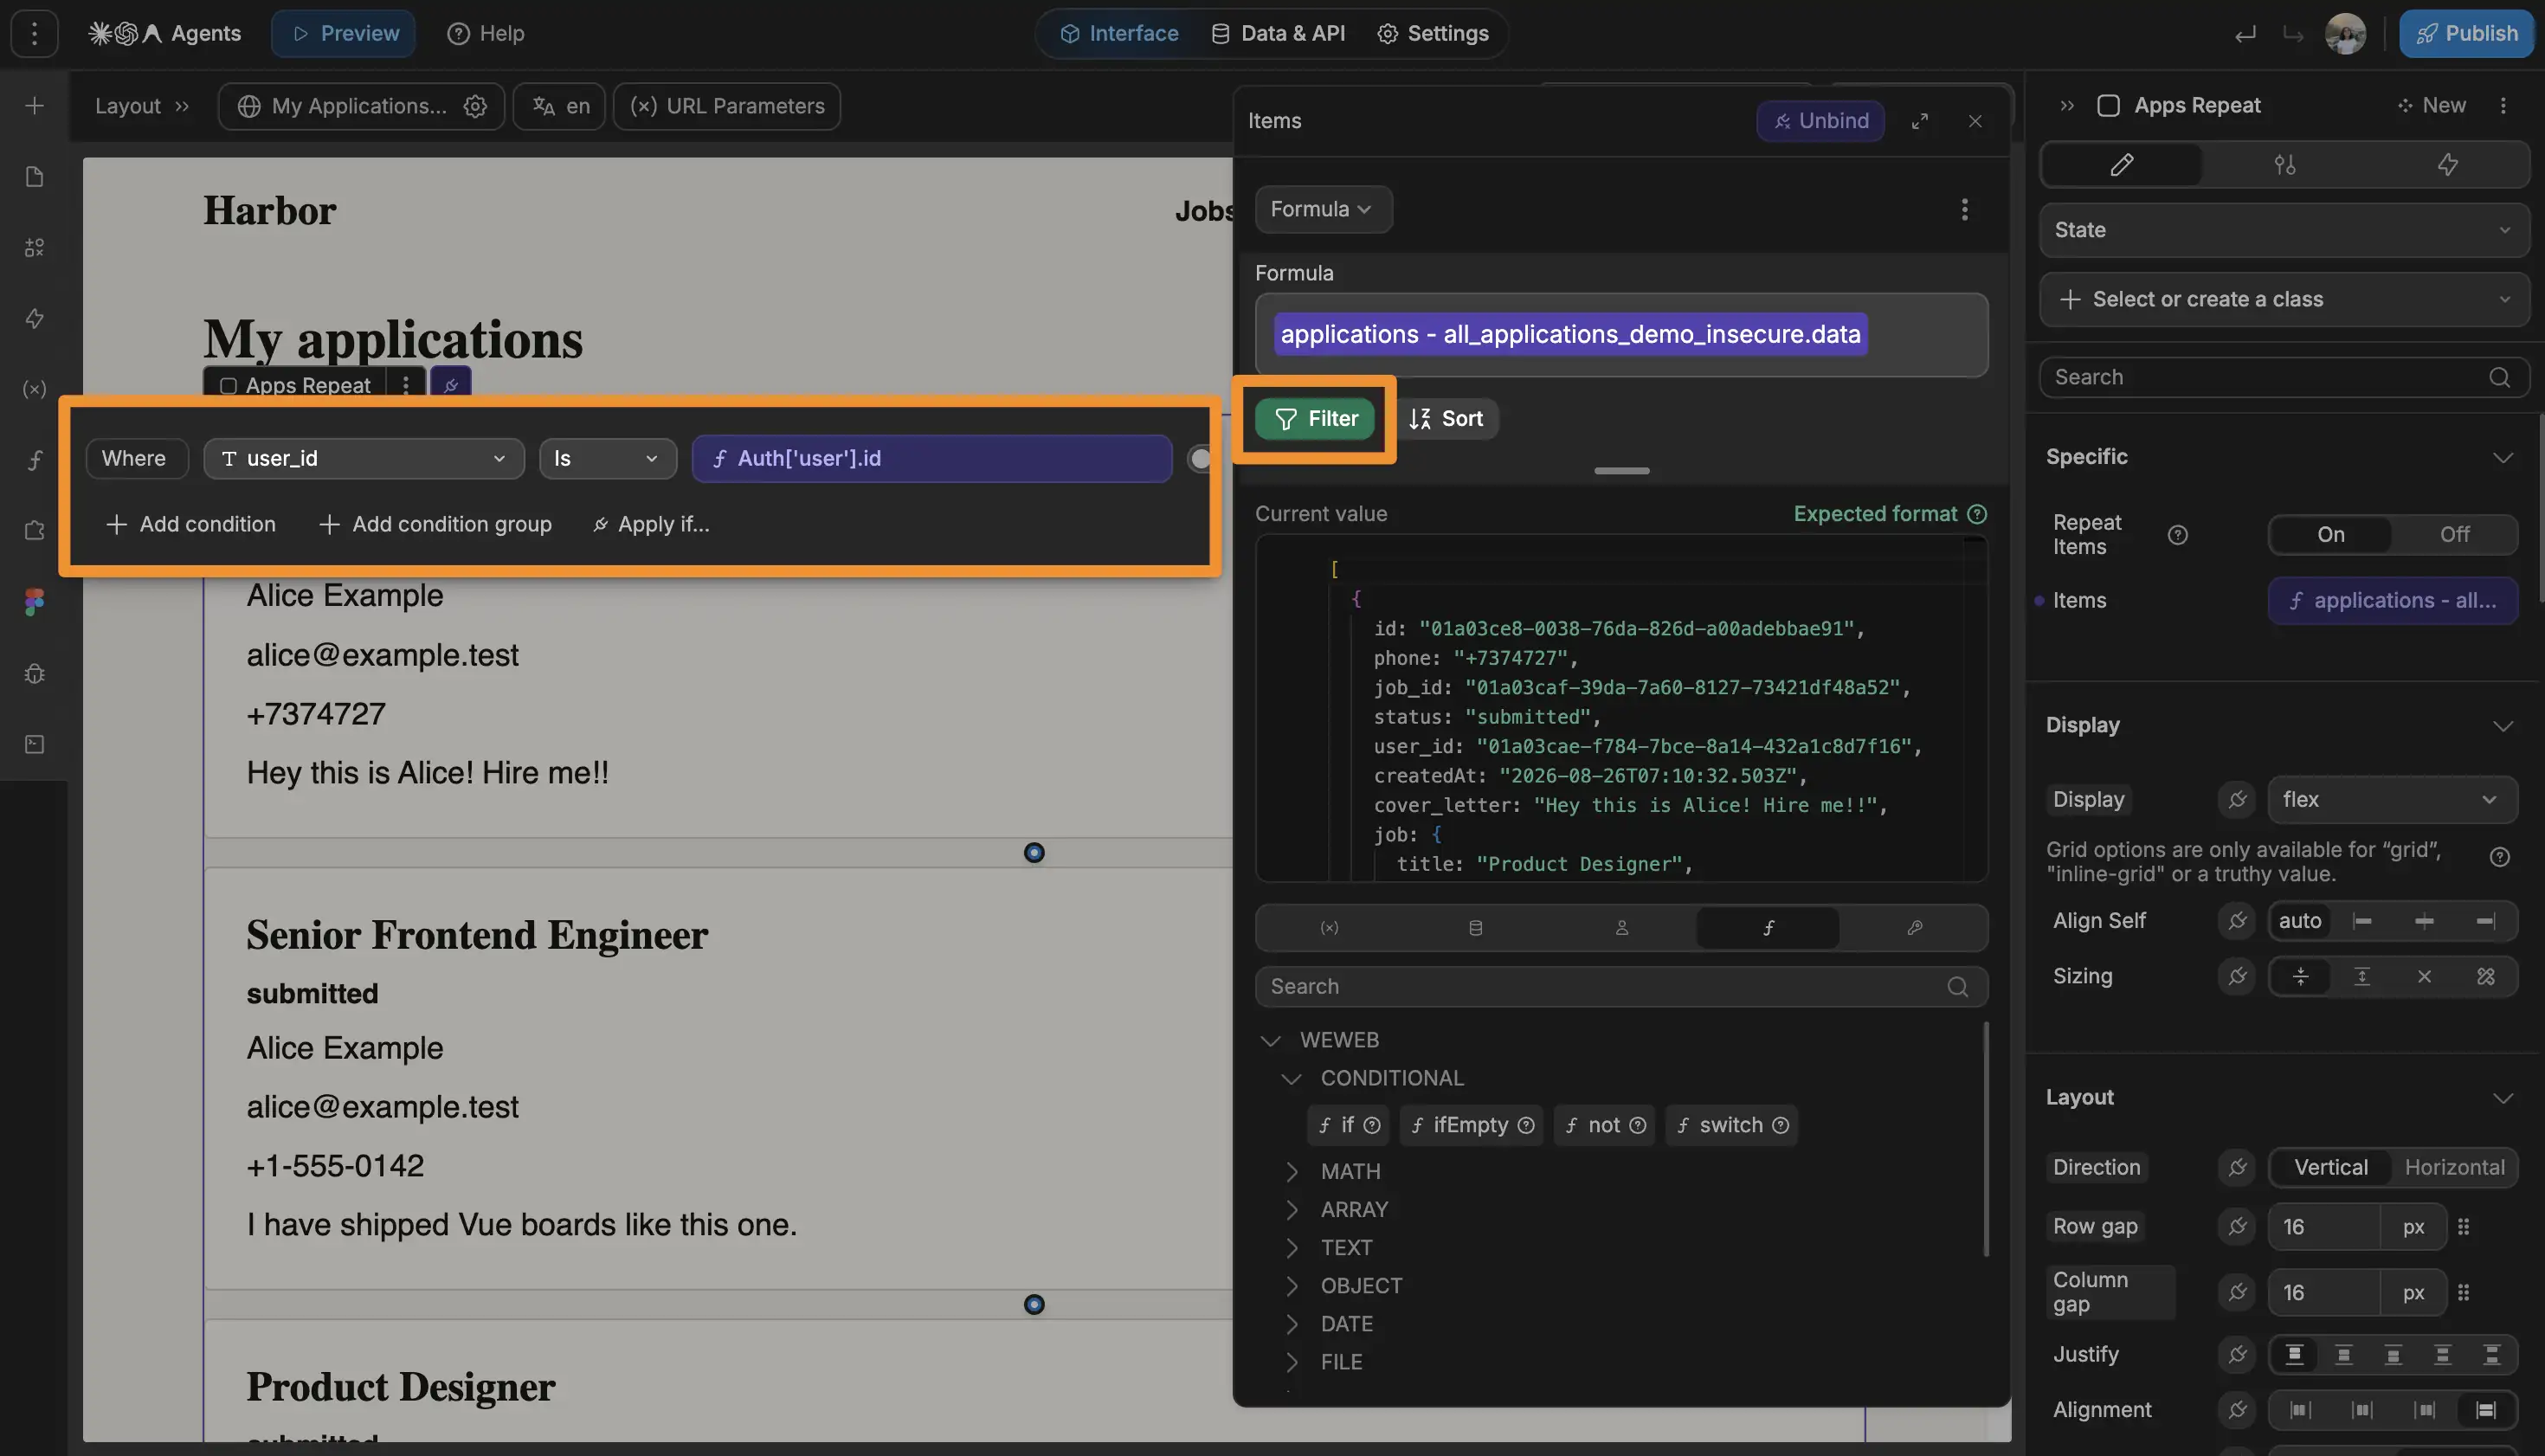
It looks perfect. Alice signs in, Alice sees two applications, both hers.
But open the browser inspector next to it, and the response your app received contains every application on the platform, including Bob's phone number and the email address he used to apply.
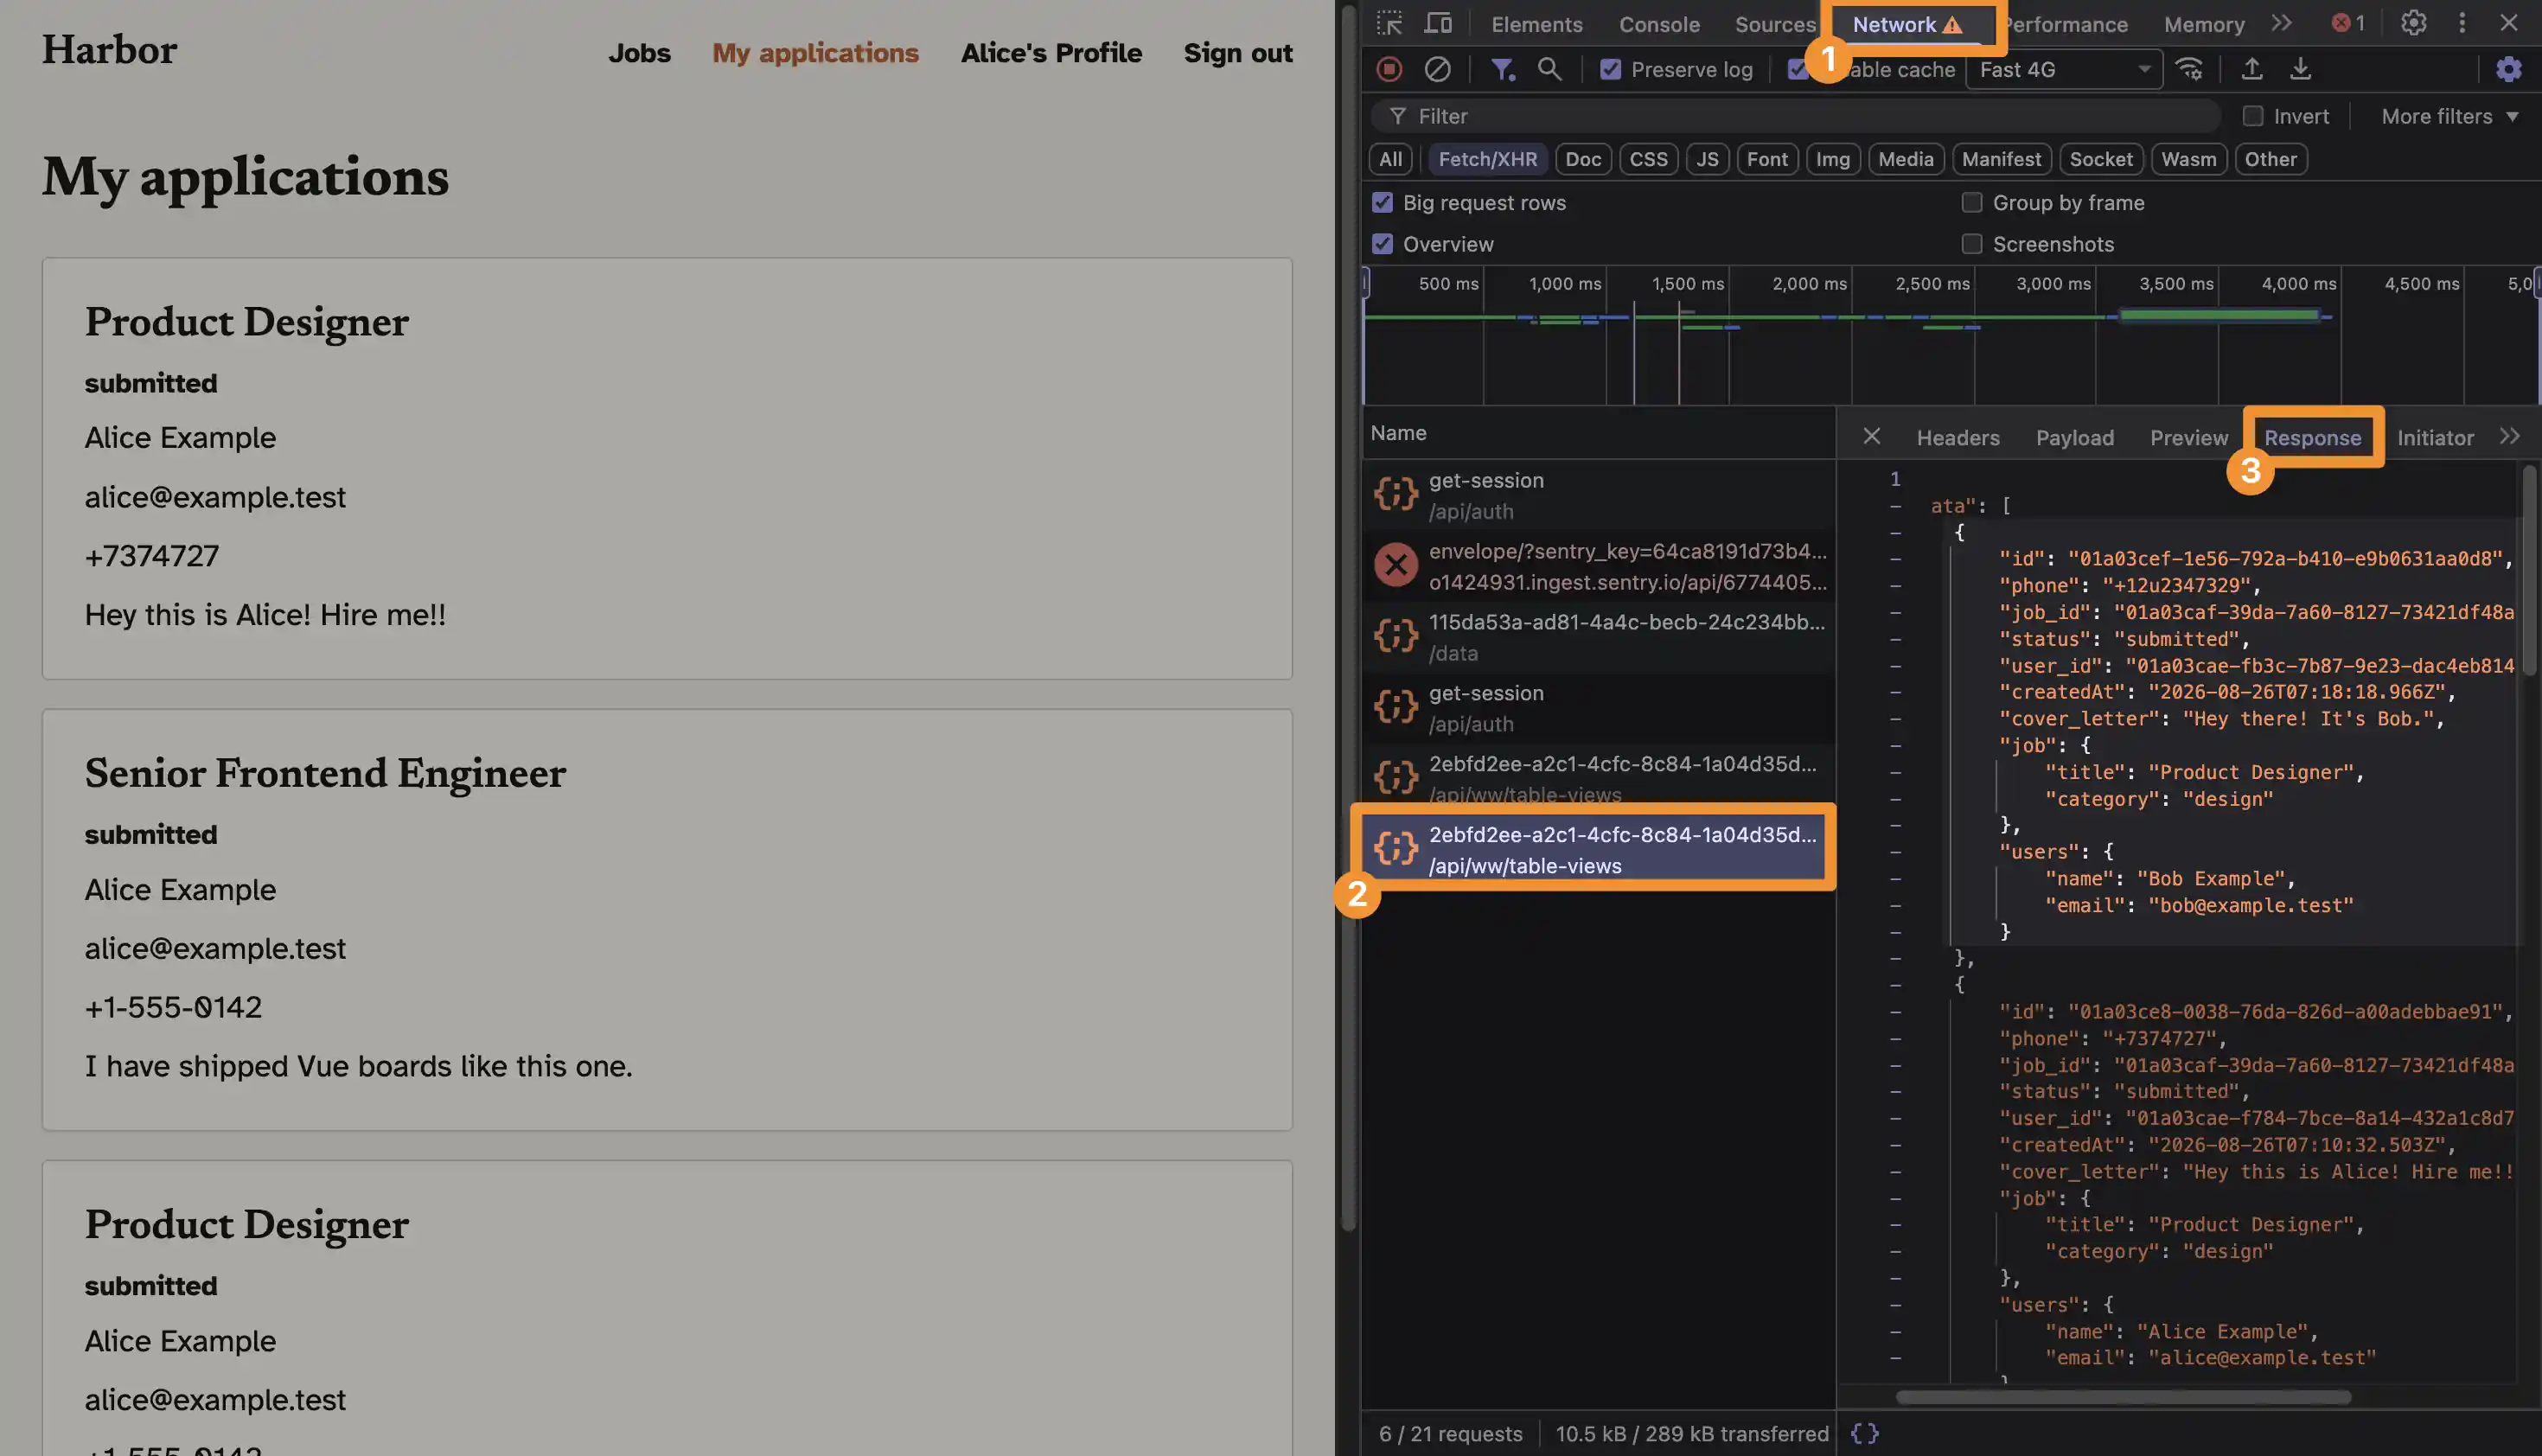
The filter is doing its job visually. It isn't protecting anything.
Security teams call this excessive data exposure: the backend returns more than the interface needs, and trusts the frontend to trim it.
The fix
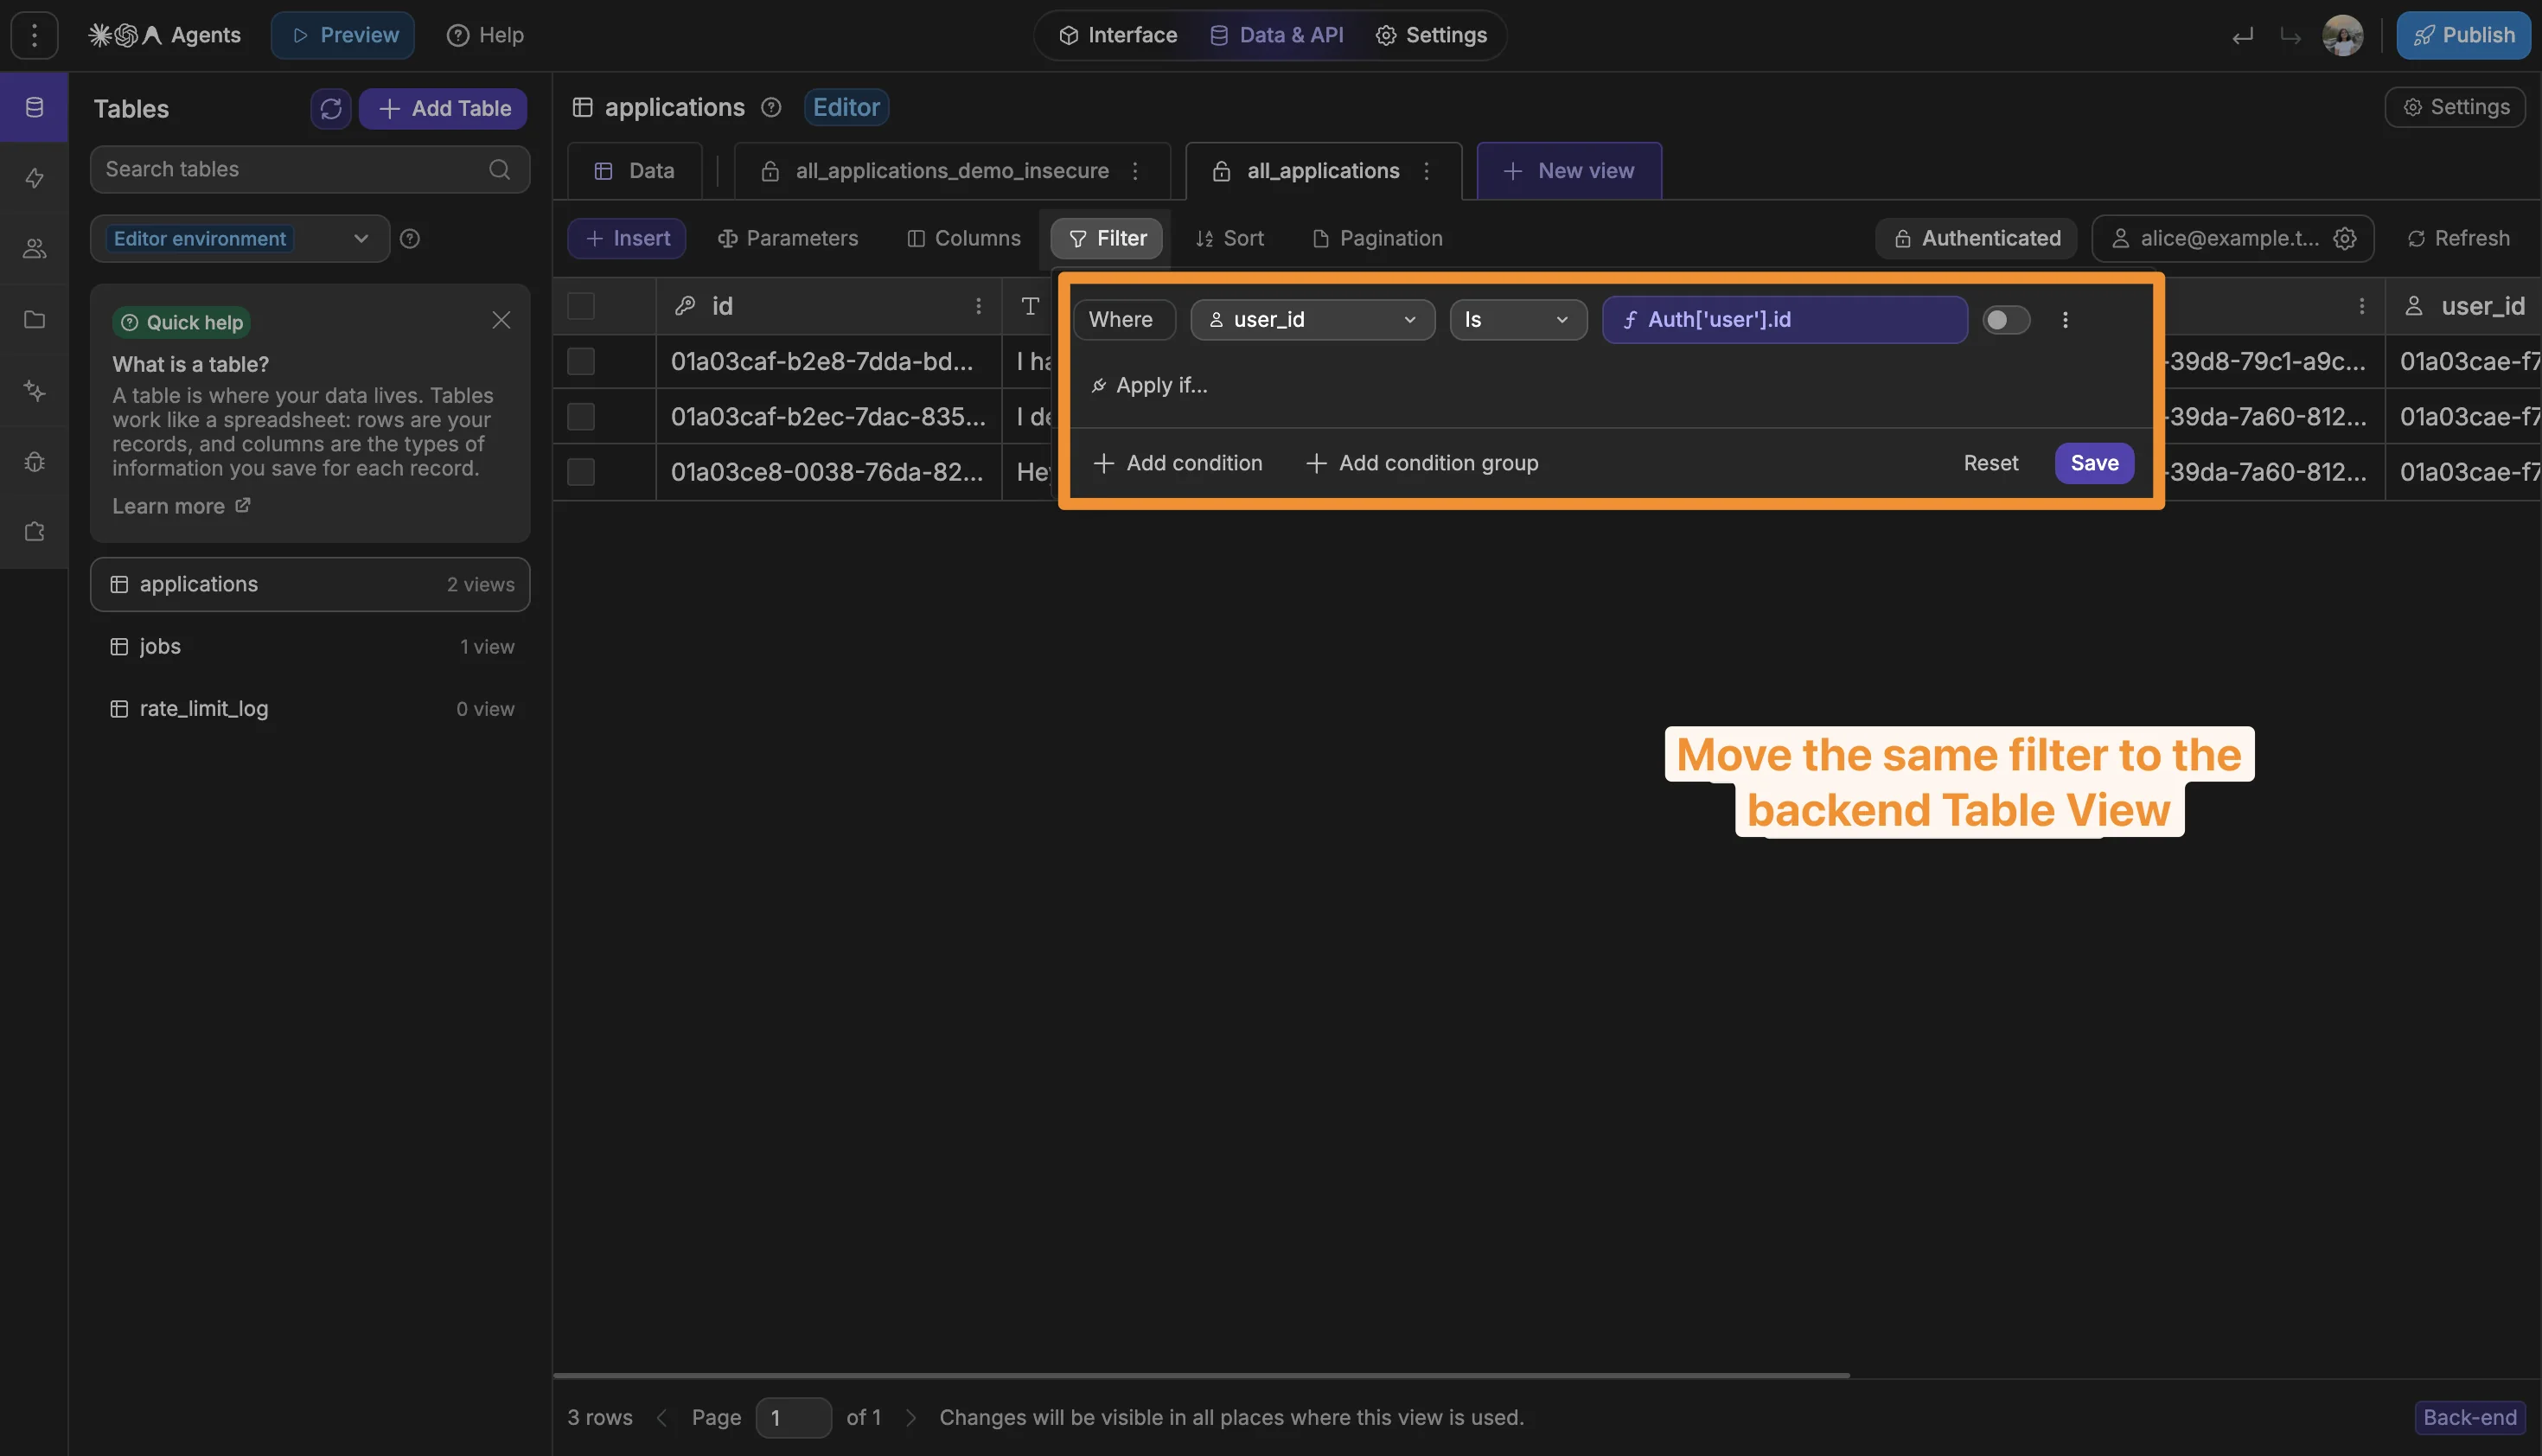
Filter in the backend, so the data never reaches the browser in the first place.
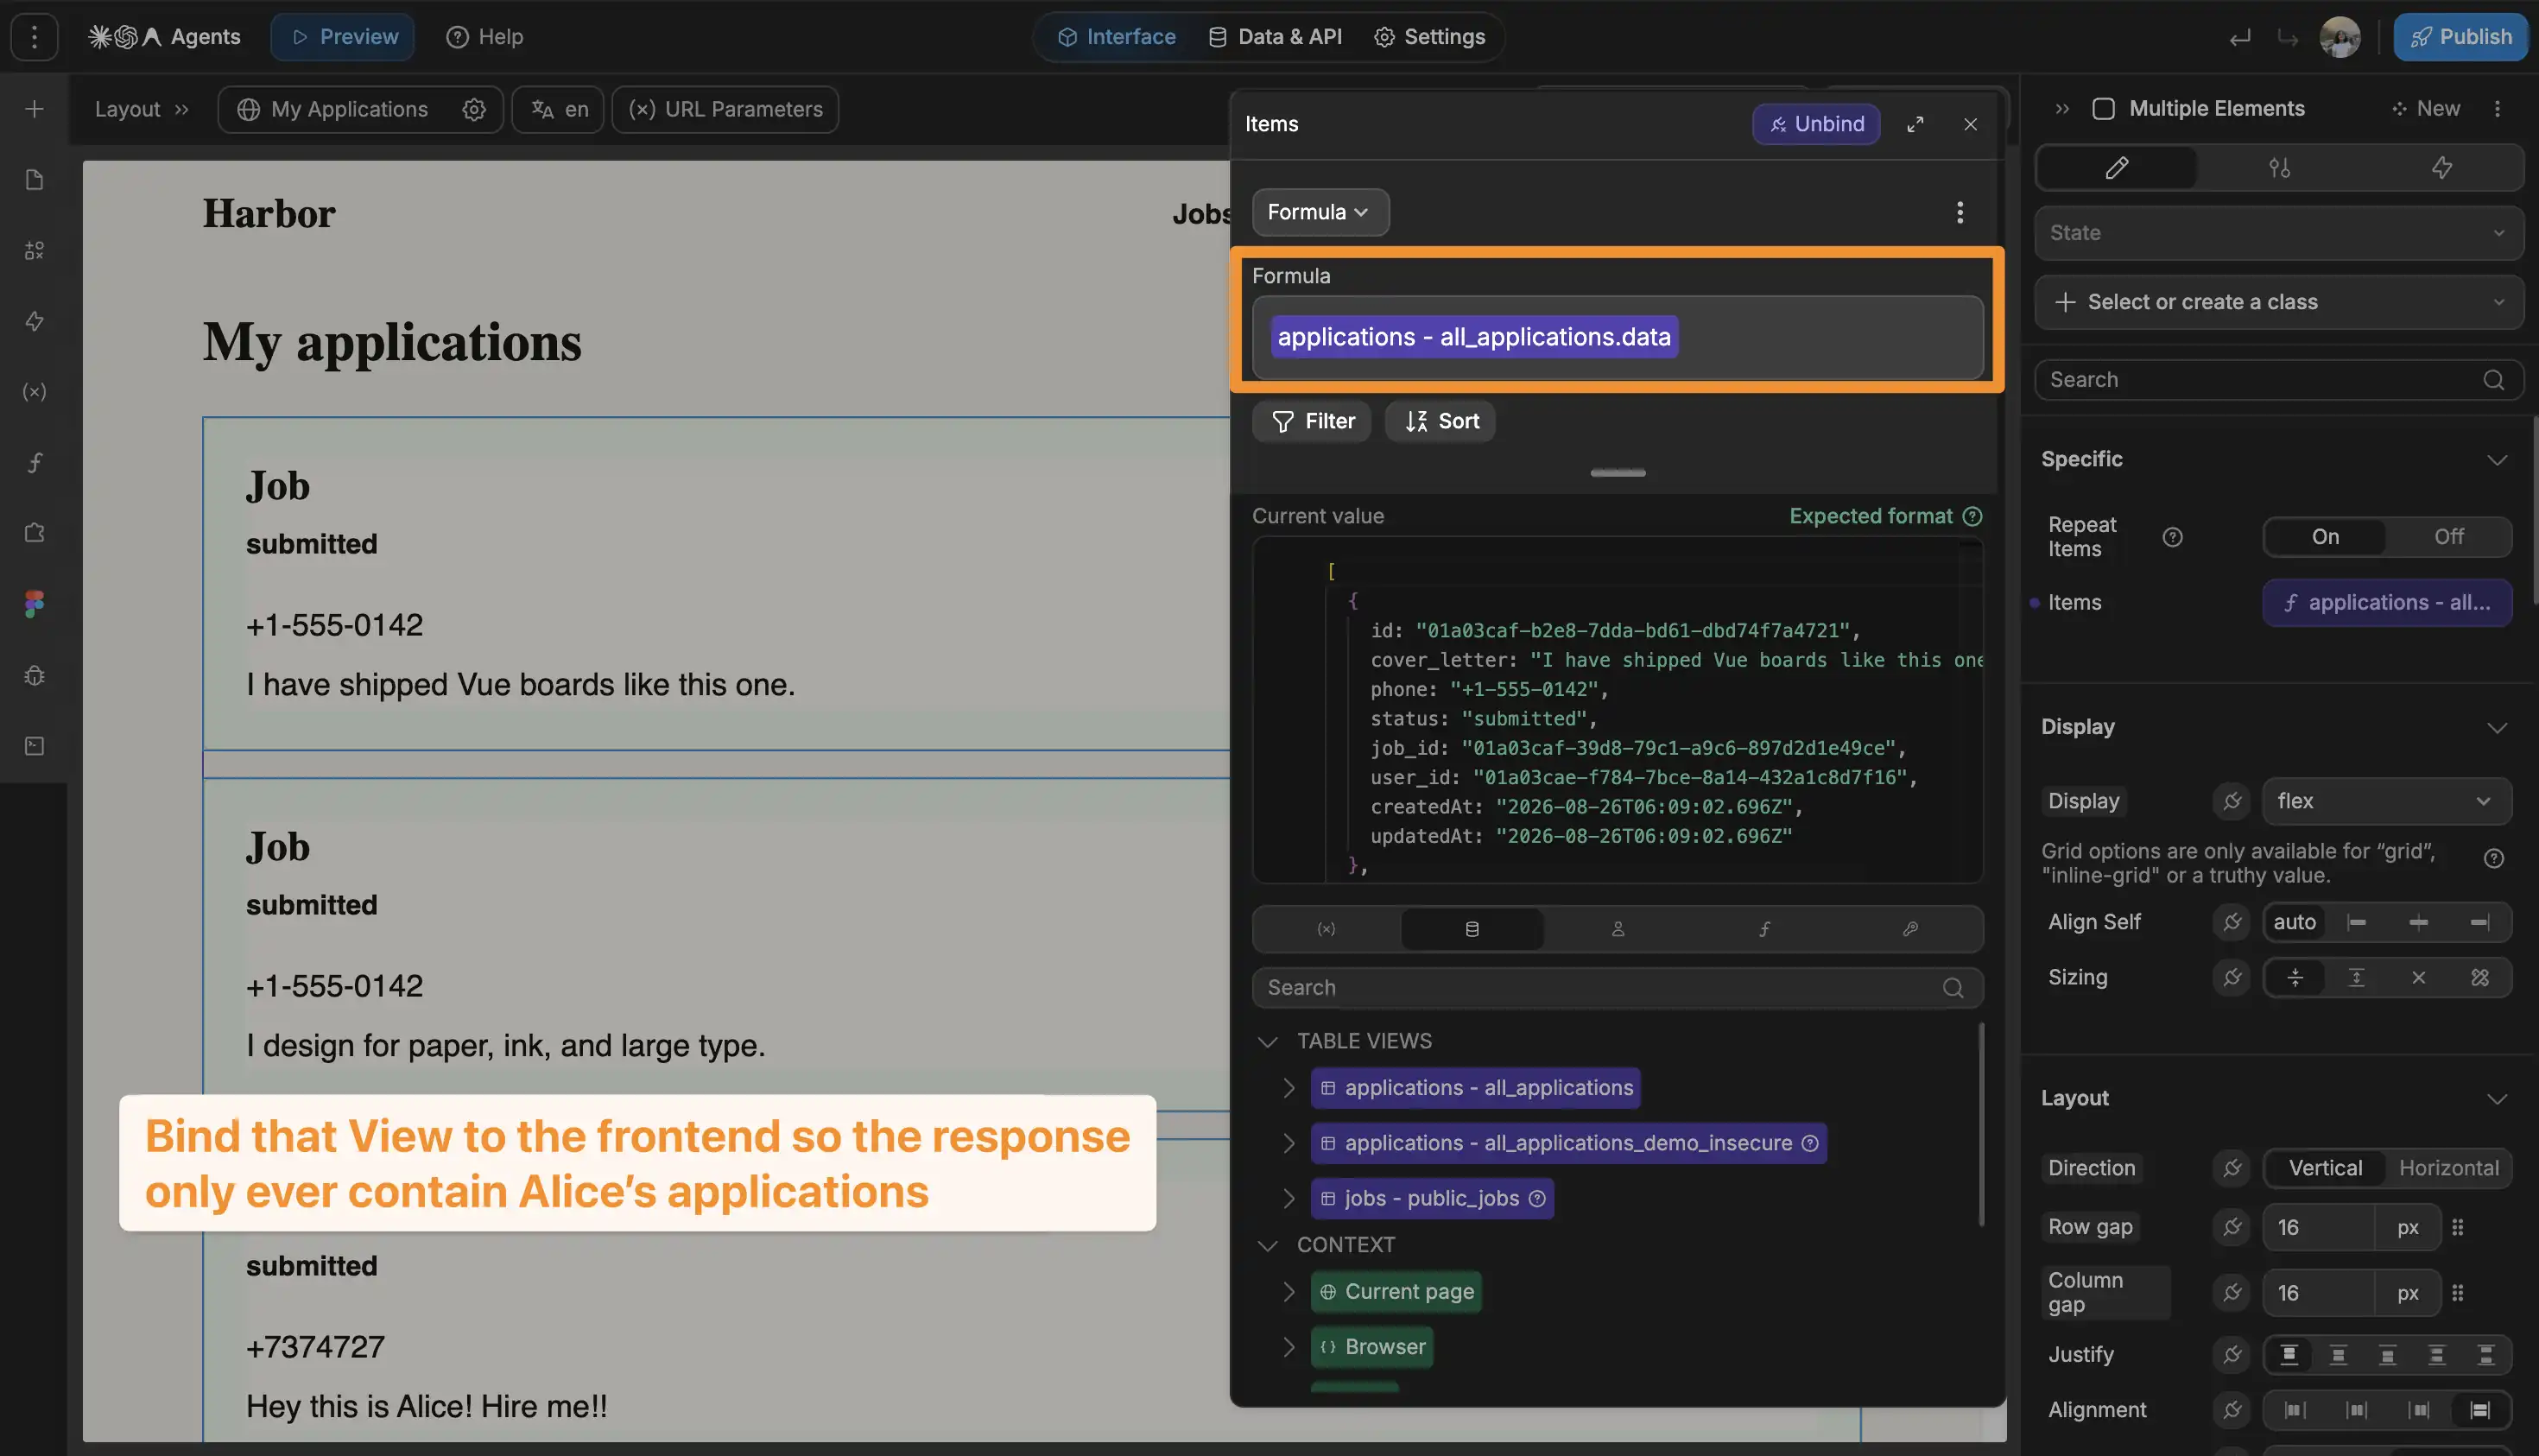
In WeWeb's backend, that means creating a Table View for applications that's filtered on the authenticated user, and binding your page to that view instead of to the raw table. The filter runs on the server, so the response only ever contains Alice's rows.
If your backend is Xano, create a dedicated endpoint that only returns the authenticated user's applications, rather than returning the table and filtering later.
If your backend is Supabase, this is what Row Level Security is for. We'll come back to it in Vulnerability 3.
🔥 Pro tip: being mindful of the data you load in the frontend is a best practice that will also come in handy when you need to scale and improve the performance of your app.
Test it
Sign in as Alice, open the Network panel, and reload "My applications". The response should contain Alice's rows and nothing else. Repeat as Bob.
Vulnerability 2: Your API works without authentication
The mistake
Our job board's listings page is public, which is fine, because job ads are meant to be read by anyone. But that means anyone can also see the call that fetches them.
REST APIs are usually pretty structured and standardized, so it's not much of a leap to add a job ID to the end of that endpoint, switch the request to POST, and see what happens.
So we tried it. We signed out completely, with no account and no token, then sent a new job title.
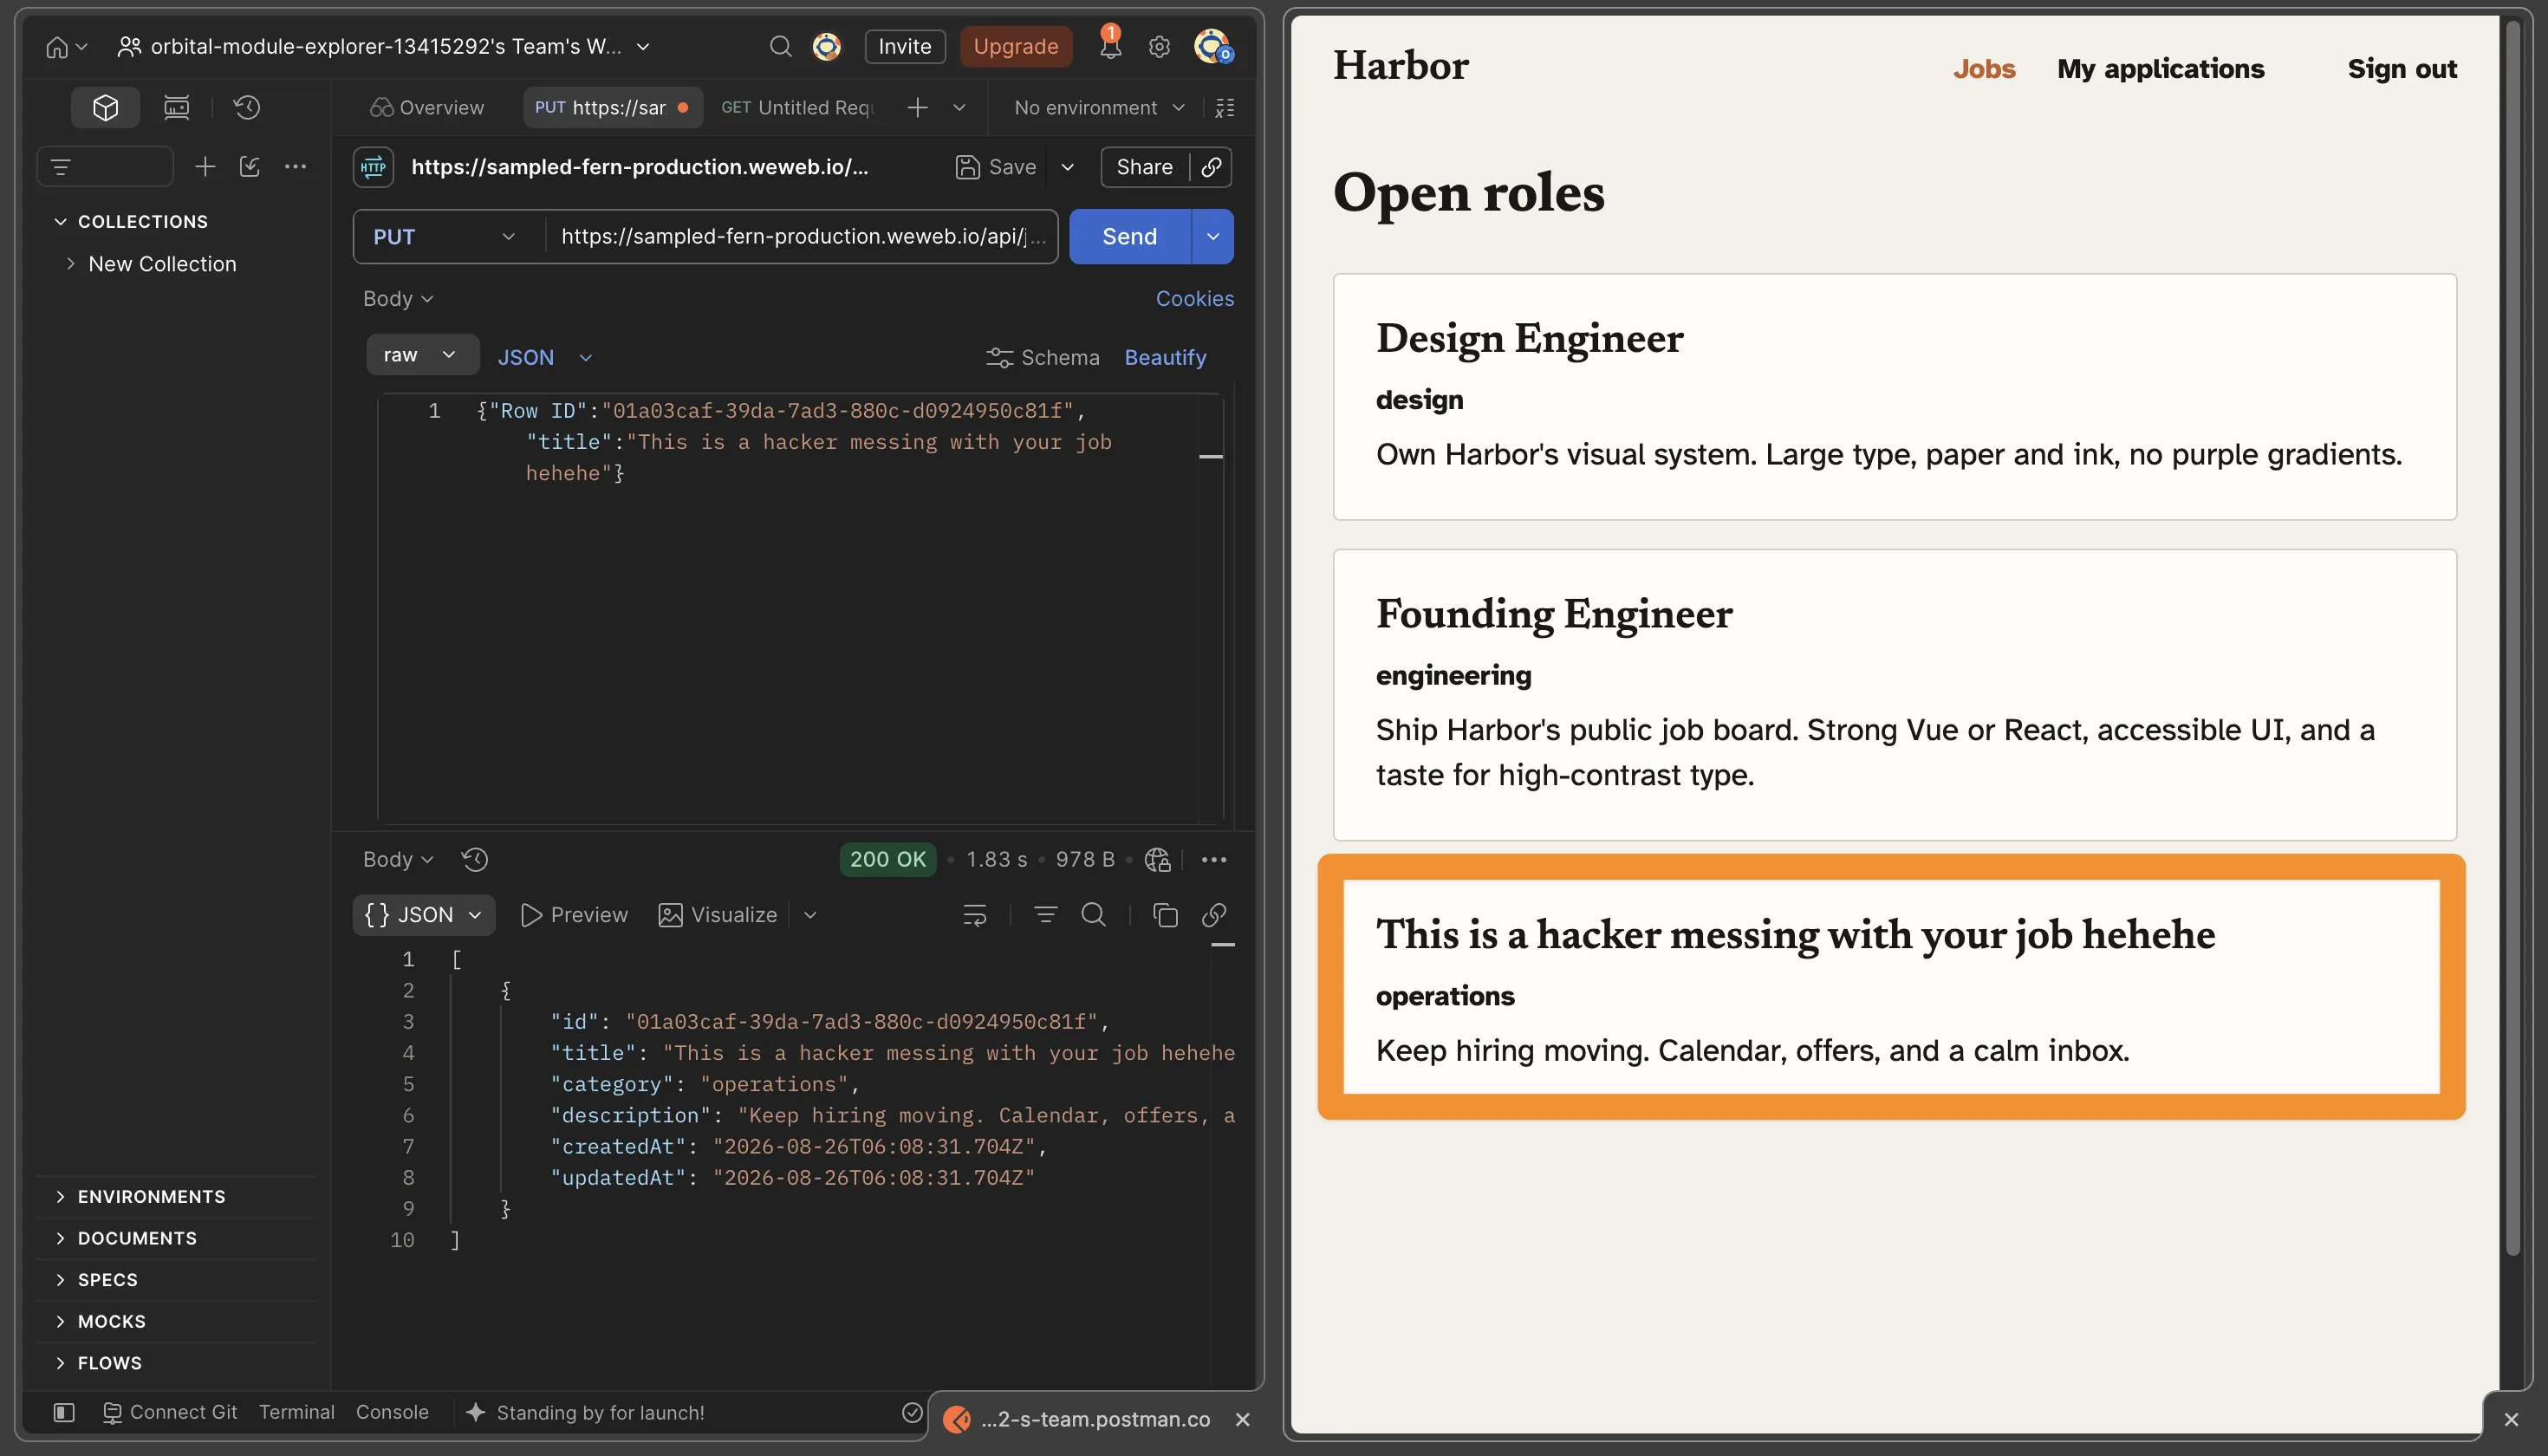
The listing changed. Nobody was signed in, and no account was involved at any point. The endpoint accepted the write because nothing had ever told it not to.
Security teams call this broken authentication: an operation that should require a signed-in user doesn't check for one.
The fix
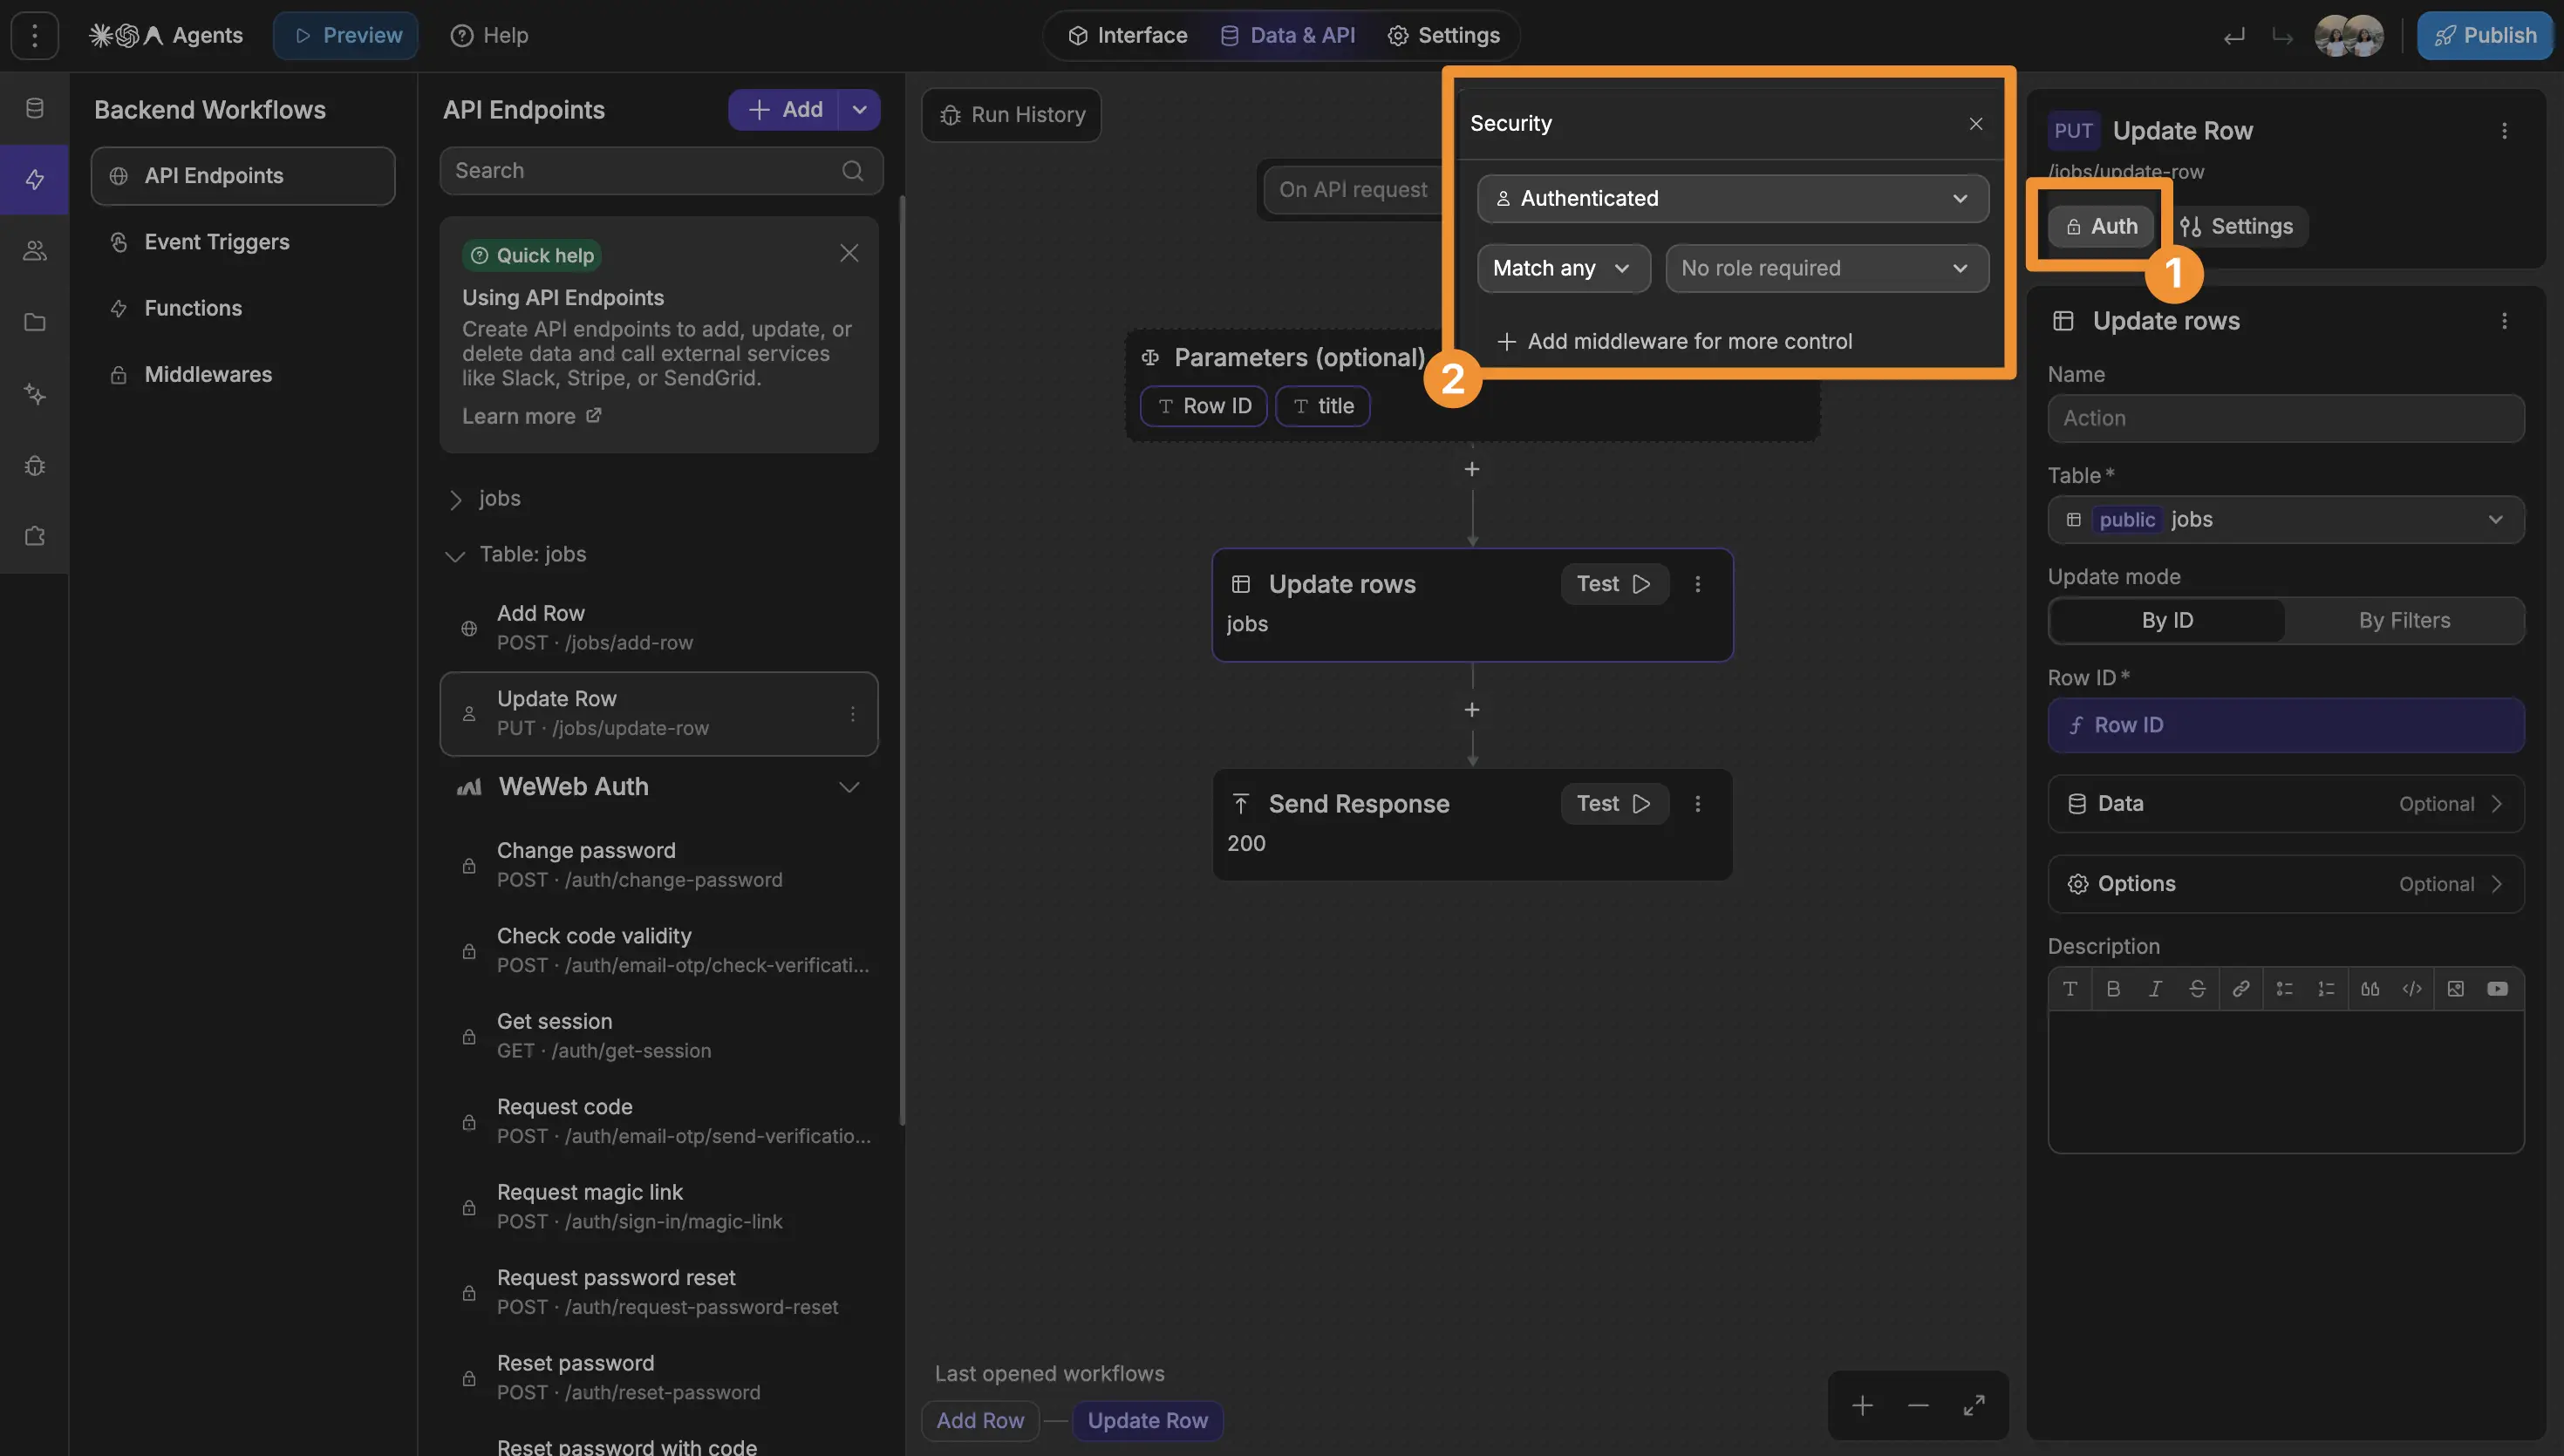
Protect the resource, not only the page it's displayed on. In WeWeb's backend, every Table View and API Endpoint has its own security setting. Leave the jobs list open to everyone if it's meant to be public, and require a signed-in user for anything that writes.
If your backend is Supabase, enable Row Level Security on the table and write a policy that lets everyone read the jobs but only authenticated users update them.
If your backend is Xano, add authentication to the /job/{job_id} endpoint.
Test it
Sign out. Capture the write request from the Network panel as cURL, paste it into Postman, remove the authorization header, send. It should be rejected, and the listing should be unchanged.
That's a good start, but it's not enough.
Vulnerability 3: Users can read and edit each other's records
The mistake
Authentication answers "who are you?" It doesn't answer "are you allowed to do this?"
So if authentication is all you've added, there's nothing stopping someone from:
- creating an account,
- logging in,
- then trying to access someone else's data.
Security teams call this horizontal privilege escalation, or broken object level authorization: a real user, on the same level of access as everyone else, reaching another user's records. It's one of the most common and dangerous authorization mistakes in web apps.
That's exactly what we did.
The leaked response carried Bob's application ID along with everything else, so we took it, signed in as Alice, and sent an update from Postman that put Alice's user ID on Bob's application.
Bob's application now belongs to Alice, and the backend never asked whose it was.
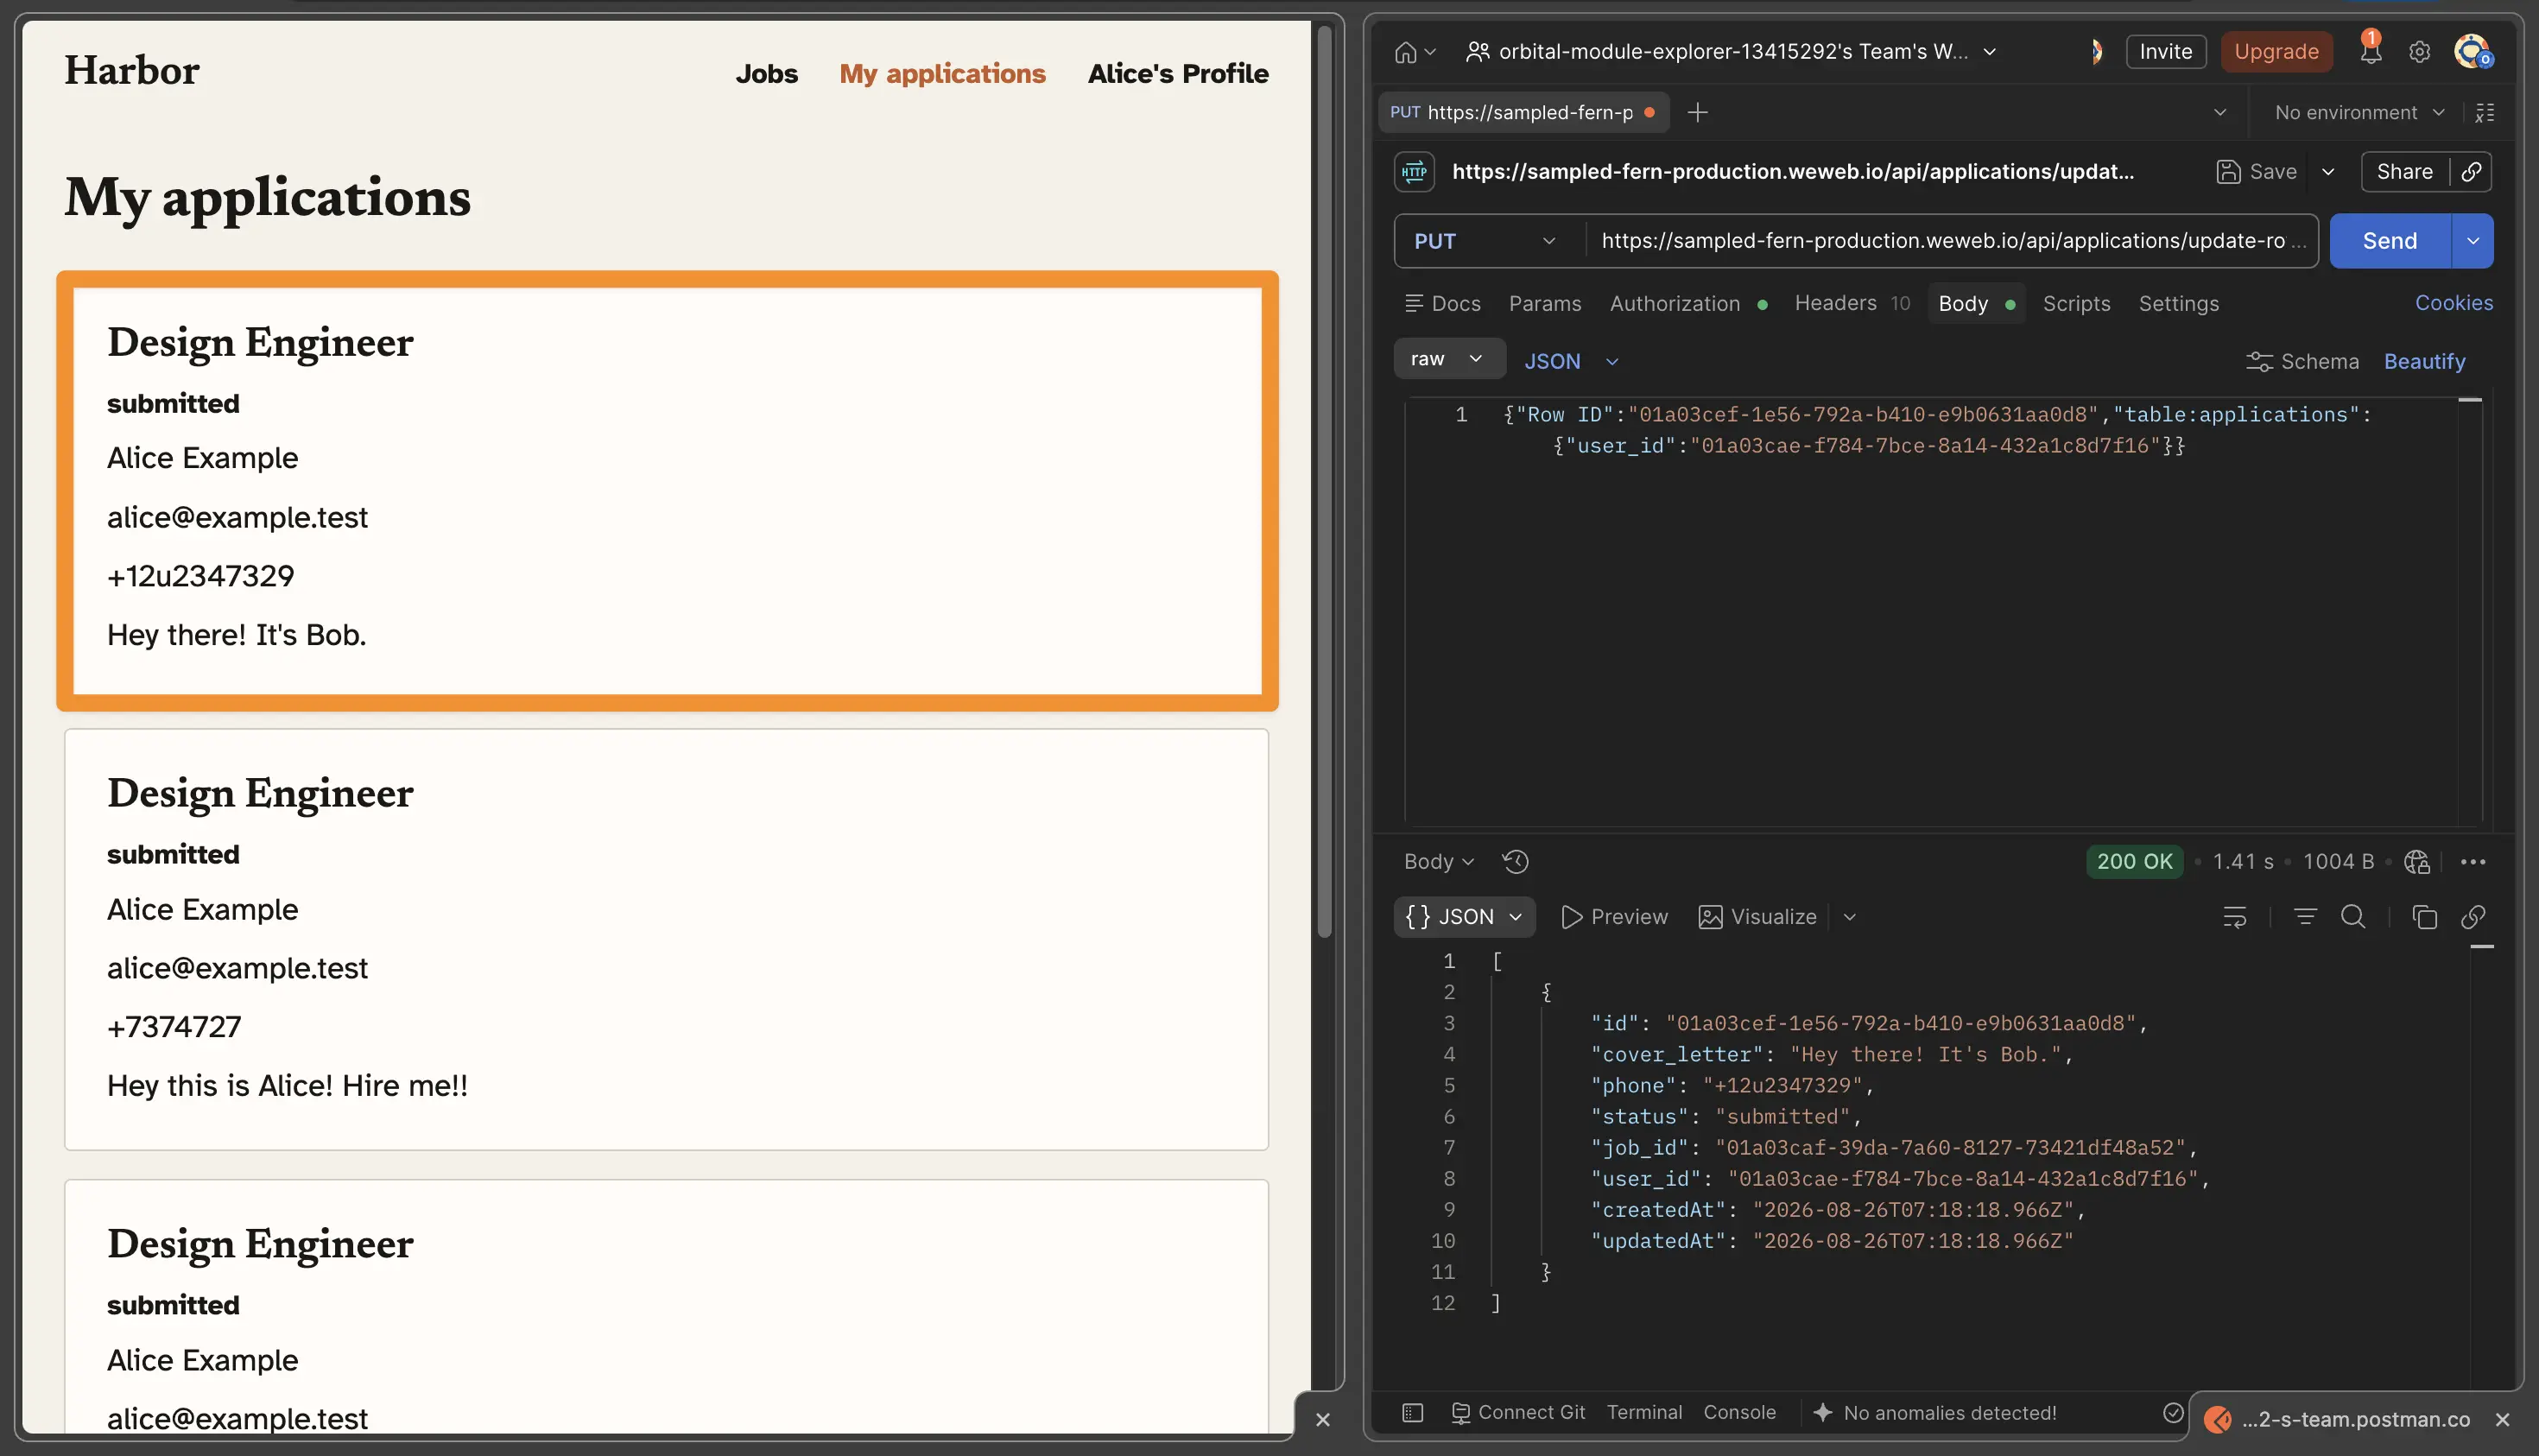
That second question has to be asked in the backend, on every single operation that takes an ID from the browser.
The fix
Check ownership in the backend, every time.
In WeWeb's backend, don't accept a user_id from the frontend as proof of anything. Read the authenticated user from the session, and use that to filter the view or to gate the endpoint. If access depends on ownership rather than a broad role, add the check in your backend workflow or middleware.
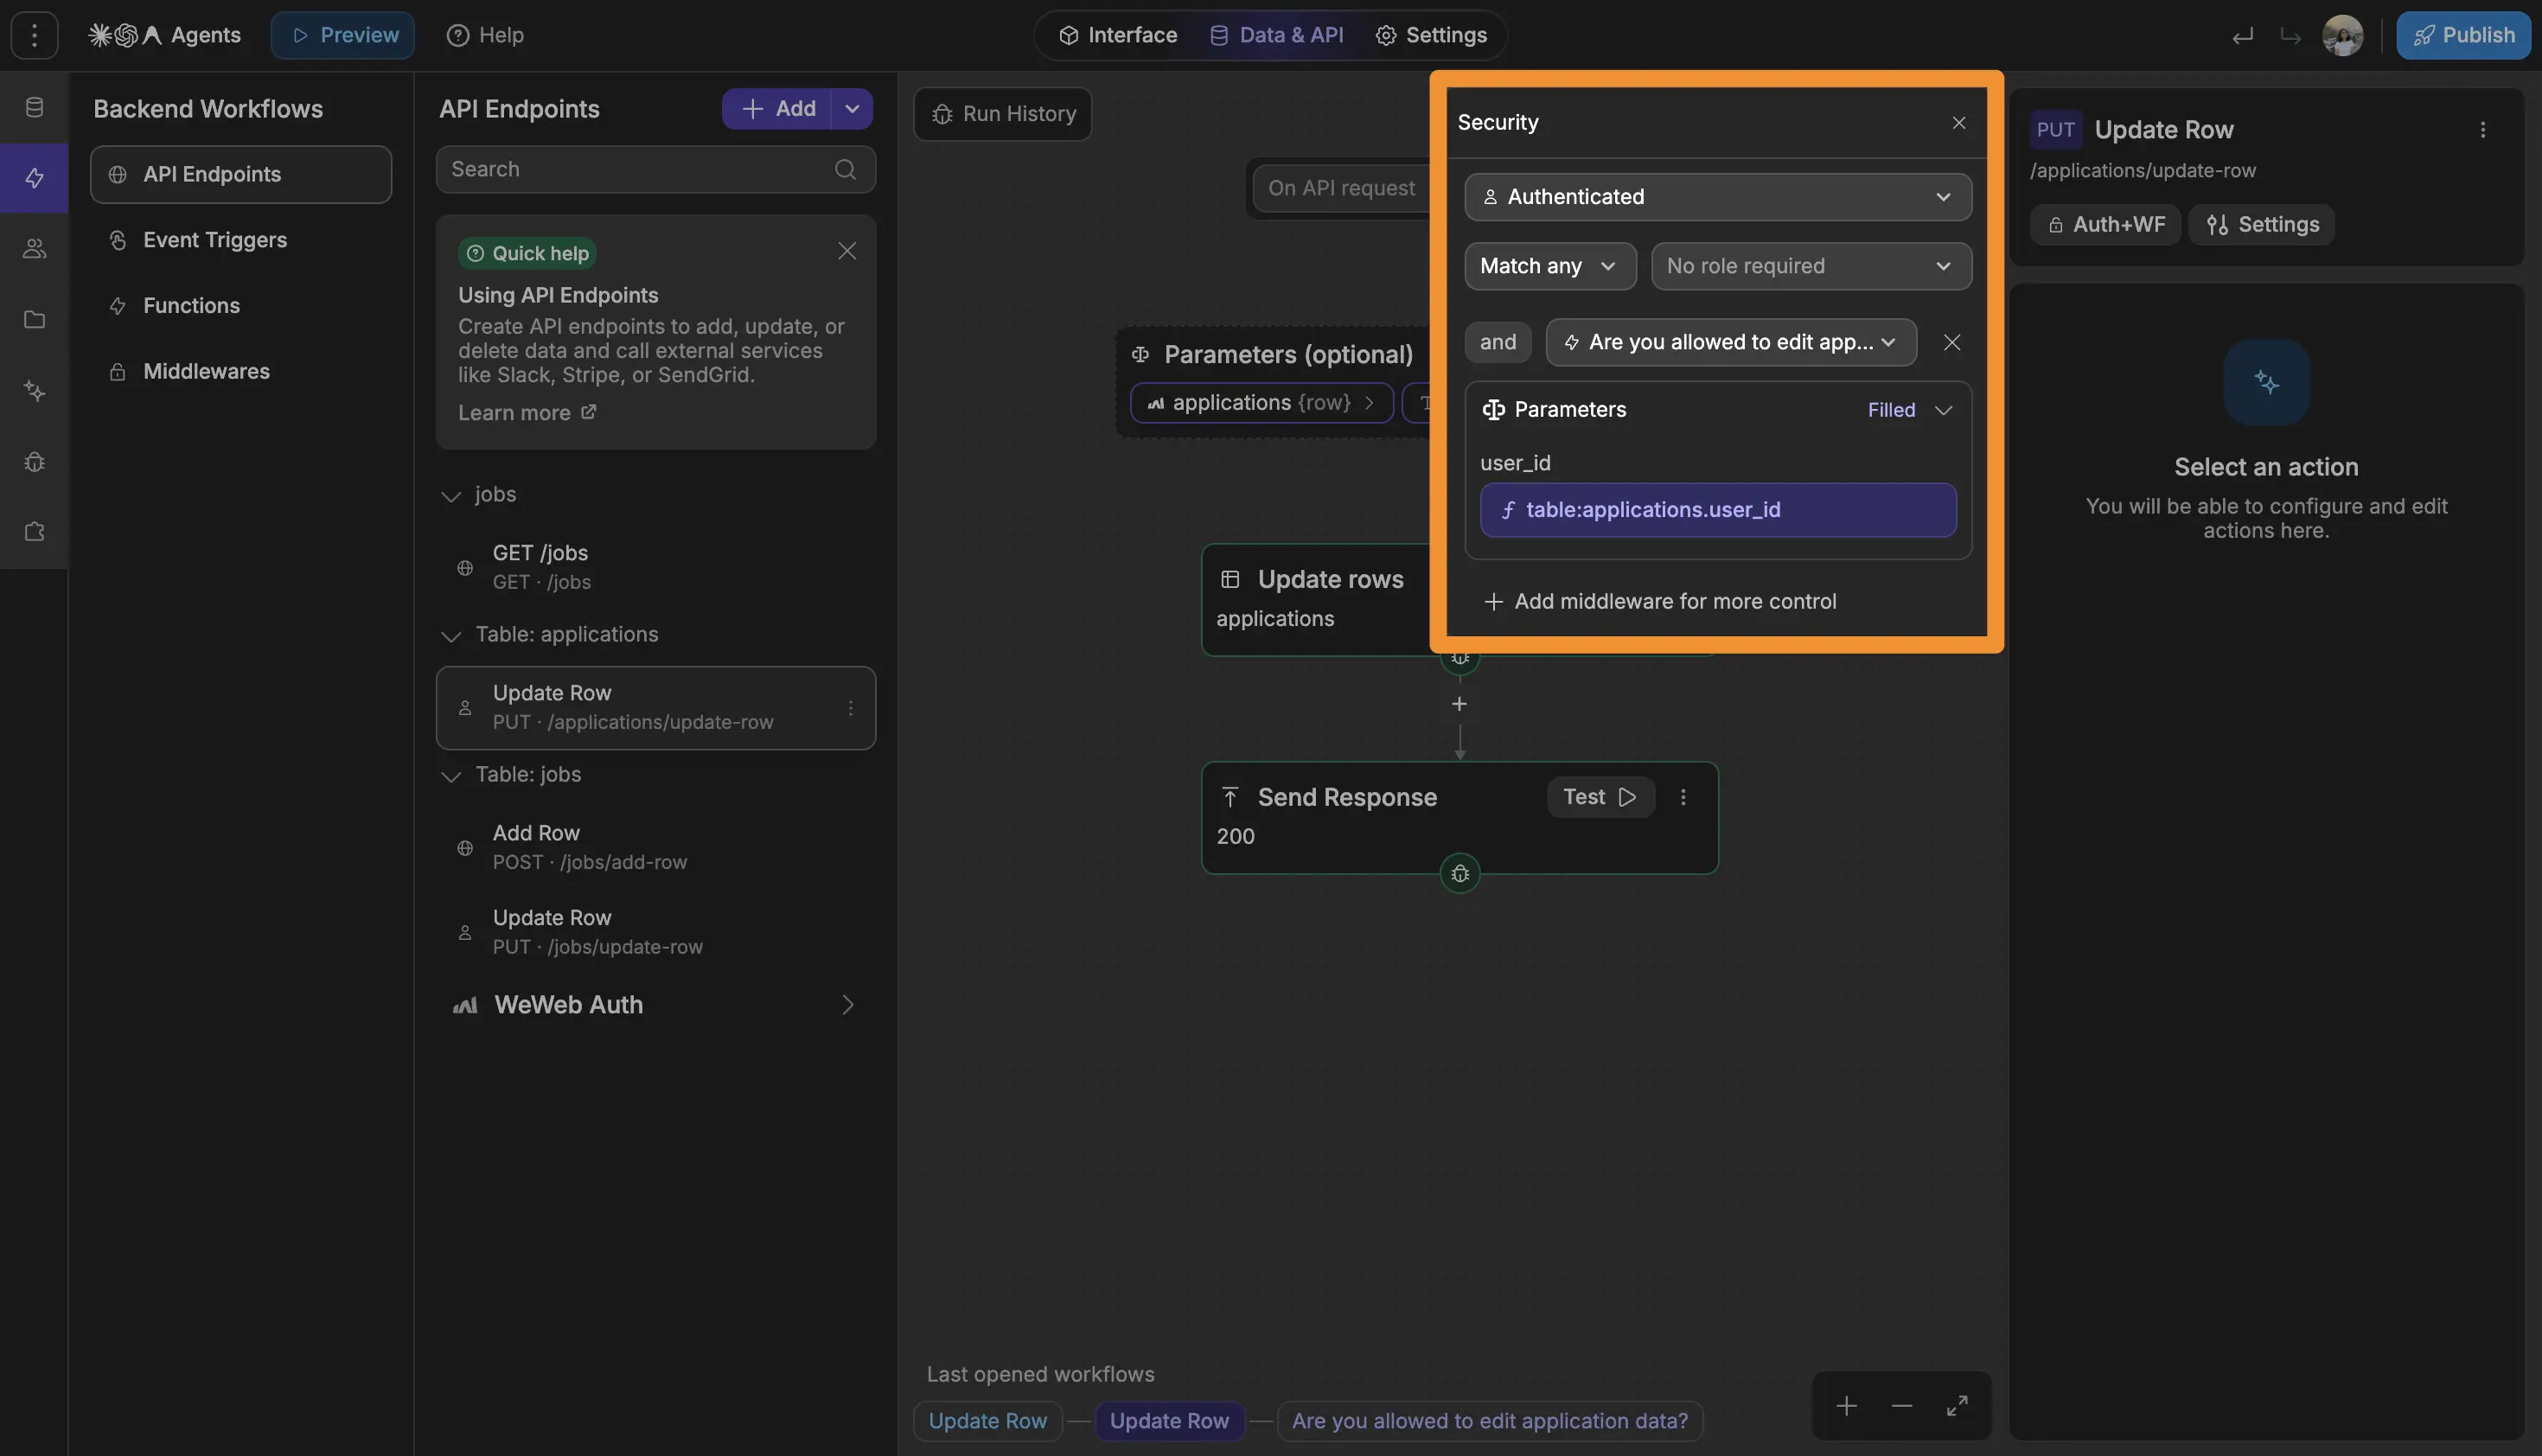
If your backend is Supabase, this is where you edit the policy so the user_id on the row has to match the ID of the user who's currently authenticated.
One thing worth being precise about: turning RLS on is the start, not the finish. Supabase's documentation explains how grants and policies combine, and you need to think about each operation separately. Run these four tests as Alice:
That last one catches people out. A policy can correctly control which rows someone can update while still letting them write whatever they like into those rows.
If your backend is Xano, add a precondition to check that the ID passed in the API call matches the ID of the user who's currently authenticated.
⚠️ You'll sometimes read that switching to UUIDs solves this. It doesn't. Unguessable IDs are a good idea and they make casual snooping much harder, but IDs leak into links, logs, exports, analytics, browser history and API responses. Treat a UUID as an extra lock, never as the lock.
Test it
As Alice, capture a read, an update and a delete from the Network panel as cURL, paste each into Postman, swap in Bob's record ID, send. All three should fail, and Bob's application should still belong to Bob.
Ok great, now users can only view their own data. But what if we want admins to view and edit other users' information?
Vulnerability 4: Users can make themselves admins
The mistake
One of the first things anyone will try is to make themselves an admin of your app. Once they are one, they don't need to be clever any more. Your app will do whatever they ask it to.
Security teams call this vertical privilege escalation: a real user handing themselves powers they were never given. Adding a field the form never offered is mass assignment; calling an admin endpoint directly is broken function level authorization. Same escalation, two doors.
On our job board, Alice can edit her own name. We captured that perfectly ordinary profile-update request, added one field to it, roles: ["admin"], and sent it back.
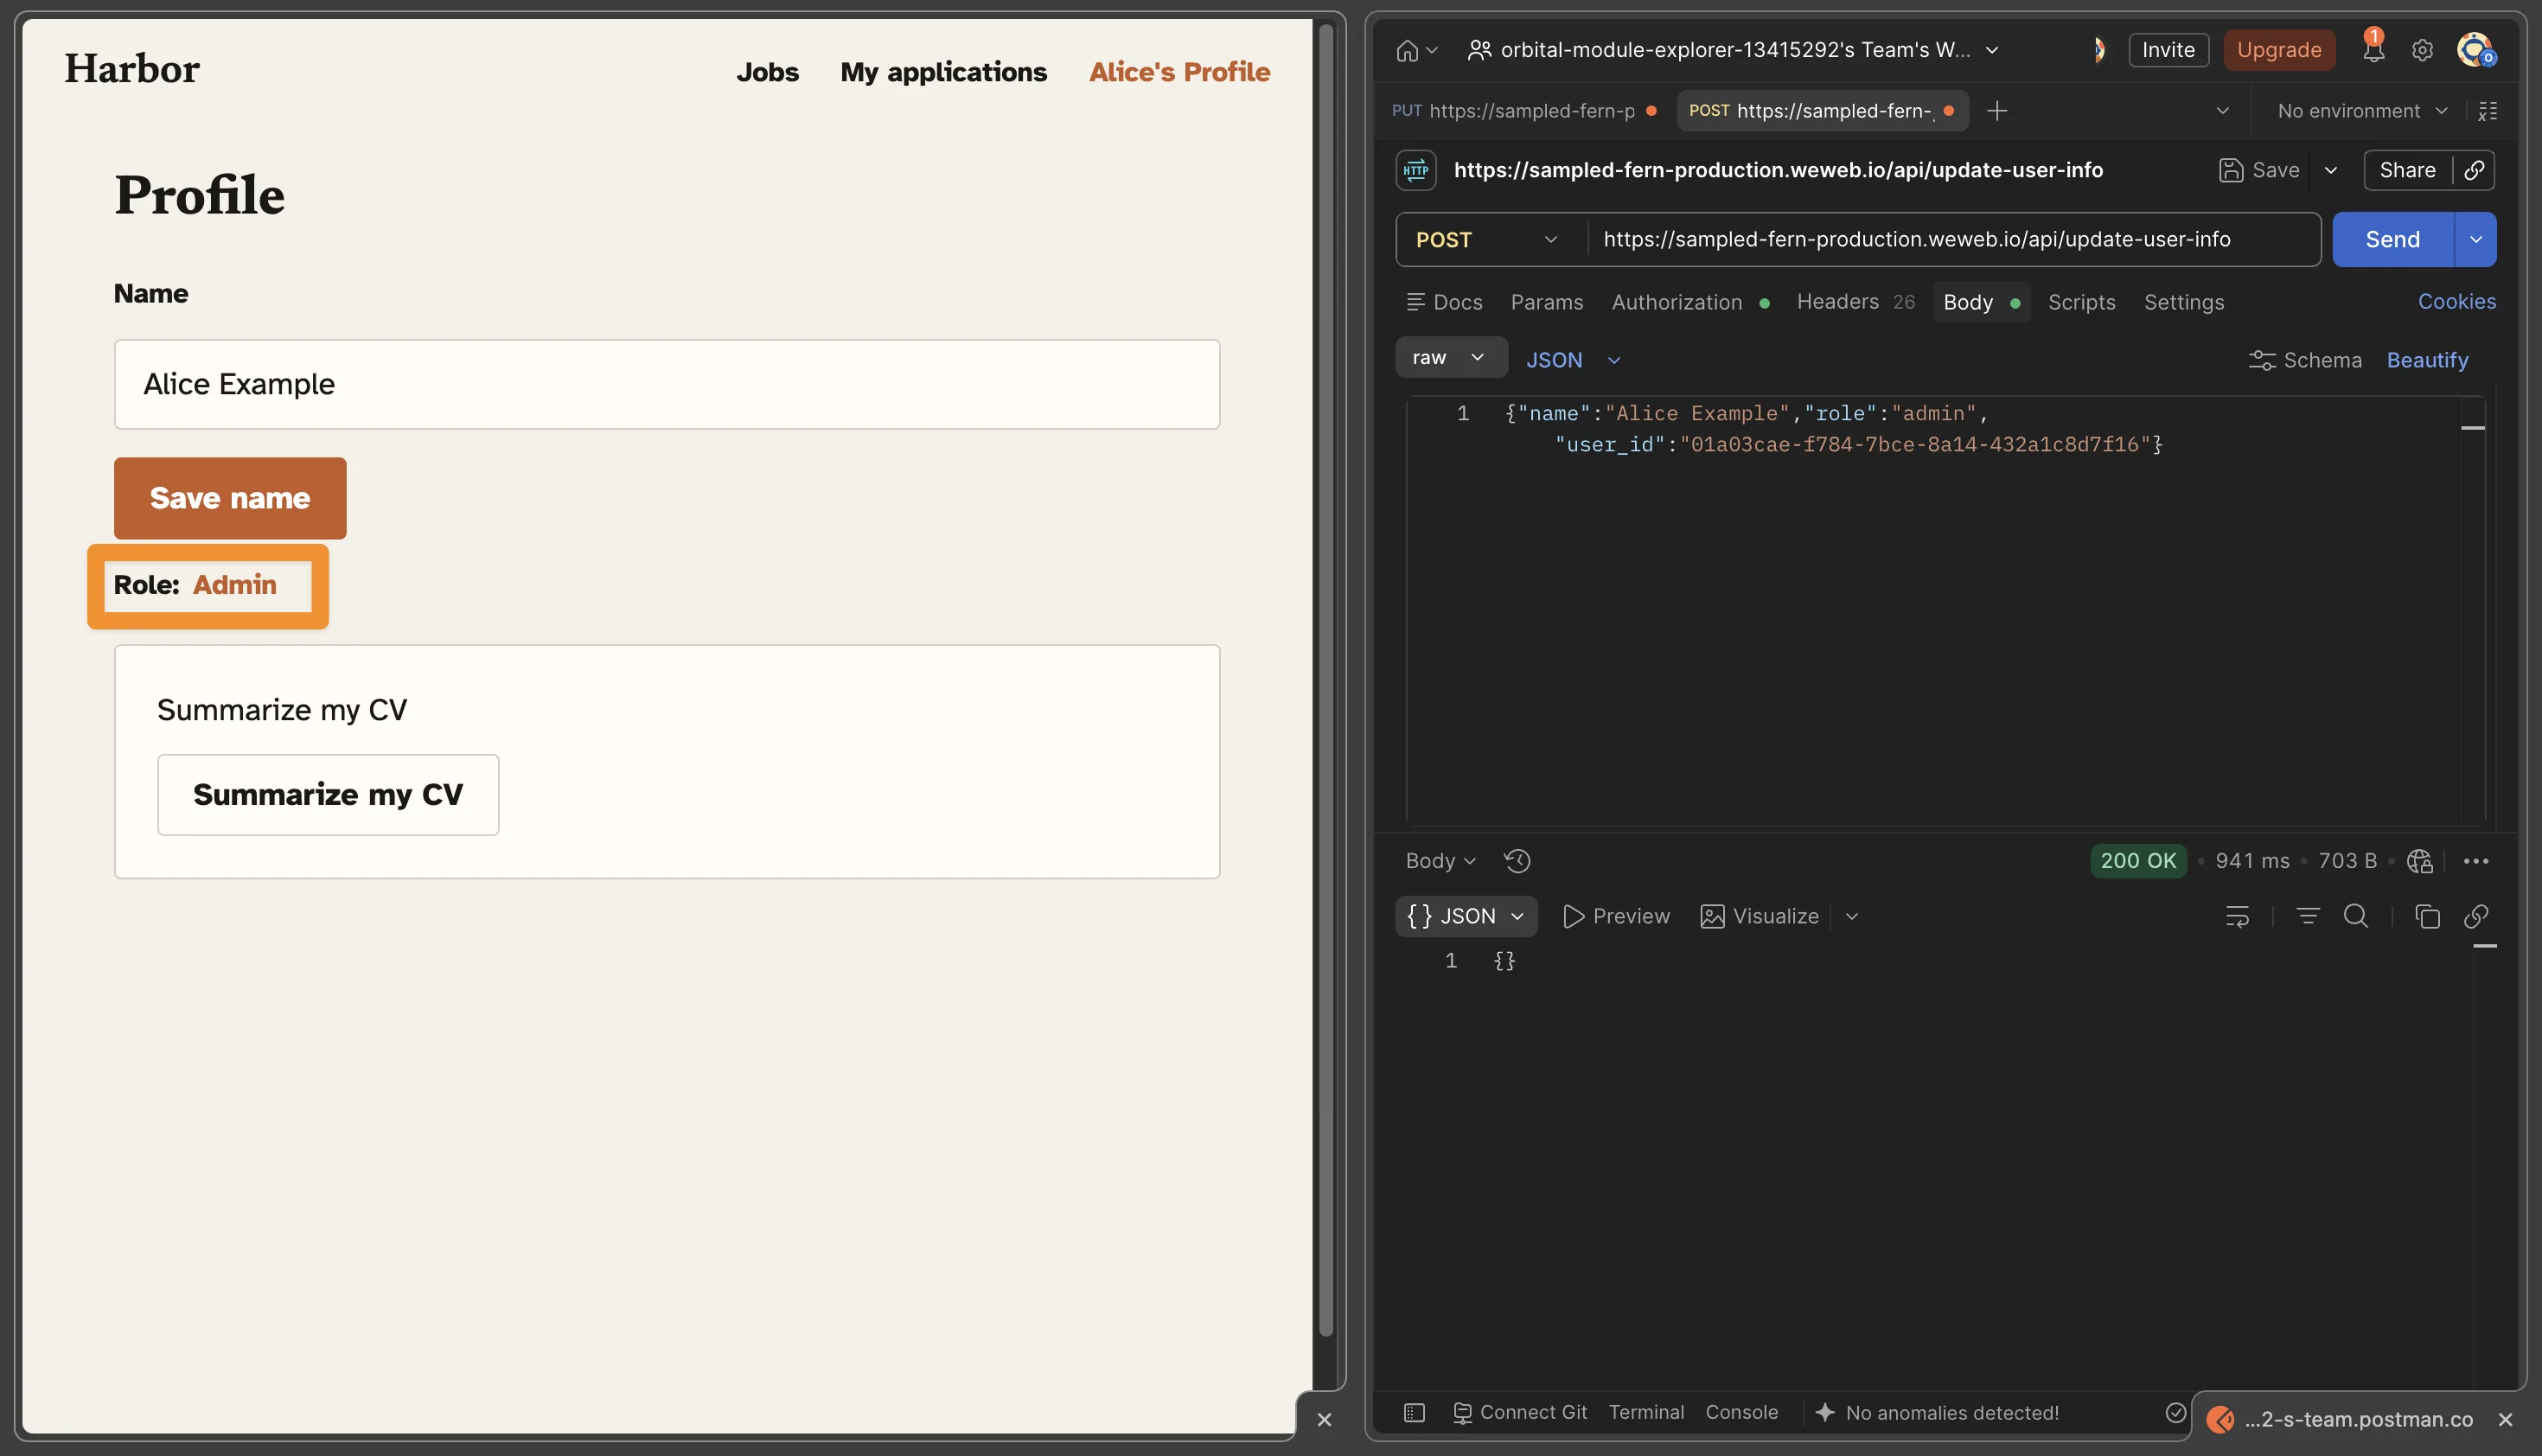
It worked, because the workflow behind that form takes whatever the browser sends it and passes the lot to the user record. Nobody ever wrote a rule saying "except roles." Alice signed out, signed back in, and the admin page opened for her, along with everything behind it.
The fix
One thing went wrong, and it needs closing in two places.
Decide which fields each operation is allowed to write. Not whether the values look sensible, but whether that operation has any business touching that field at all. A profile form updates a name. It should be incapable of setting a role, an owner, a workspace or a billing status, no matter what arrives in the request.
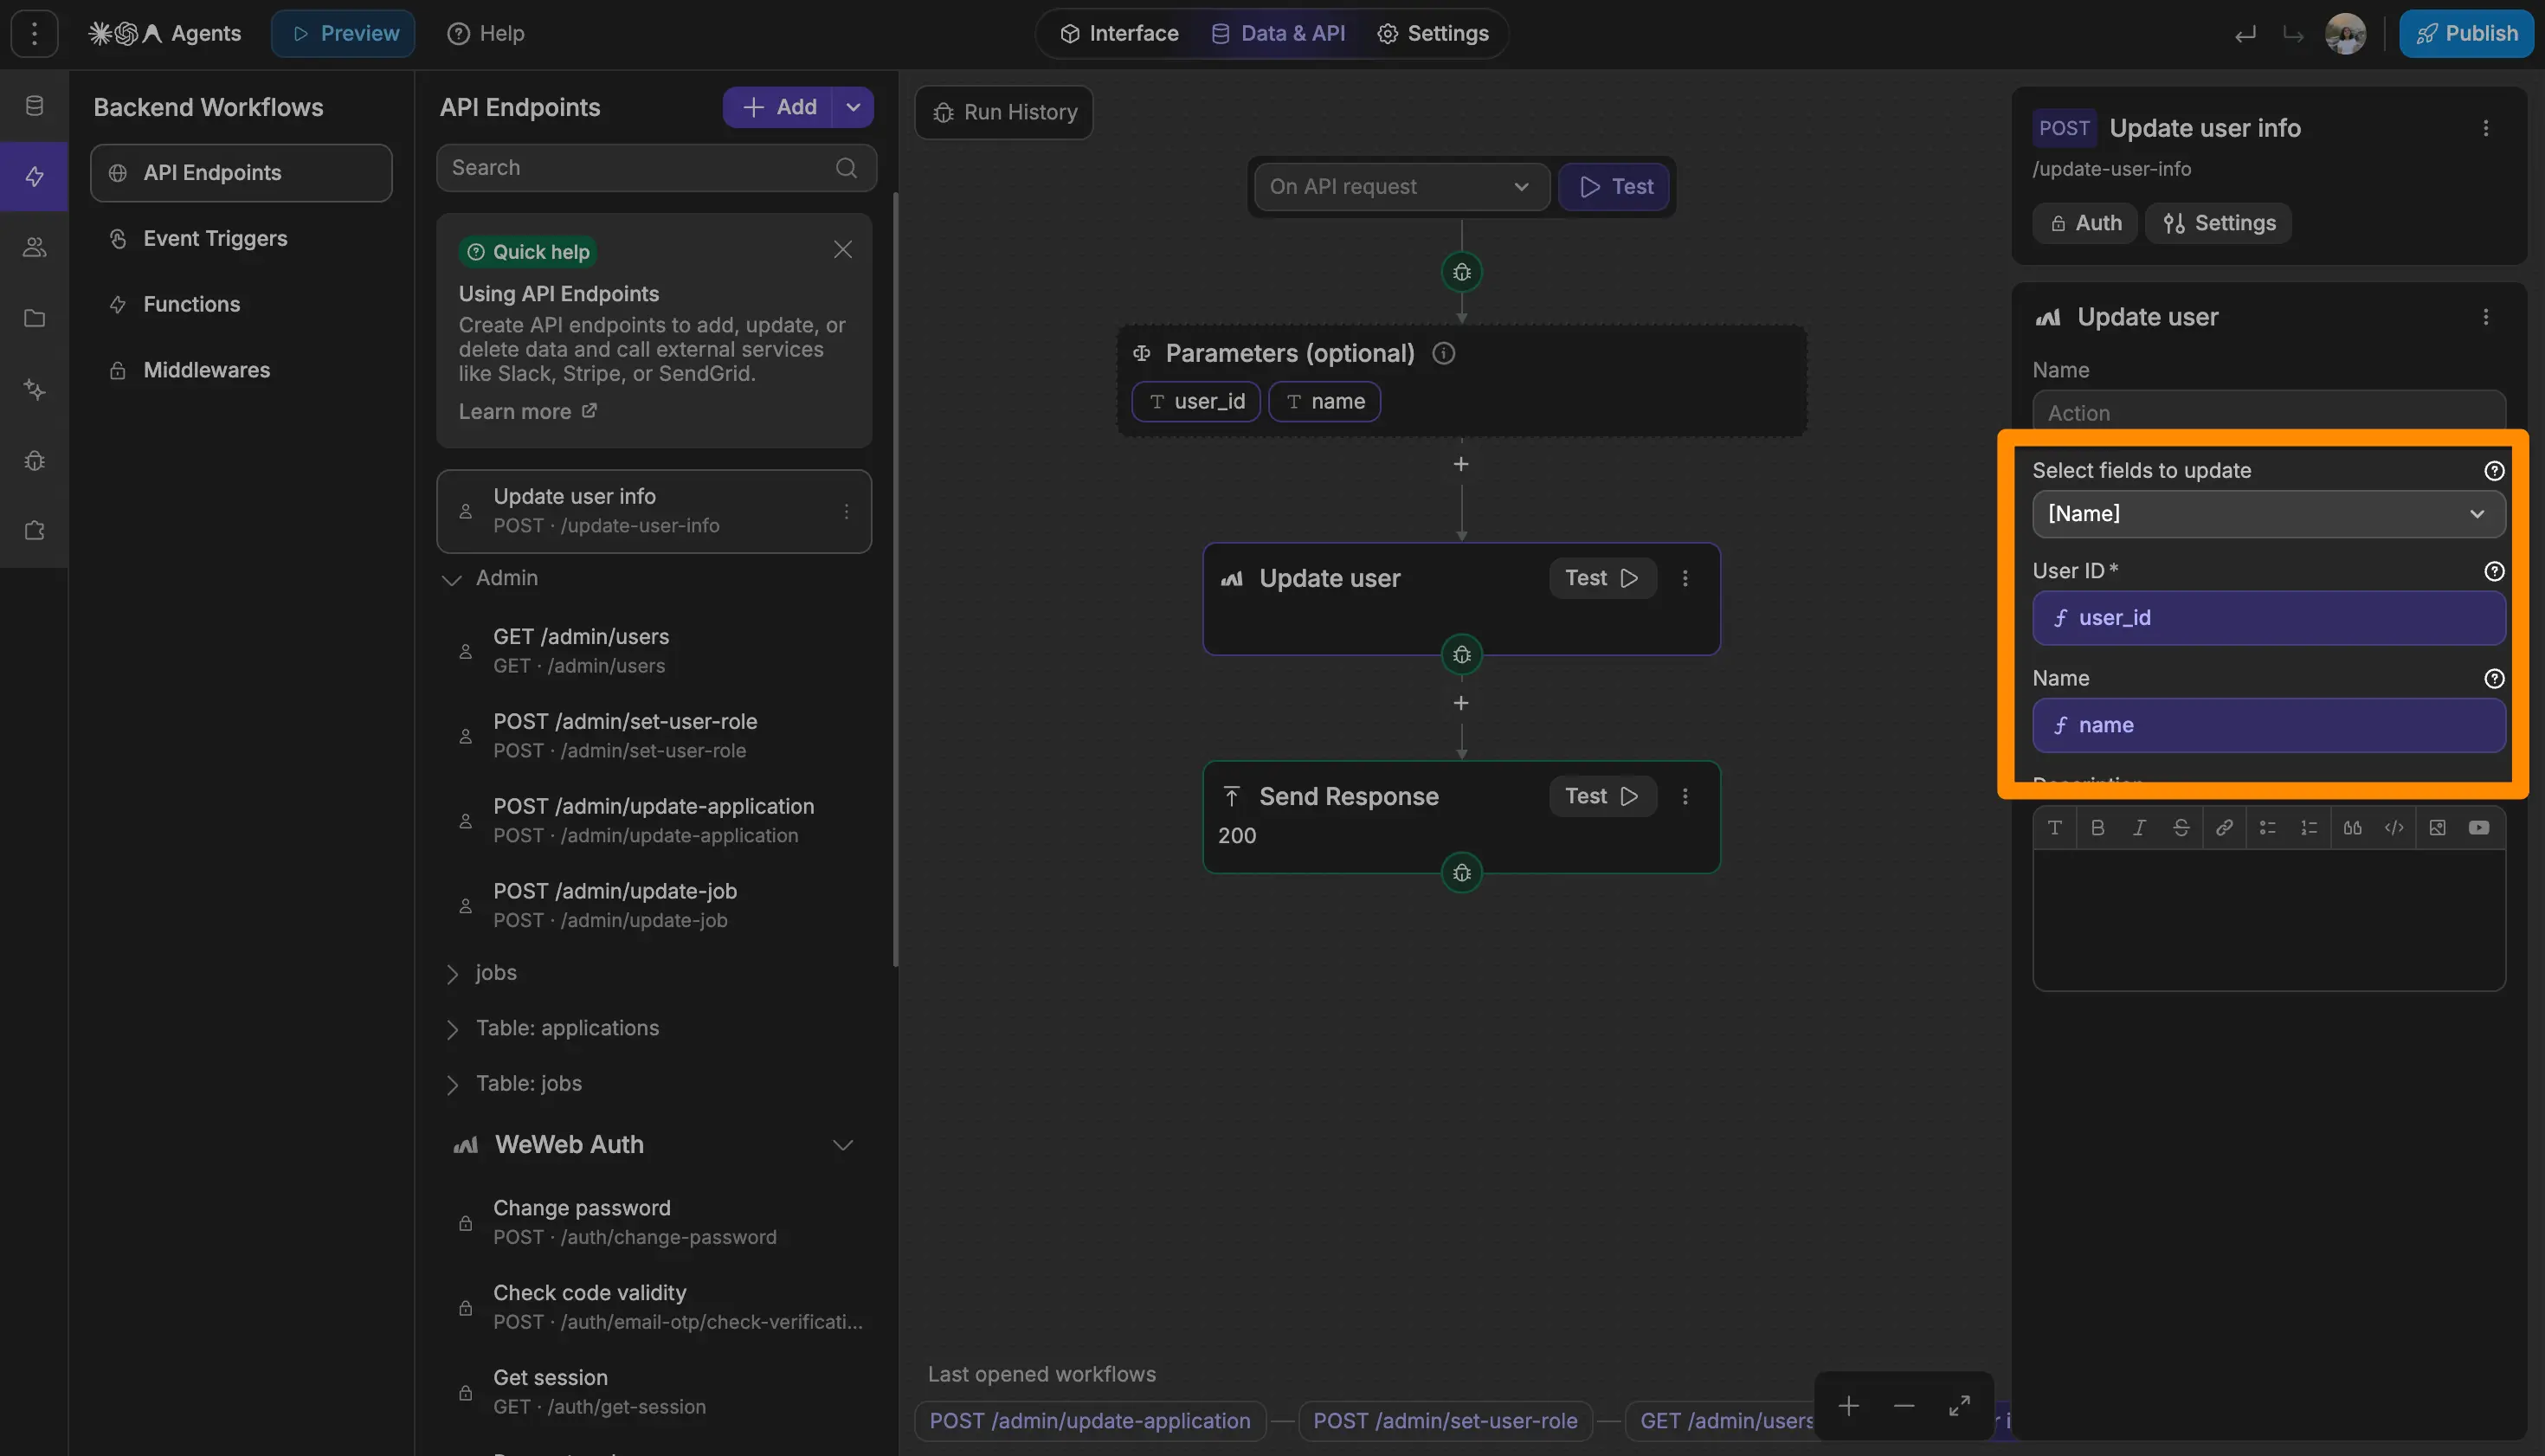
Make the role actually load-bearing. Every admin resource should check the role on the server rather than relying on a hidden page to keep people out. In WeWeb's backend you can restrict a Table View or API Endpoint to the admin role directly. For anything beyond a flat role check, put the logic in a middleware workflow that runs before the operation, so every route into that resource is covered rather than each one separately.
You should still restrict pages to roles, hide elements conditionally and redirect people who shouldn't be there, because it makes for a much better app. Be clear with yourself about what that is, though: it's the interface, not the lock. Someone who never loads your admin page can still call the endpoint behind it.
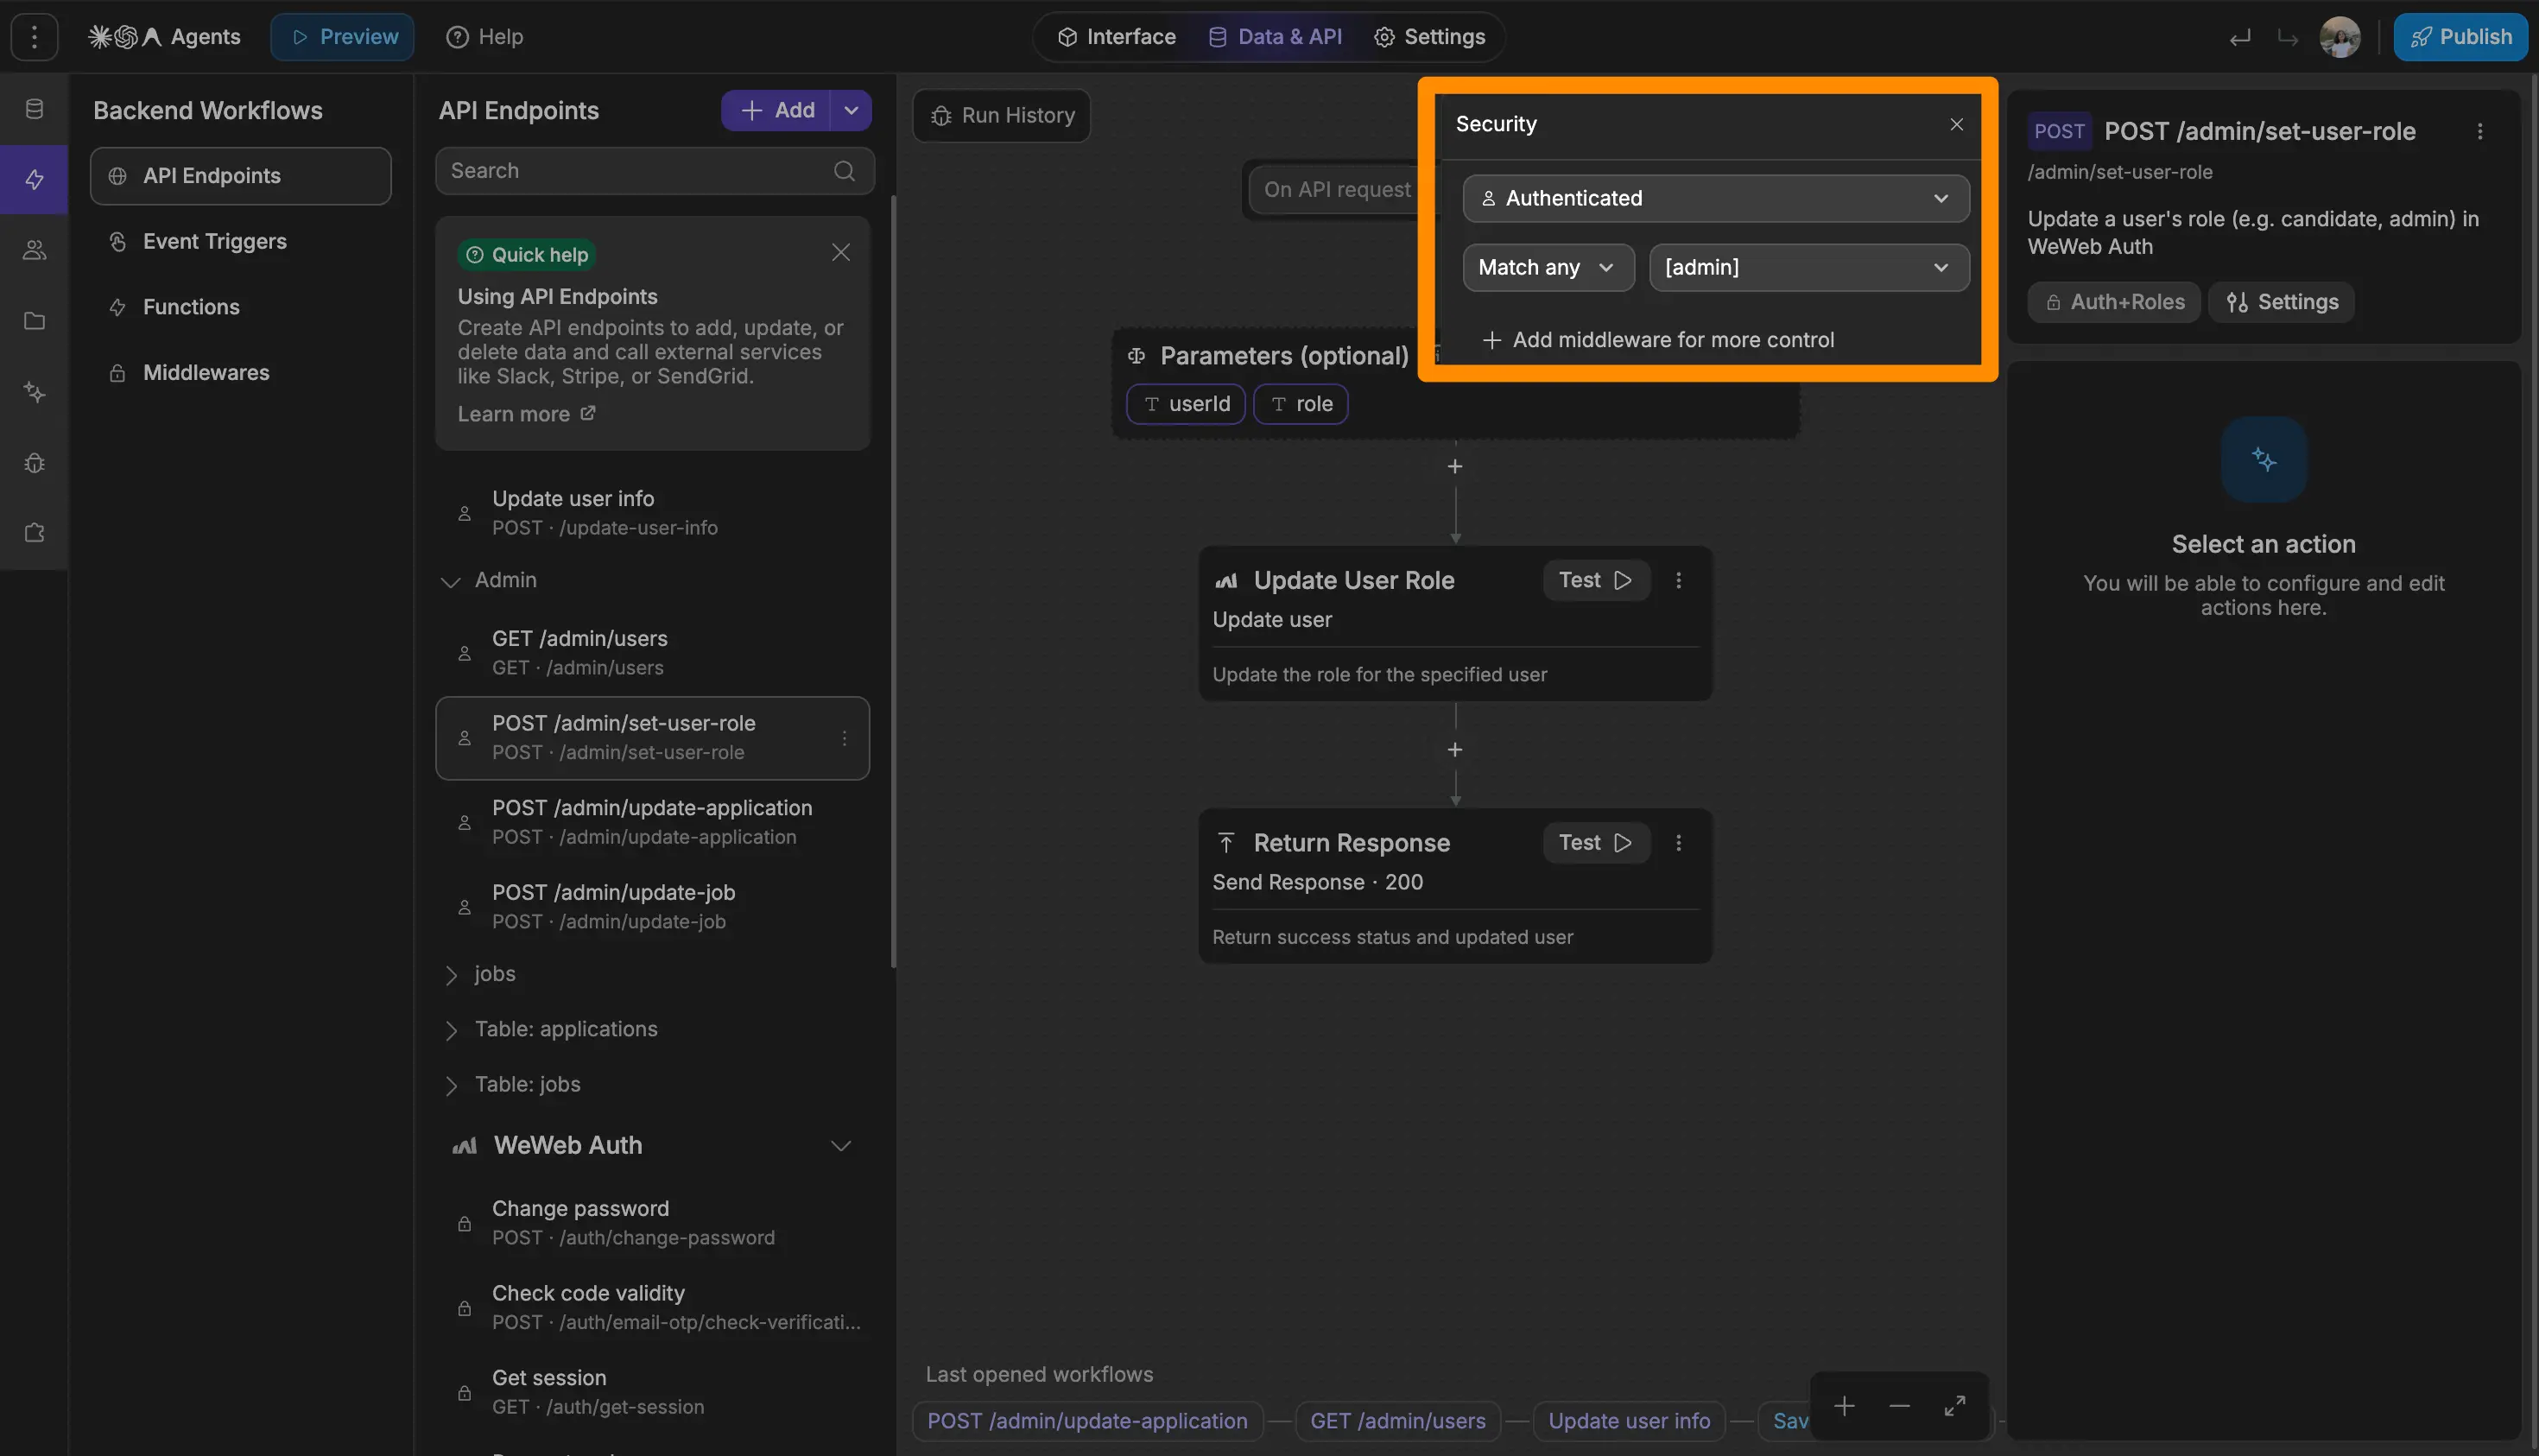
If your backend is Supabase, write the admin policy against the user's role rather than their ID, either from a custom claim on the token or by joining the table that holds roles. Check separately that a user can't update their own role column, because that's the same hole in a different place.
If your backend is Xano, add a function to your admin endpoints that checks for admin rights and returns an error if they're missing.
Test it
As Alice, capture the profile update from the Network panel as cURL, paste it into Postman, add roles: ["admin"] to the payload, send. It should silently drop the field or be rejected outright, and her account should still be a candidate afterwards. Then call an admin endpoint directly as Alice: it should refuse her.
🔥 Pro tip: run the same tests as Ada, our admin account. It's surprisingly easy to lock a feature down so thoroughly that your actual admins can't use it either.
Vulnerability 5: Your API keys are exposed
The mistake
We wanted our job board to summarize a candidate's CV, so we built an AI summarization workflow and wired it to a button. On click, the workflow triggers a REST API call from the frontend to the AI provider, with the API key in the Authorization header.
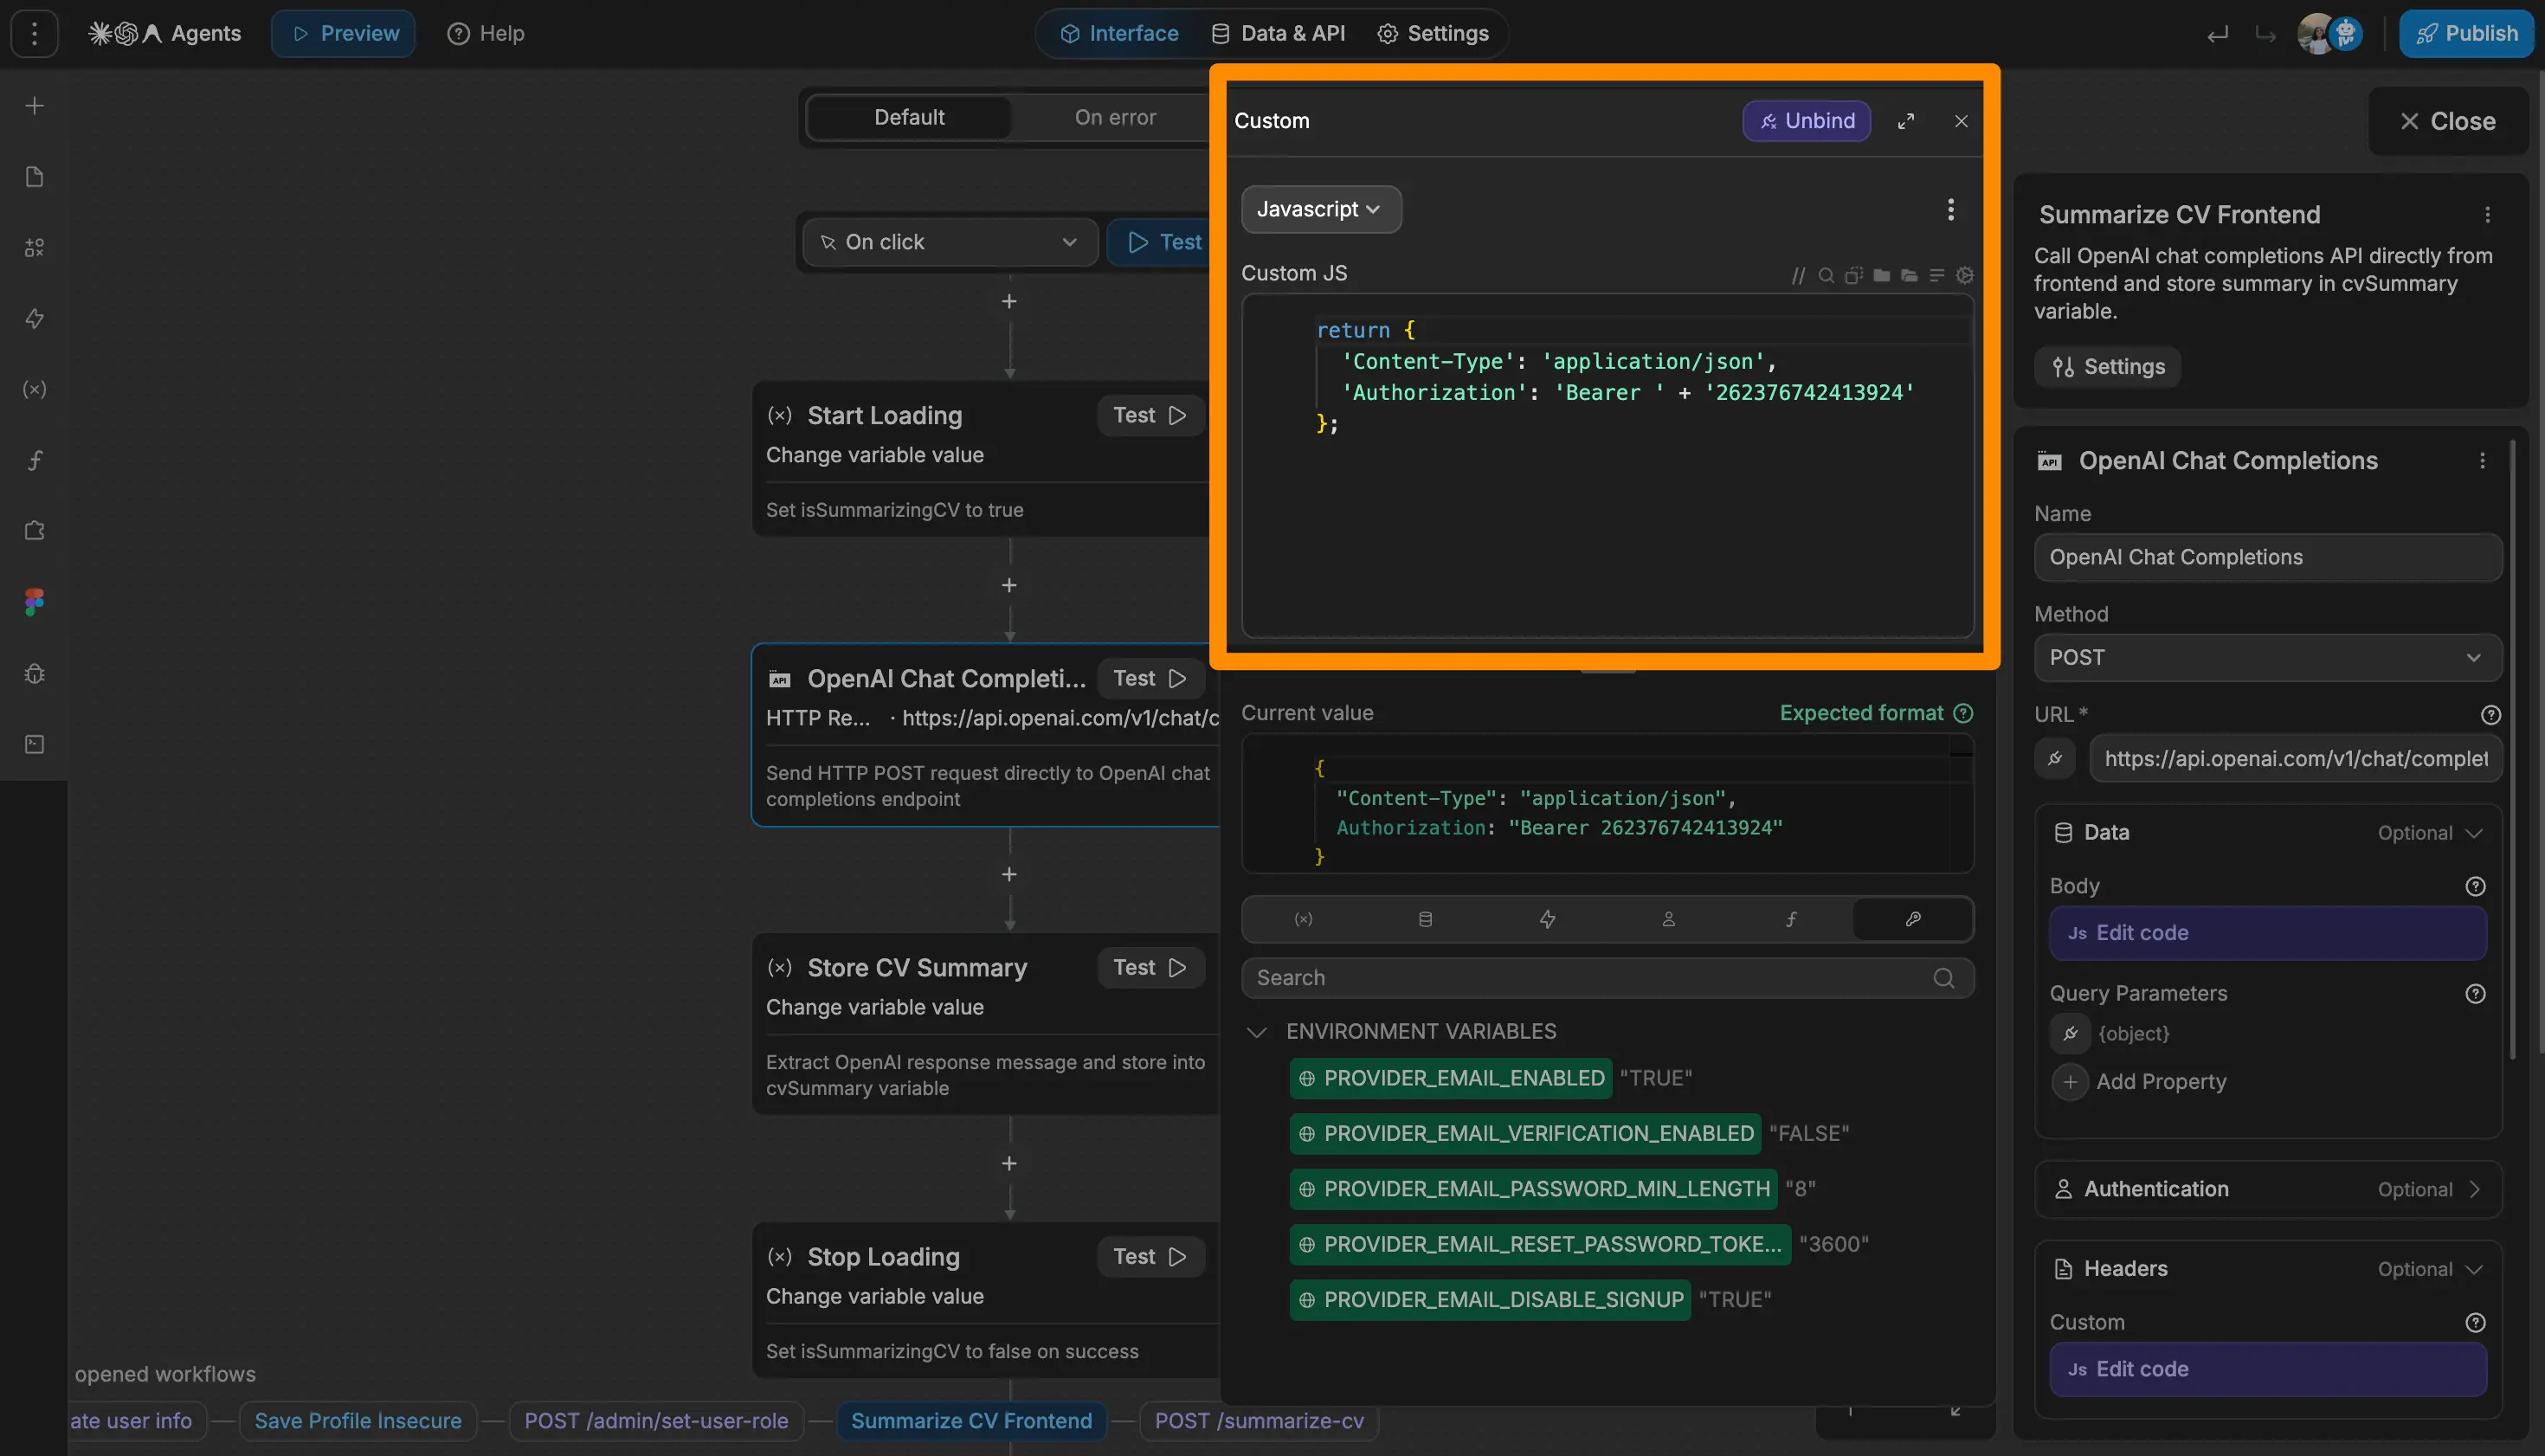
The page sits behind a login, only signed-in users can trigger the workflow, and your platform is secure. All of that is true, but your API key is still readable by anyone who signs up.
The call runs in the browser, not in your backend. A login controls who gets into your app, not what their browser can see once they're in. Open the Network panel and the whole operation is there: the provider you're calling, the CV you're sending it, the response that comes back, and the key that authorises the request.
Two things go wrong, and the second is the expensive one. Your key is out in the open, and once somebody copies it they can run their own workloads on your bill until you notice.
Security teams call this a hard-coded credential or exposed secret: a private key shipped somewhere the user can read it.
The fix
The fix is to move the call out of the page and into a backend workflow, where the browser can't see it.
Start with WeWeb's native integrations. If the service you need is already there, connect it once and add the action to your workflow. WeWeb holds the credential for you, so there's nothing in your app for anyone to find. If the tool you're looking for isn't on the list yet, let us know :)
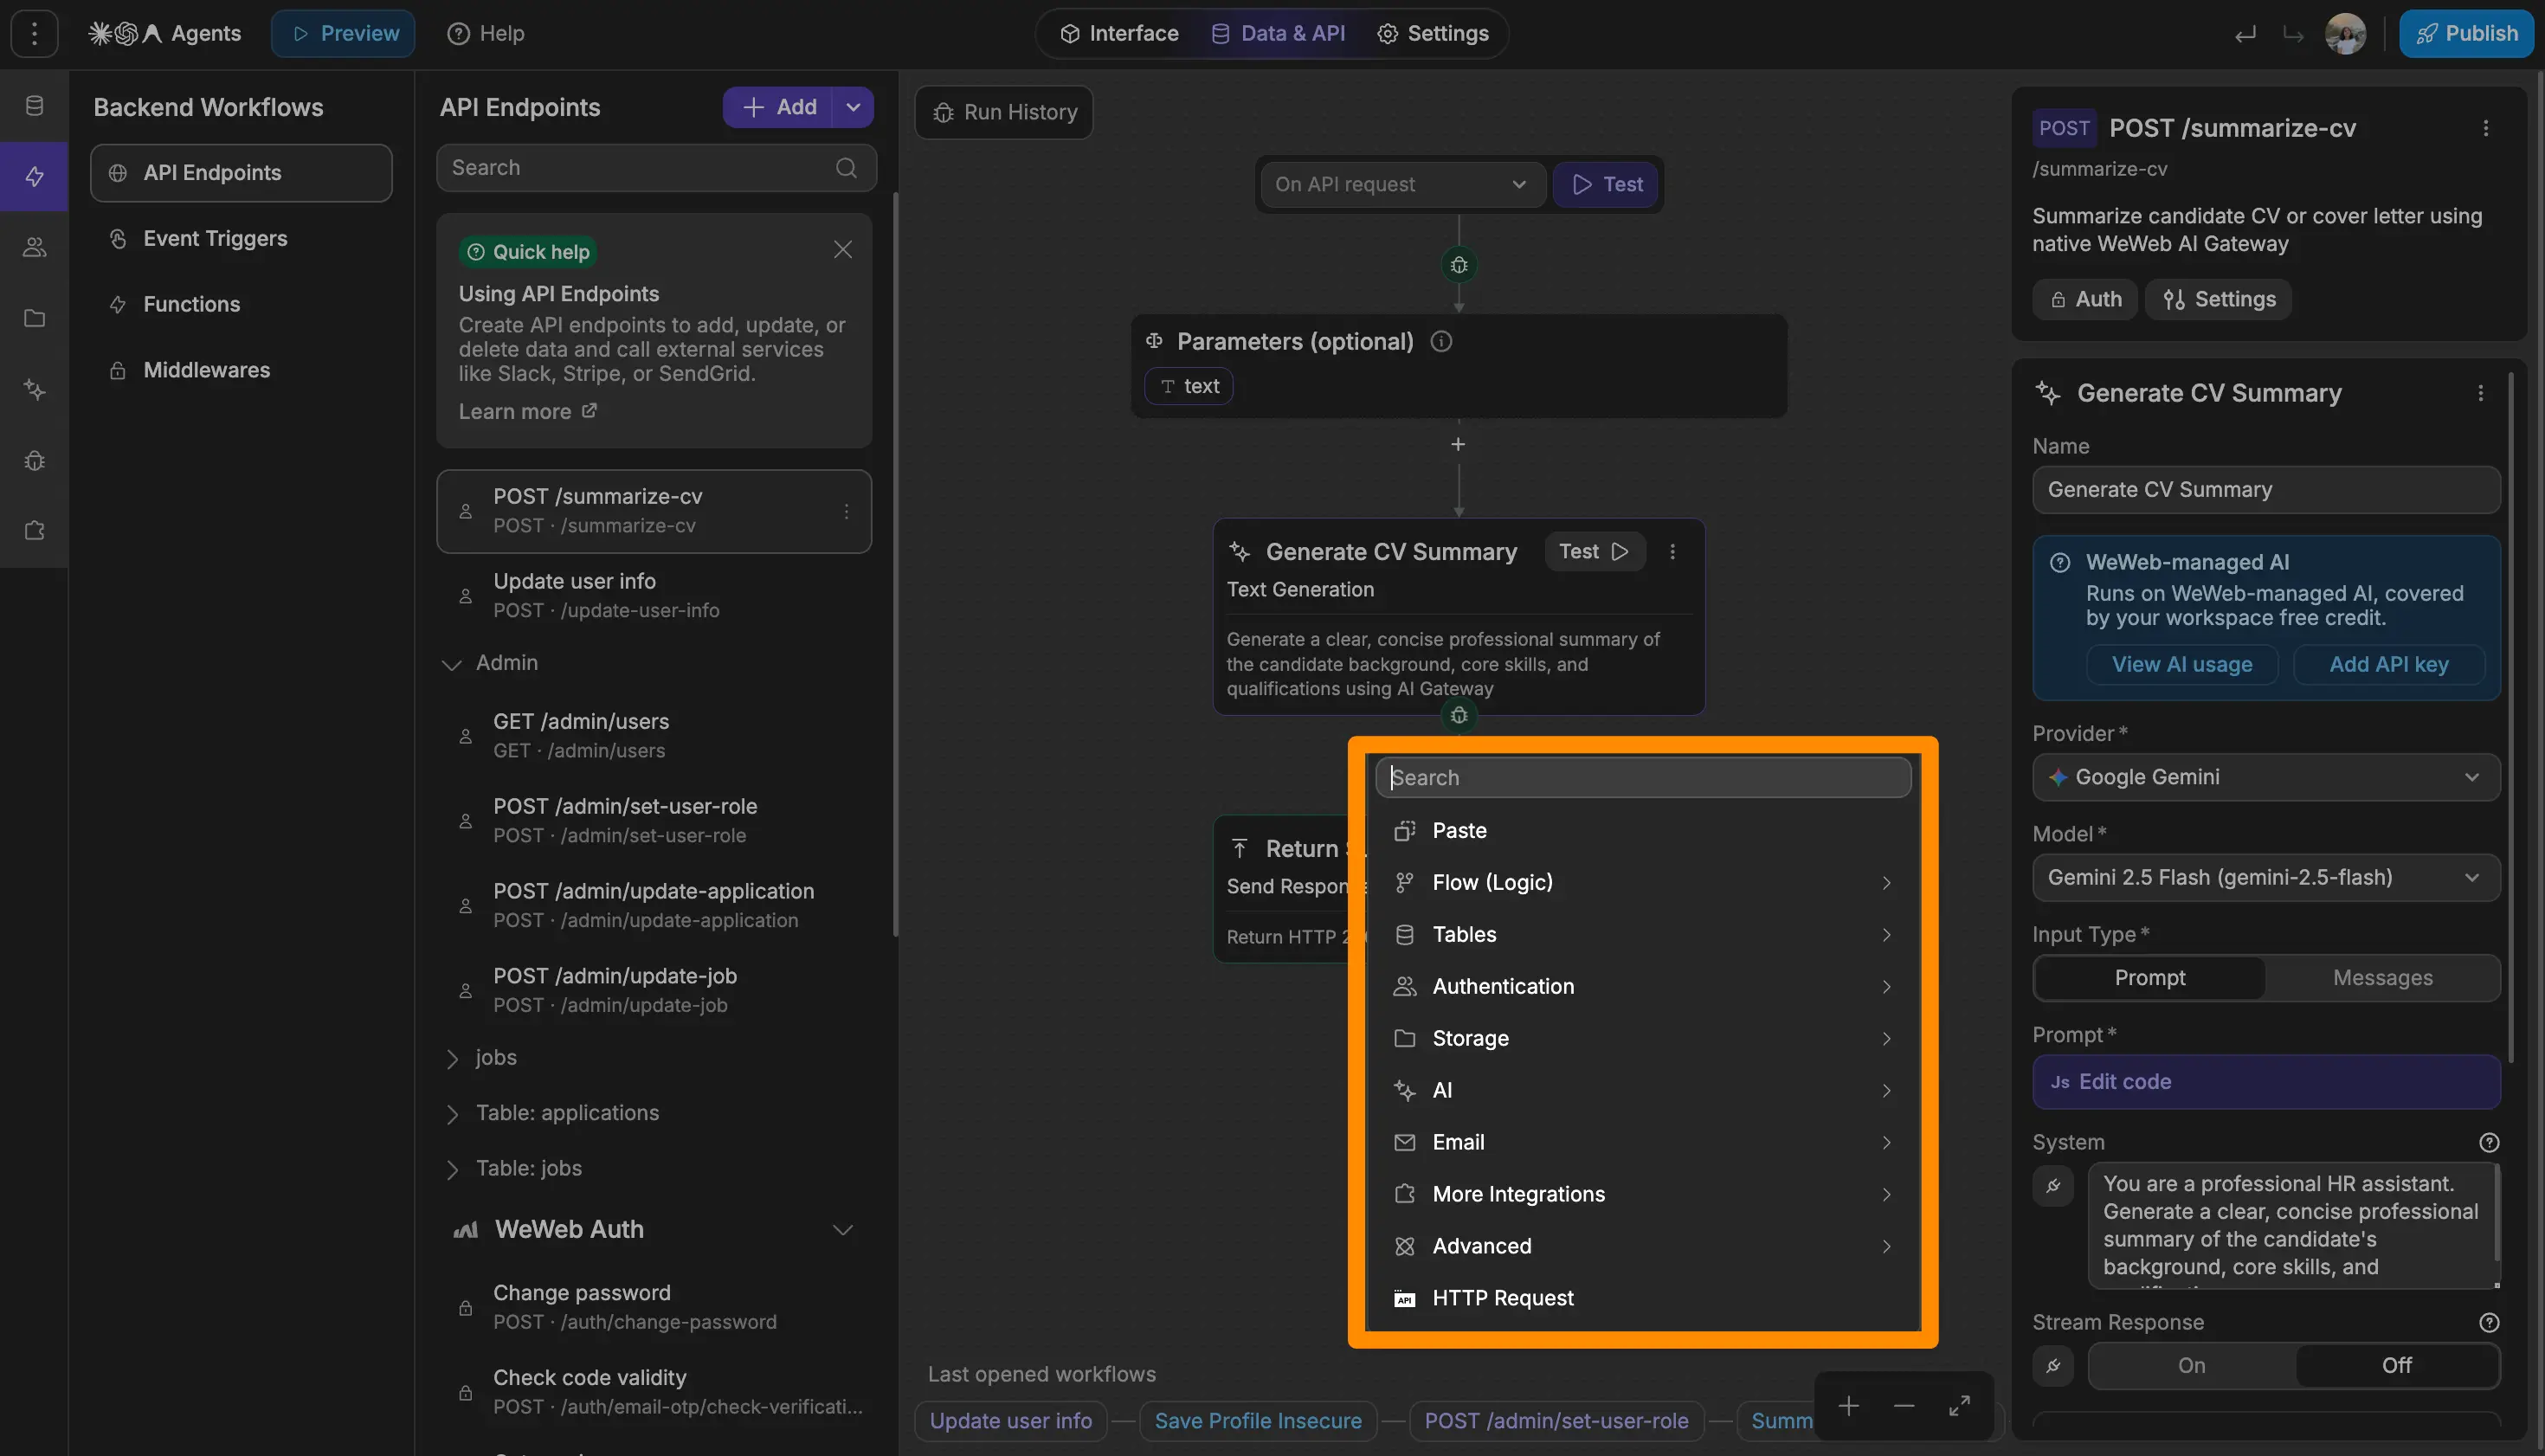
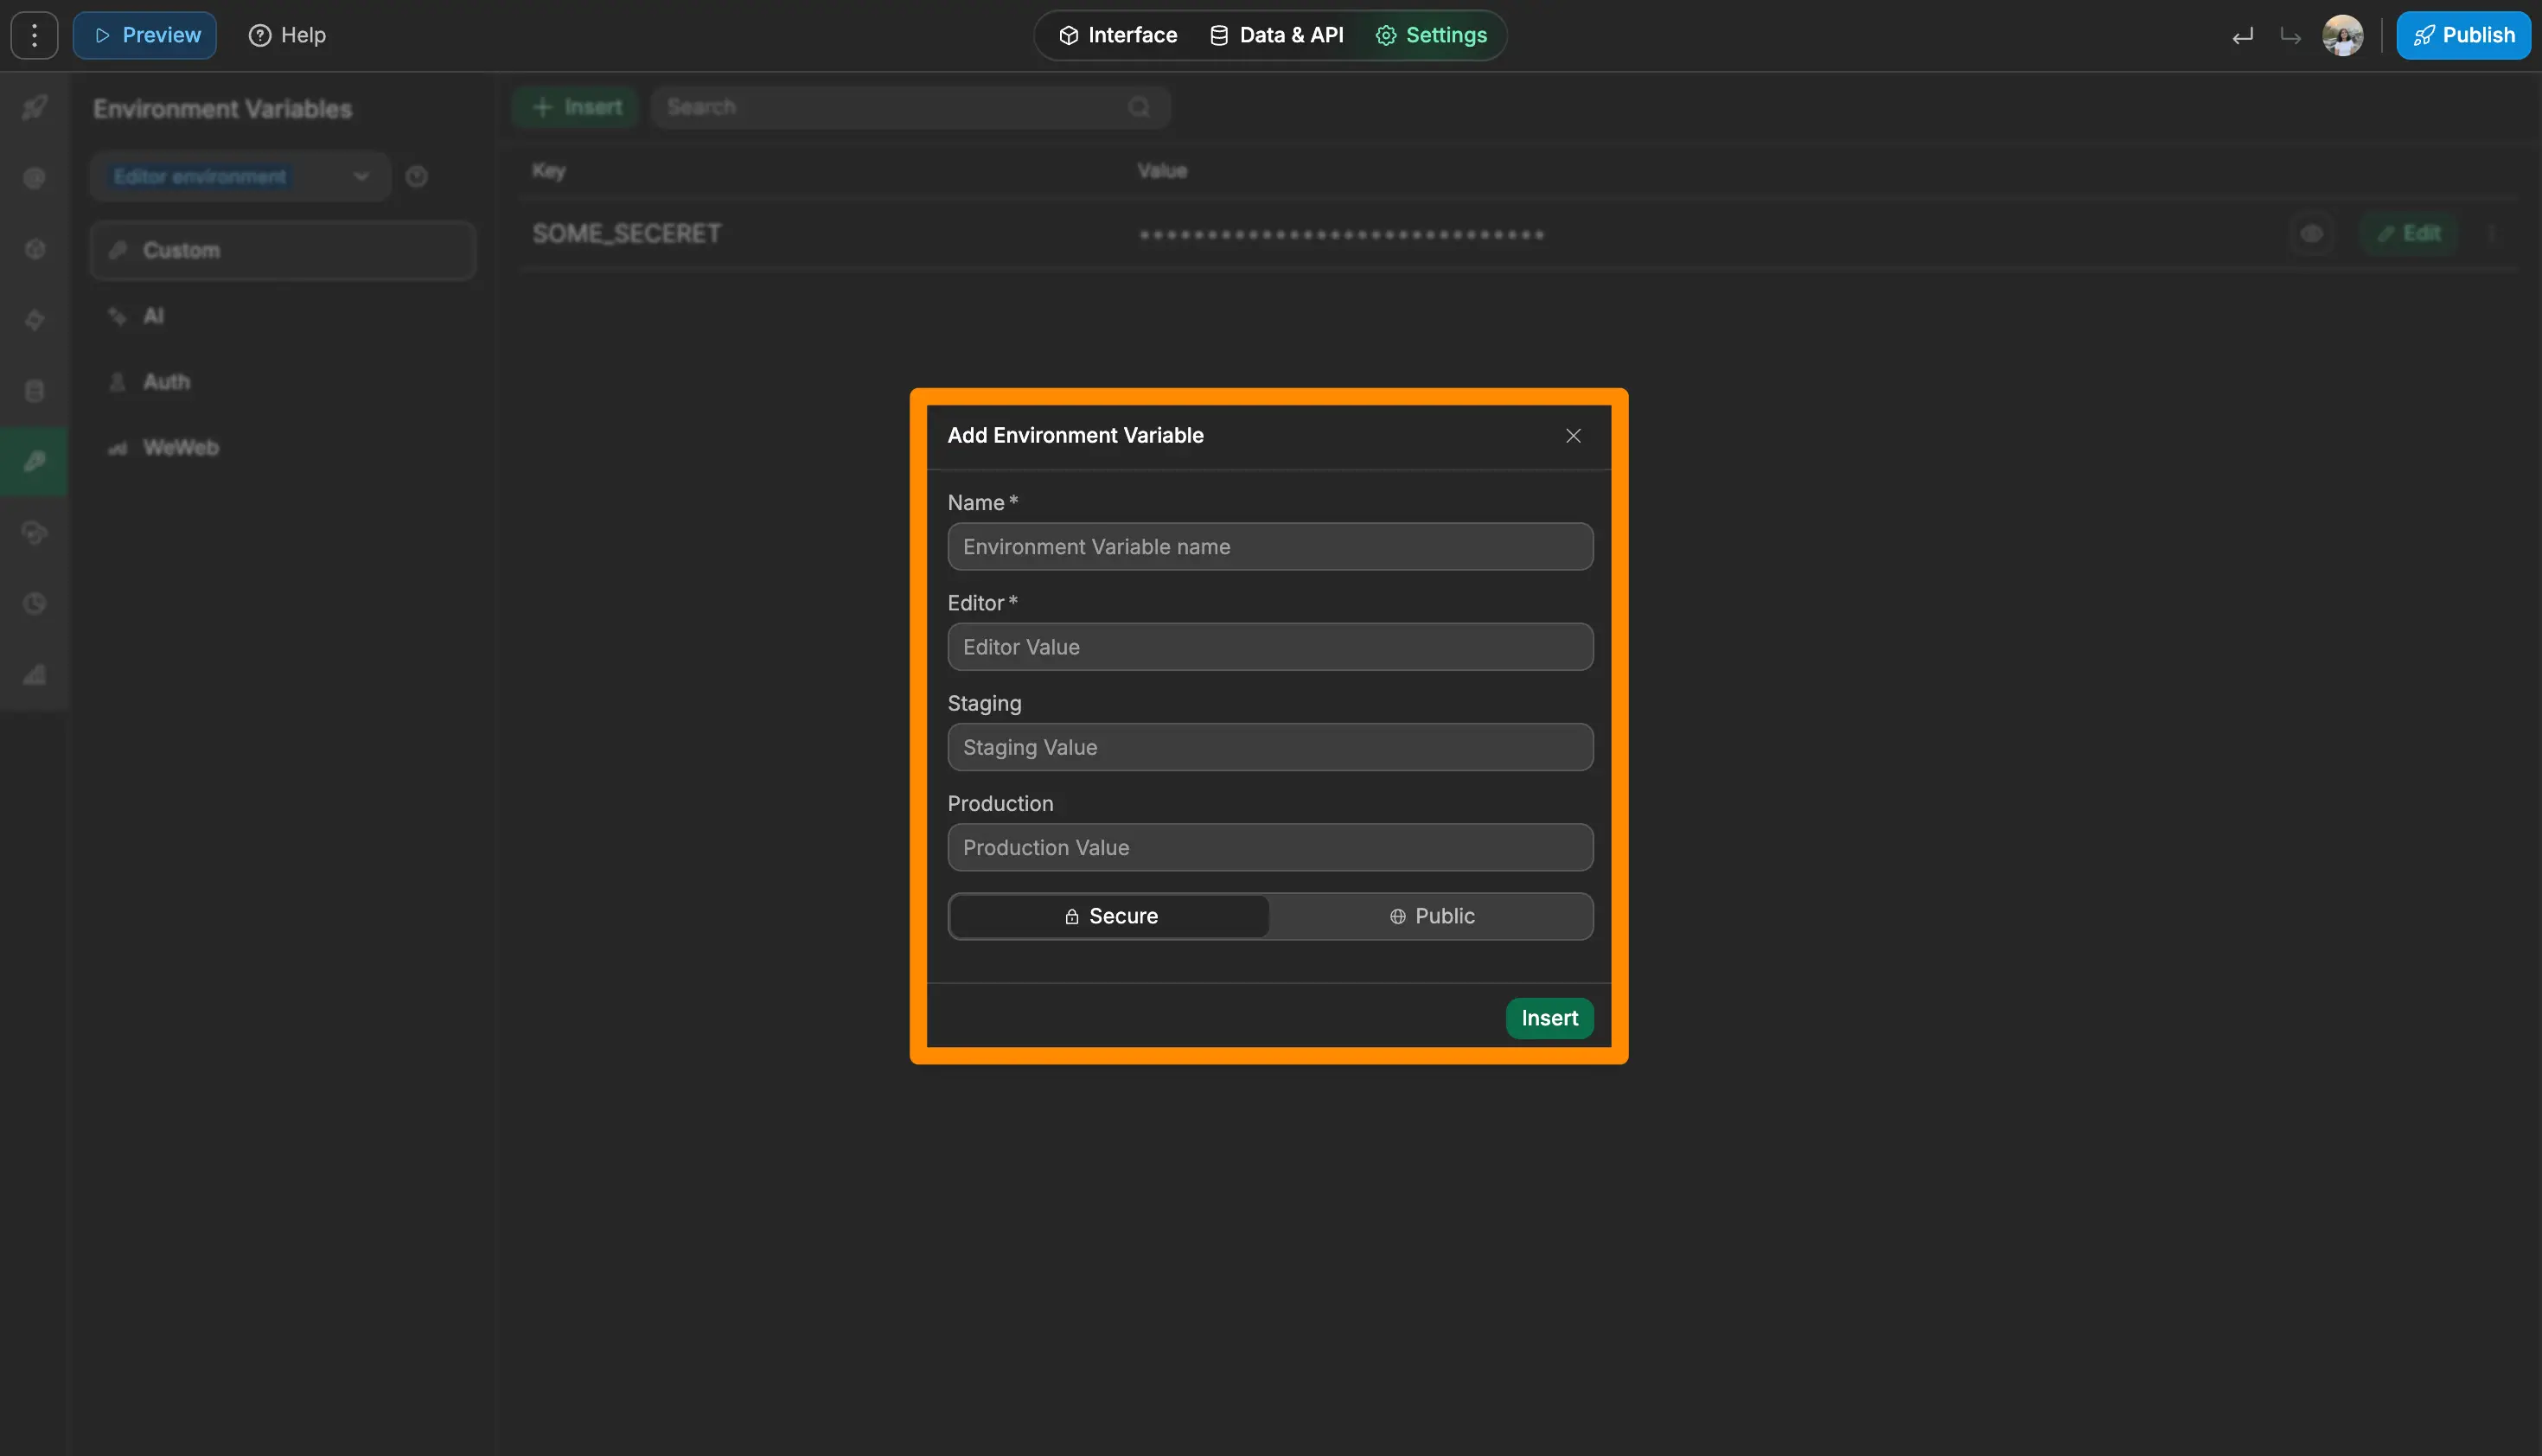
Otherwise, use an HTTP request inside a Backend Workflow. Save your key as an environment variable and reference it in the request header. Your page calls the workflow, the workflow calls the provider, and the key stays out of the browser.
If your backend is Supabase, store the key as a secret and call the provider from an Edge Function rather than from the page.
If your backend is Xano, store it as an environment variable and make the call from a Xano function.
🔥 Pro tip: environment variables are the right home for anything sensitive, not only API keys. Webhook signing secrets, connection strings, internal URLs and third-party account IDs all belong there.
Test it
Click "Summarize CV" with the Network panel open. The only request leaving the browser should go to your own backend, and no request header, payload or JavaScript file should contain the provider's key.
Vulnerability 6: Your backend trusts whatever the frontend sends
The mistake
Our application form has a 500-character cover letter field and a dropdown with four job categories. Neither of those limits exists anywhere except in the browser.
We replayed the submission with a 2MB cover letter and a category called banana, and the backend stored both, because nothing had ever told it not to.
Security teams call this improper input validation. Its better-known cousin, cross-site scripting, is what happens when that unvalidated input is later rendered as HTML; the pro tip below covers it.
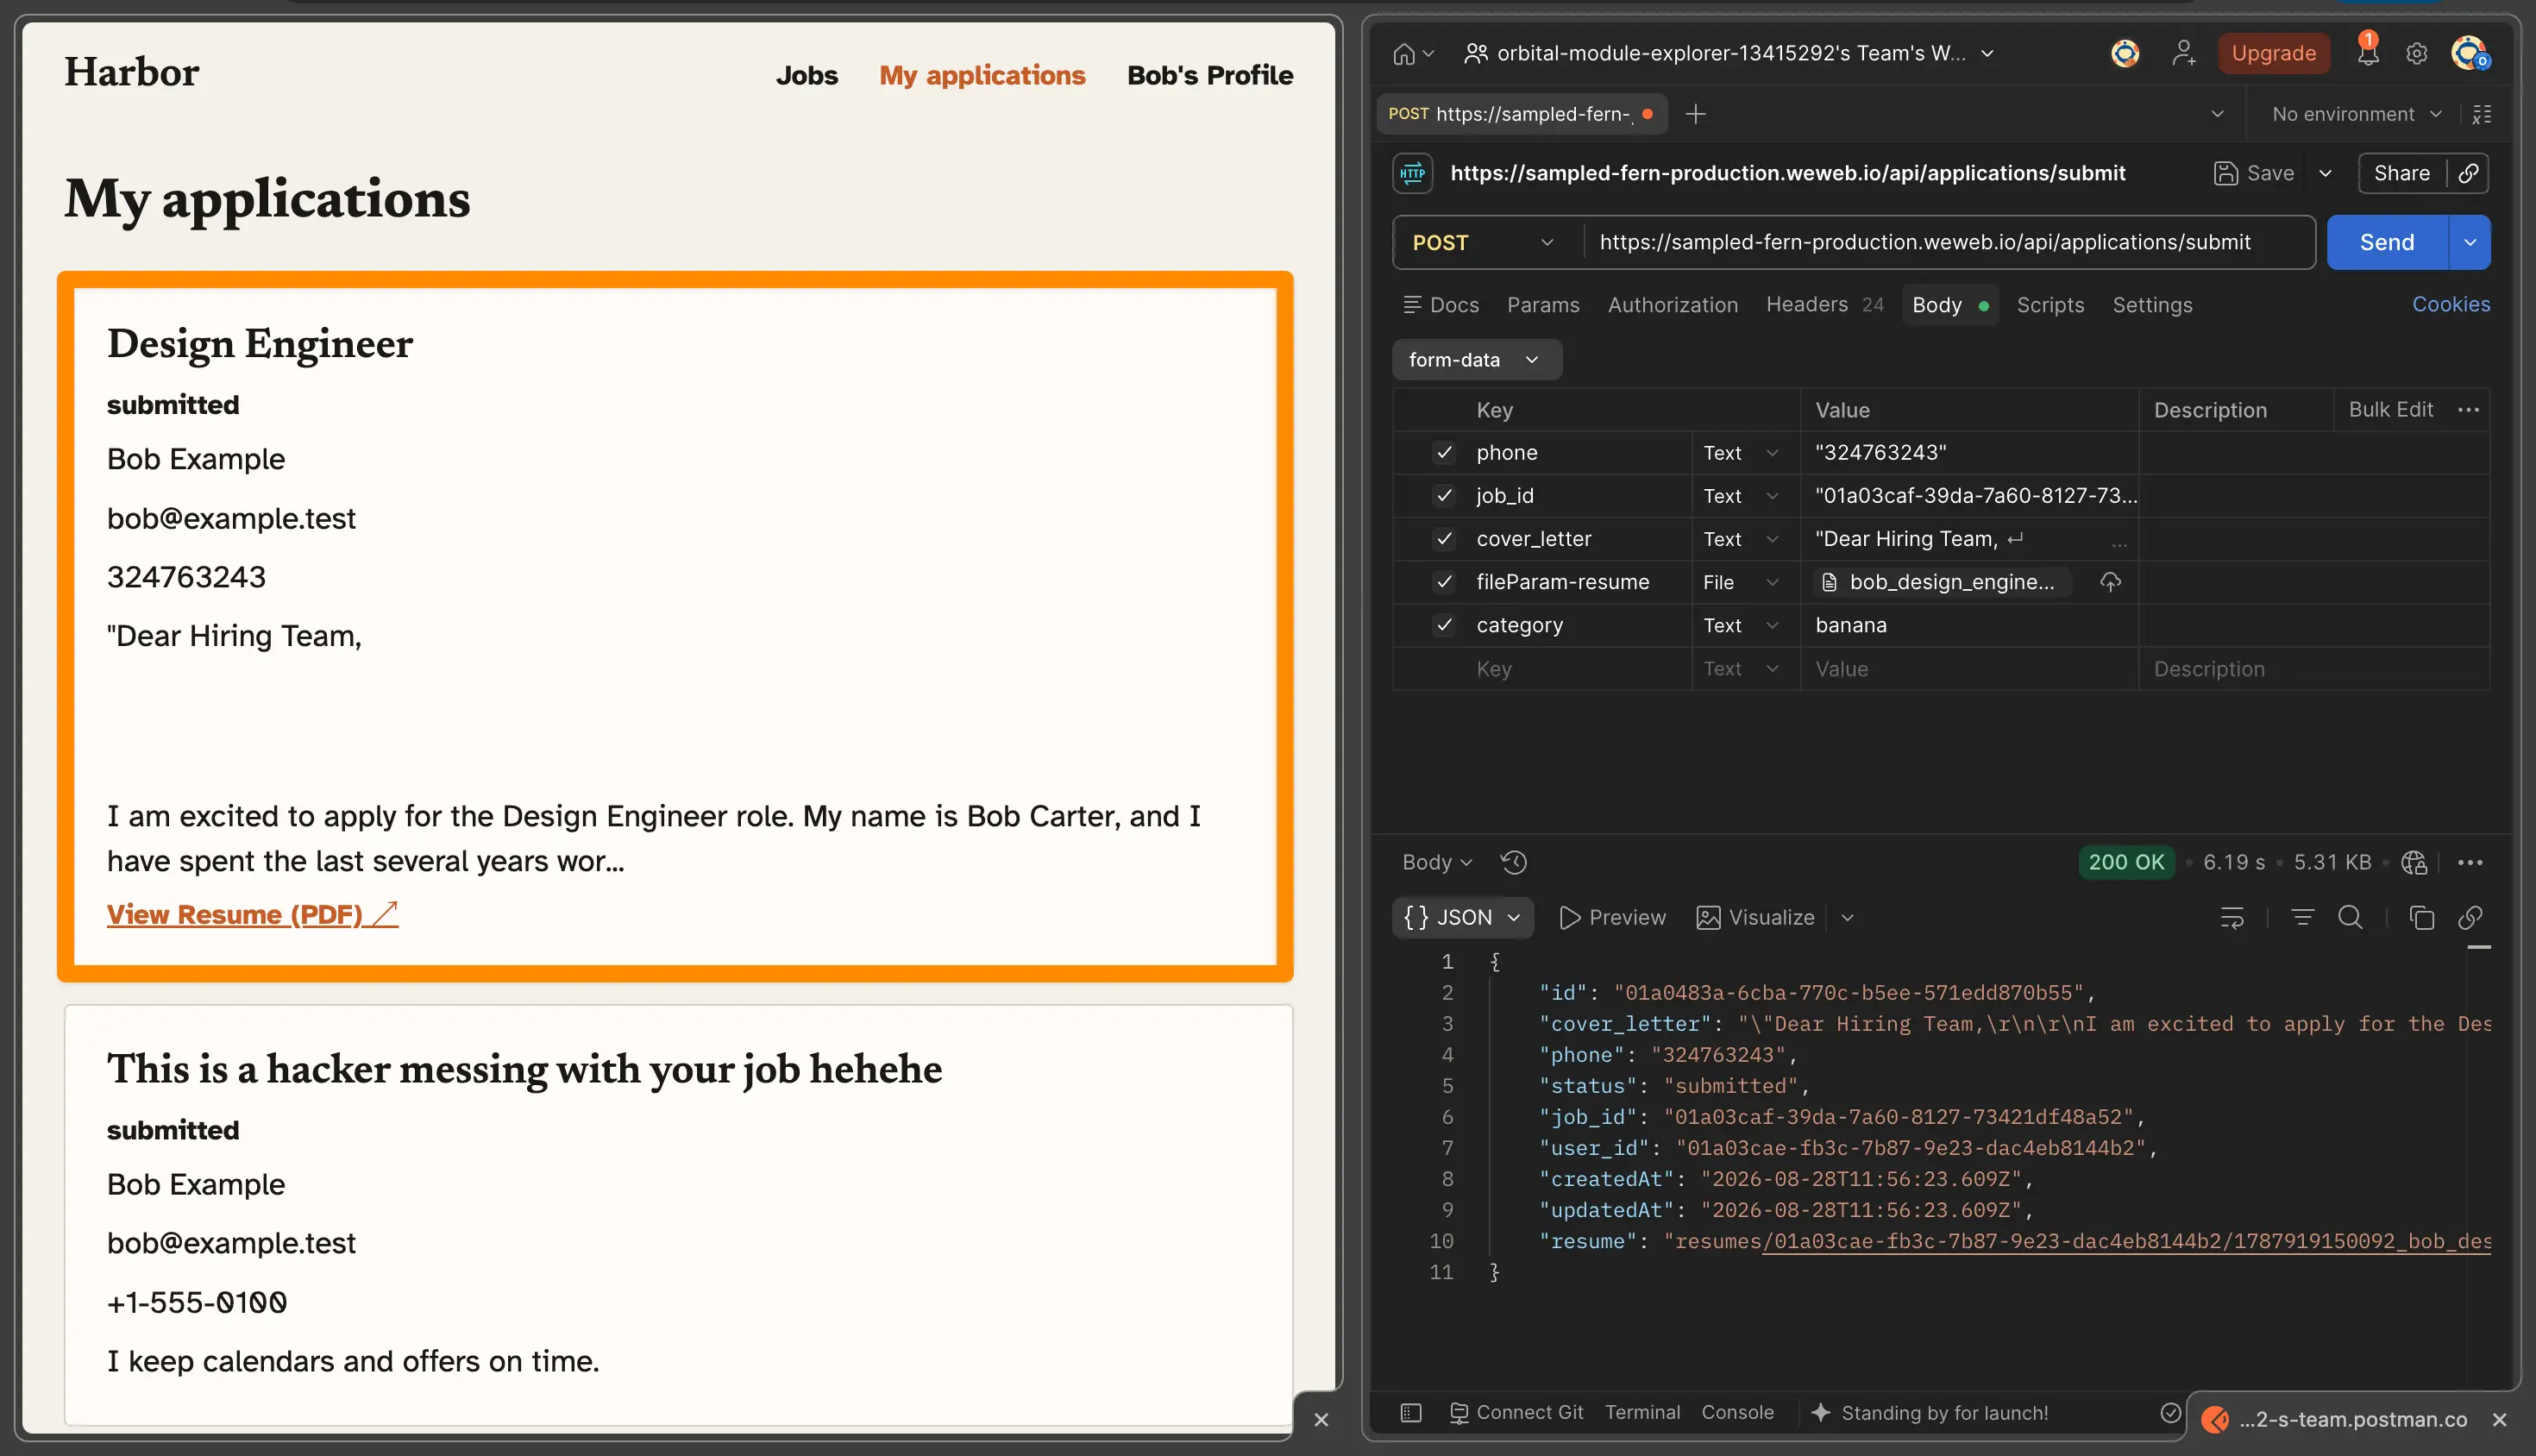
Form validation runs in the browser, while someone is filling in the form. The request we sent never went near the form, so none of those rules applied to it.
The fix
Validate in both places, because the two checks are doing different jobs.
In the frontend, use form validation. Required fields, character limits, a category chosen from a list. WeWeb's form container handles this, and it's what makes a form pleasant to fill in, because people find out about the problem while they're typing instead of after they submit.
In the backend, check it again. This is the layer nobody can skip. Before your workflow stores anything, sends an email or takes a payment, test what arrived: the cover letter is under 500 characters, the category is one of your four, the file is a PDF under 5MB.
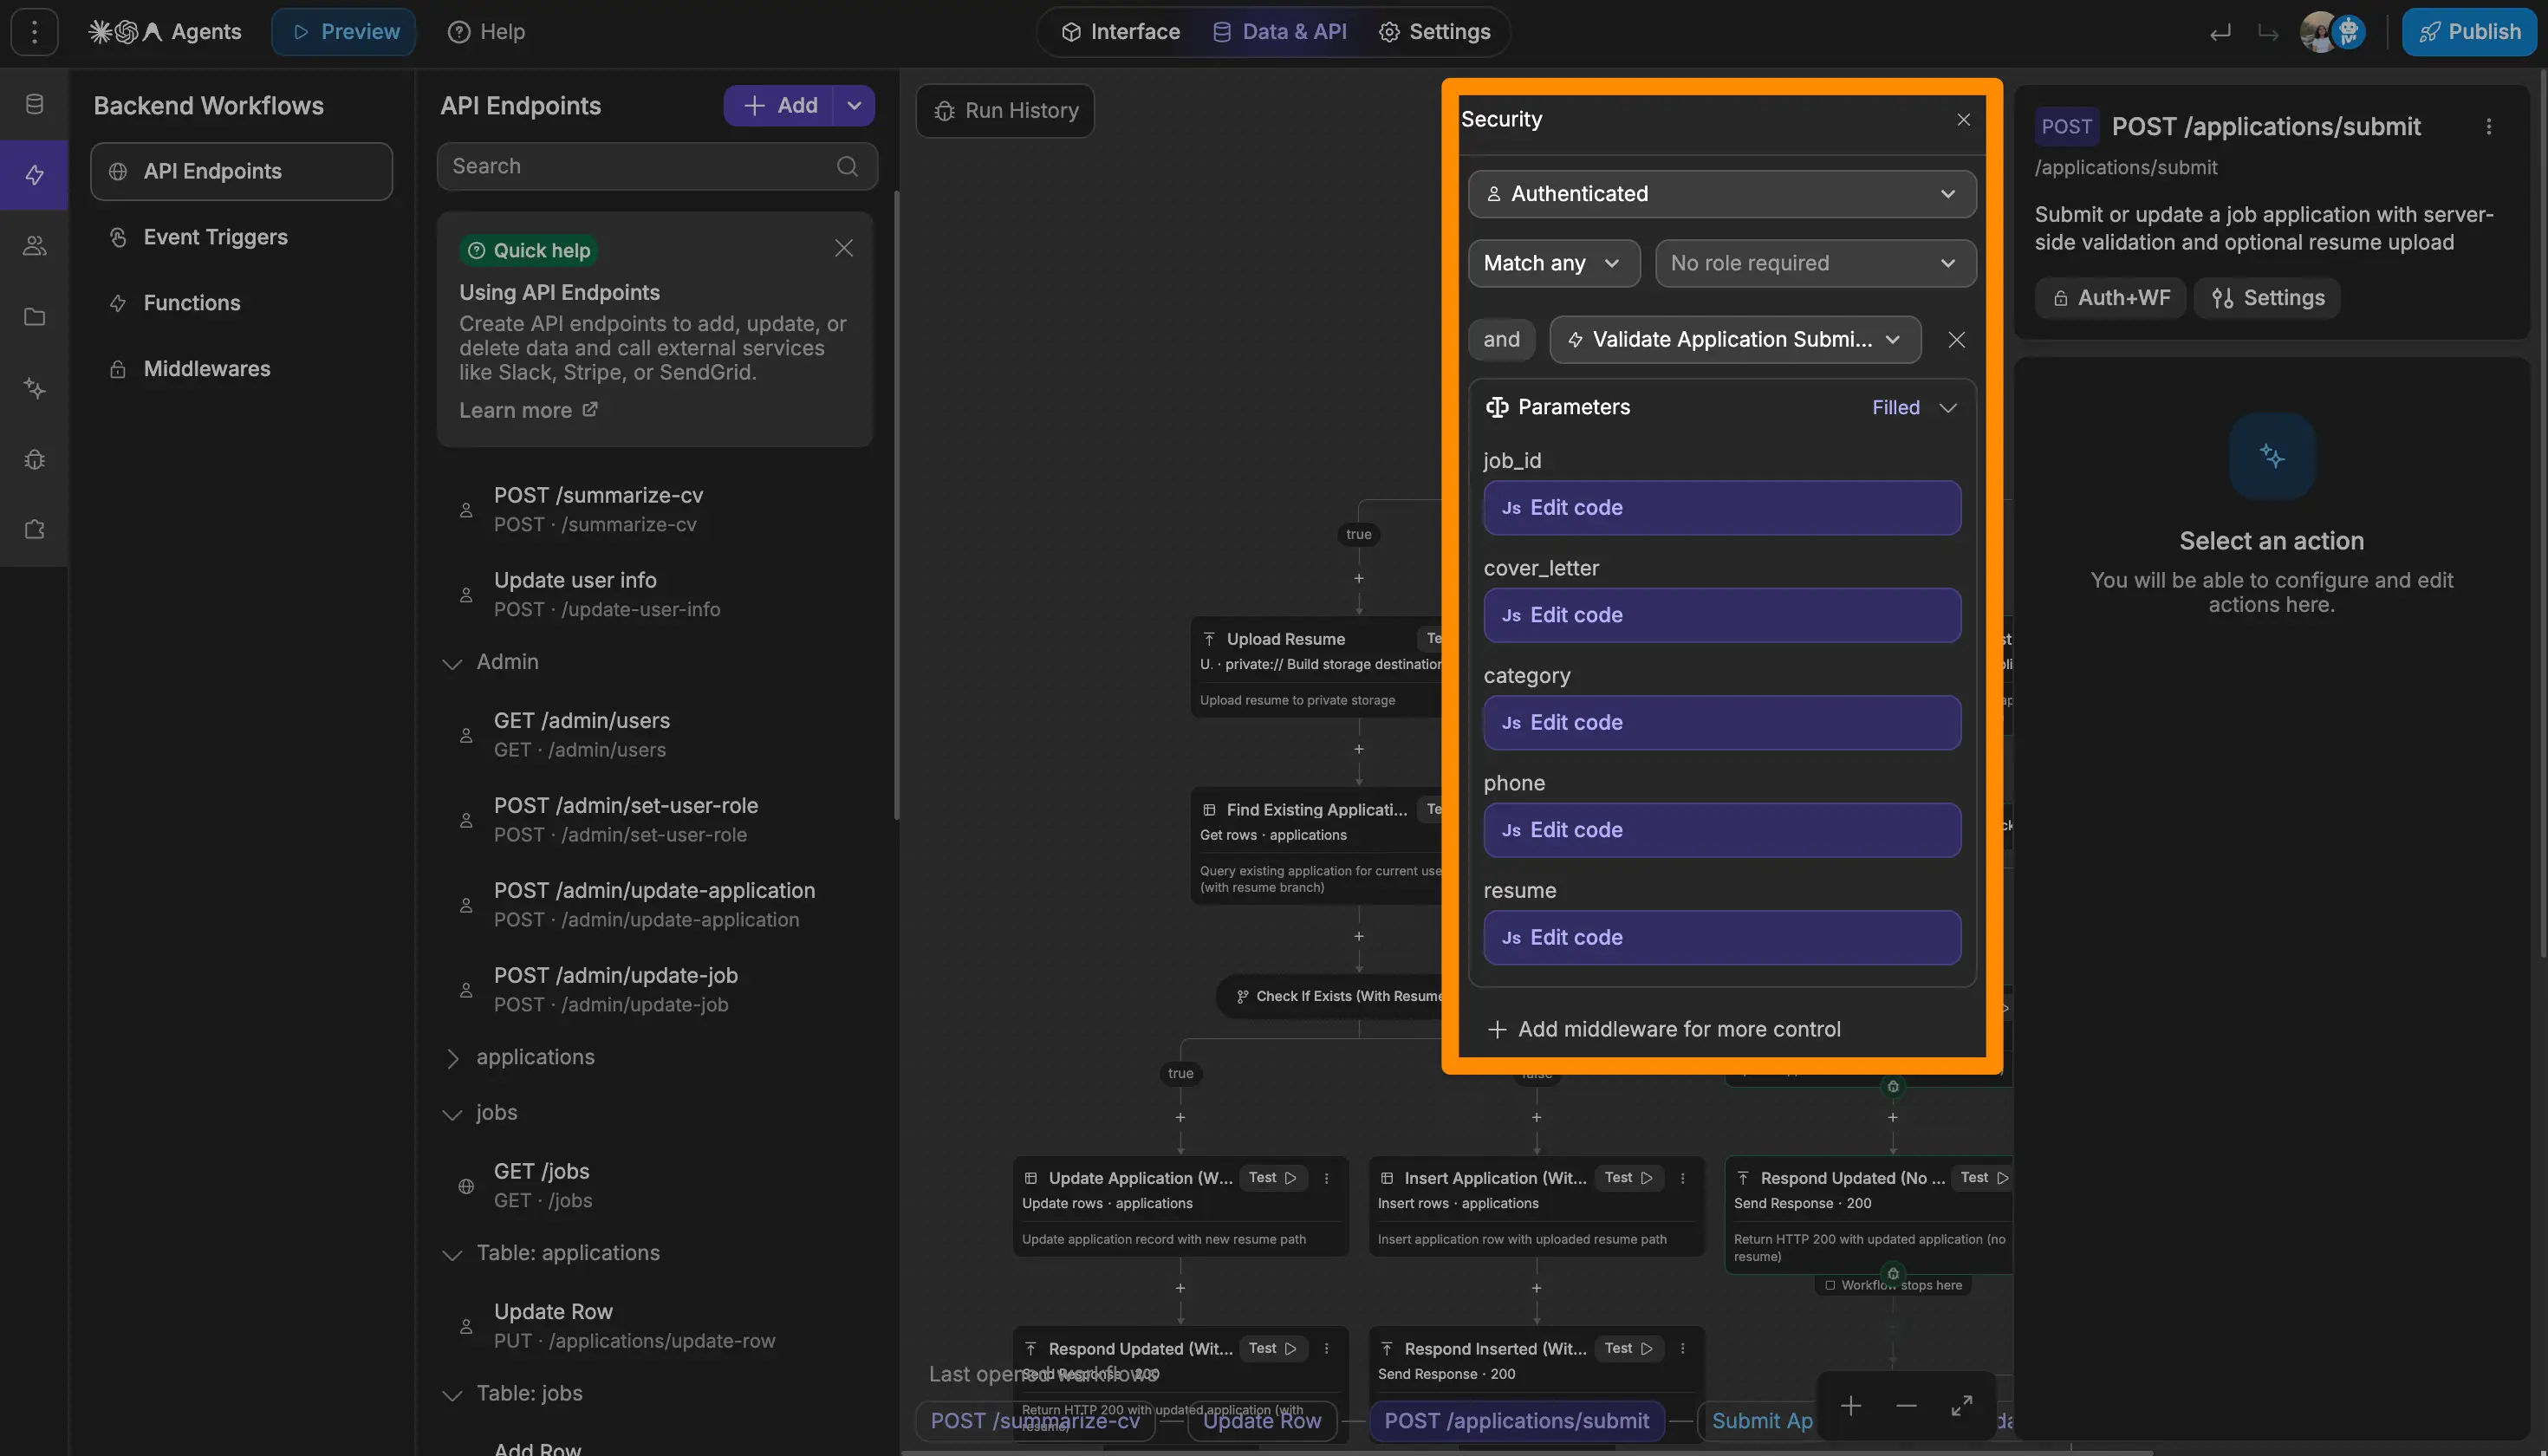
If your backend is Supabase, add CHECK constraints on the columns for rules a type can't express, and do the rest in an Edge Function before the write.
If your backend is Xano, set the input types on the endpoint and add a precondition for anything the types don't cover.
🔥 Pro tip: wherever your app displays something a person typed, make sure it renders as text rather than as HTML.
A cover letter containing a <script> tag is harmless sitting in your database, and only becomes a problem when a page treats it as code and runs it. The person it runs on is usually a recruiter, signed in, with more access than the candidate who sent it.
Test it
Capture the application form submission from the Network panel as cURL, paste it into Postman, then send three variants: the cover letter replaced with 2MB of text, the category replaced with banana, and a required field removed. The backend should reject every one with a clear error and store nothing.
Vulnerability 7: One user can run up your API bill
The mistake
An endpoint can be perfectly authenticated, perfectly authorized, perfectly validated, and still ruin your week.
Our "Summarize CV" workflow is now safely behind the backend and only signed-in candidates can call it. Alice is a signed-in candidate. Nothing stops Alice from calling it four thousand times.
Security teams call this unrestricted resource consumption: a legitimate user, or someone with their token, using an operation far more than you ever intended.
The same applies to password resets, exports, file uploads, search, transactional email, and any paid third-party API.
The fix
Cap how many times one account can trigger an action in a given period, so a single user can summarize ten CVs an hour instead of four thousand.
In WeWeb, that's a middleware workflow. It runs before your backend workflow does, counts how many times this user has called it recently, and refuses the request once they've hit the number you set.
Then size each cap to what the operation costs you. Summarizing a CV calls a paid model, so a handful per candidate per hour is generous. Browsing job listings costs nothing and needs no cap at all. Where your provider offers a spending limit as well as a rate, set that too, so a bad day has a ceiling rather than an invoice.
Sign-in and password reset need a different kind of limit. Everywhere else you're counting one account's requests, but somebody attacking your login doesn't have an account yet. Count those attempts against the email address being tried and the IP address they're coming from instead.
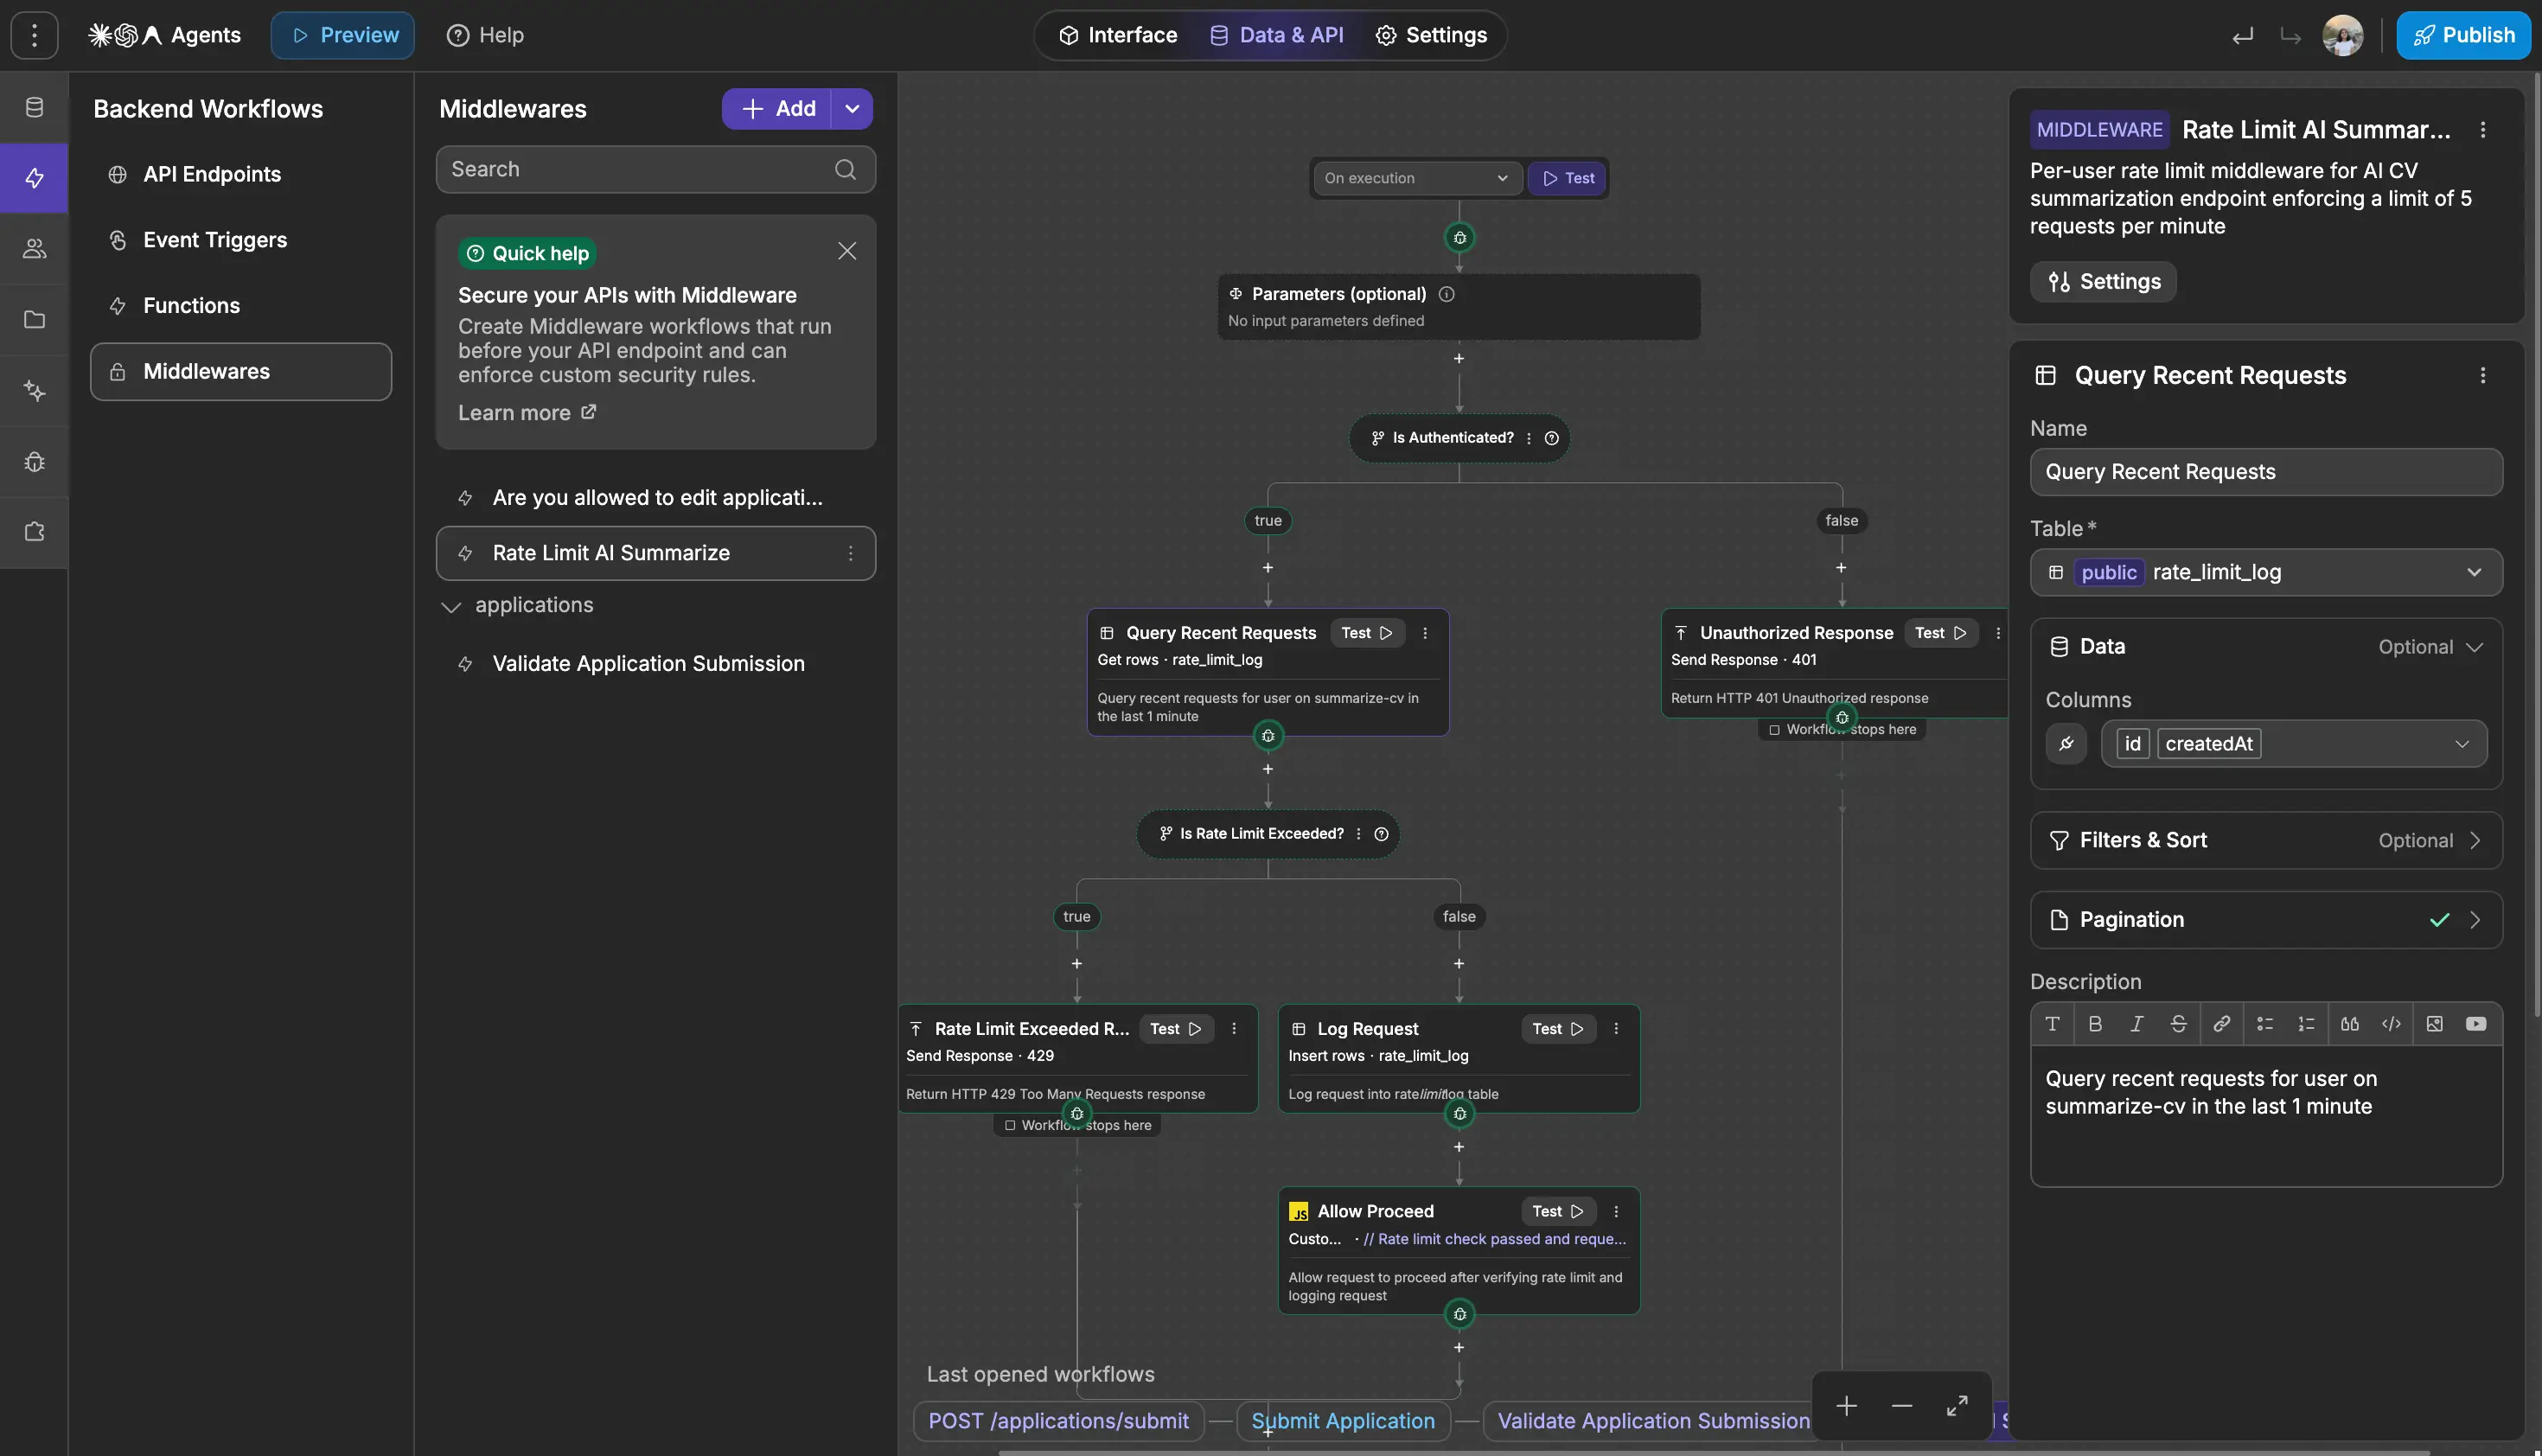
If your backend is Supabase, sign-in and password reset already have limits you can tune in Authentication → Rate Limits. For everything else the cap goes in an Edge Function, which needs somewhere to keep the count, and Supabase's guide uses Upstash Redis for it.
If your backend is Xano, there's a Rate Limit function you add to the endpoint's function stack. Give it a key, a maximum and a time window, and it turns the caller away once they're over.
Test it
As Alice, in staging, capture "Summarize CV" from the Network panel as cURL, paste it into Postman, and send it more times than your cap allows. The extra calls should be refused with a controlled error, and your provider dashboard should show no more than the capped number of requests.
After you launch
None of this is finished when you ship. What changes is that you stop testing and start watching.
Log the operations that matter and the requests you turned away, recording who did what, when, and whether it worked. Keep passwords, tokens and personal data out of those logs, and put the logs themselves behind the same access rules as everything else. Then set alerts on the things that cost you money or let people in: unusual sign-ins, a billing spike, a workflow failing over and over.
Write down who can revoke a credential or pull a deployment at two in the morning, while it's still a calm decision.
And re-run the tests in this article whenever you change your data model, your roles or your workflows. That's the one people skip, and access control breaks quietly when you add a table.
Use this free checklist to stress-test your app's security in under an hour
Your biggest takeaway: anything that reaches the browser is visible to the user. Security rules belong in the backend.
You don't need to be a security engineer to ship an app users can trust. You do need to attack your own assumptions and pentest your app. Repeatedly.
Assume every request can be replayed. Every ID can be swapped. Every hidden field can still be submitted. Then go looking for the gap before someone else finds it, and close it.
Use this checklist to run every test in this article in under an hour. If it's your first time, do the audit yourself so you can see exactly what your browser receives and understand where the risks come from.
Re-run the checklist with every release, and whenever your data model, roles, permissions, or workflows change. Once you've done it yourself, hand over the checklist to your coding agent to keep the audit running as part of your release process.
Start your next WeWeb app with these security habits built into the way you work.
FAQs about no-code app security
Are no-code web apps secure?
No-code web apps can be secure when the platform provides the right security controls and you configure them correctly. A secure platform does not automatically make every app built on it secure. You still need to control which data reaches the browser, authorize every backend operation, protect credentials, validate inputs, and test your rules with different user accounts.
Is authentication enough to protect a web app?
No. Authentication confirms who a user is, but authorization determines what that user can access or change. Your backend must check permissions for every protected record and operation. For example, a signed-in candidate should not be able to view another candidate’s application simply by changing an ID in an API request.
Does hiding a page or element protect sensitive data?
No. Hiding an element or restricting a page improves the user experience, but it does not protect the data or API endpoint behind it. Anything sent to the browser can be inspected, even when it is not visible on the page. Filter sensitive data and enforce permissions in the backend before returning a response.
Does enabling Row Level Security make a Supabase app secure?
Enabling Row Level Security is only the first step. You also need grants and policies for each operation your app supports, including select, insert, update, and delete. Test both allowed and denied actions with multiple accounts. Your policies should prevent users from reading someone else’s records, creating records for another user, or changing a record’s owner.
Where should API keys be stored in a no-code app?
Private API keys should be stored in your backend’s secret store or environment variables. Call the third-party service from a backend workflow, Edge Function, or server-side endpoint rather than directly from the browser. Some keys are designed to be public, such as certain publishable or browser keys, but you should still restrict their domains and permissions.
How do you test a no-code app for security problems?
Use a staging environment, fake data, and at least two test accounts with different roles. Inspect the browser’s network requests, try accessing another user’s records, modify IDs and protected fields, submit invalid inputs, and call sensitive operations repeatedly. Every test should confirm what the backend allows or rejects, not only what the interface displays.
When should you get a professional security review?
Bring in a qualified security professional when your app handles payments, health information, financial data, employee records, regulated data, or privileged business operations. Internal tools are not automatically low-risk, especially when they connect to customer databases or other sensitive systems. The steps in this article provide a strong baseline, but higher-risk apps need a deeper review before launch.